1 01 - SMIT TestCaseHub overview
01 - SMIT TestCaseHub overview
1.1 SMIT TestCaseHub
Upon installation of SMIT TestCaseHub a new hub is created in your projects. Two new work item types 'SMIT Test Case' and 'SMIT Test Step' are created too.
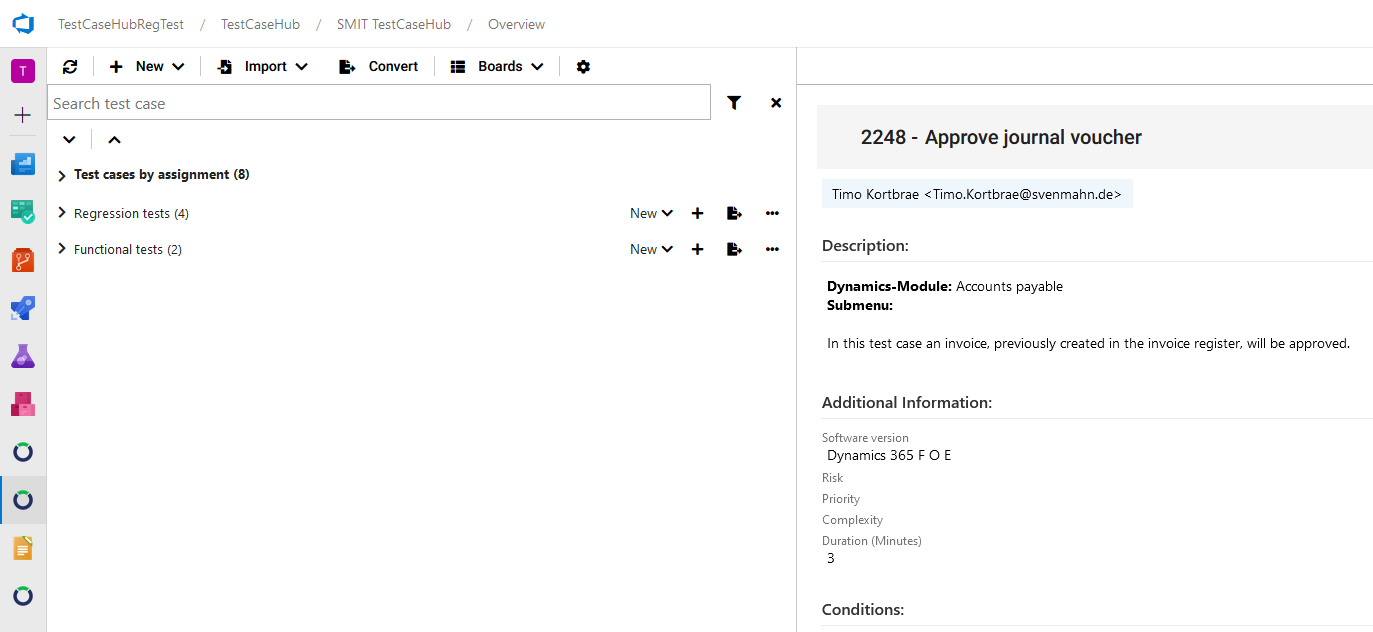
A click on the SMIT TestCaseHub will open the SMIT TestCaseHub page. This page consists of two parts:
- A tree view on the left side, and
- an SMIT Test Case preview on the right side.
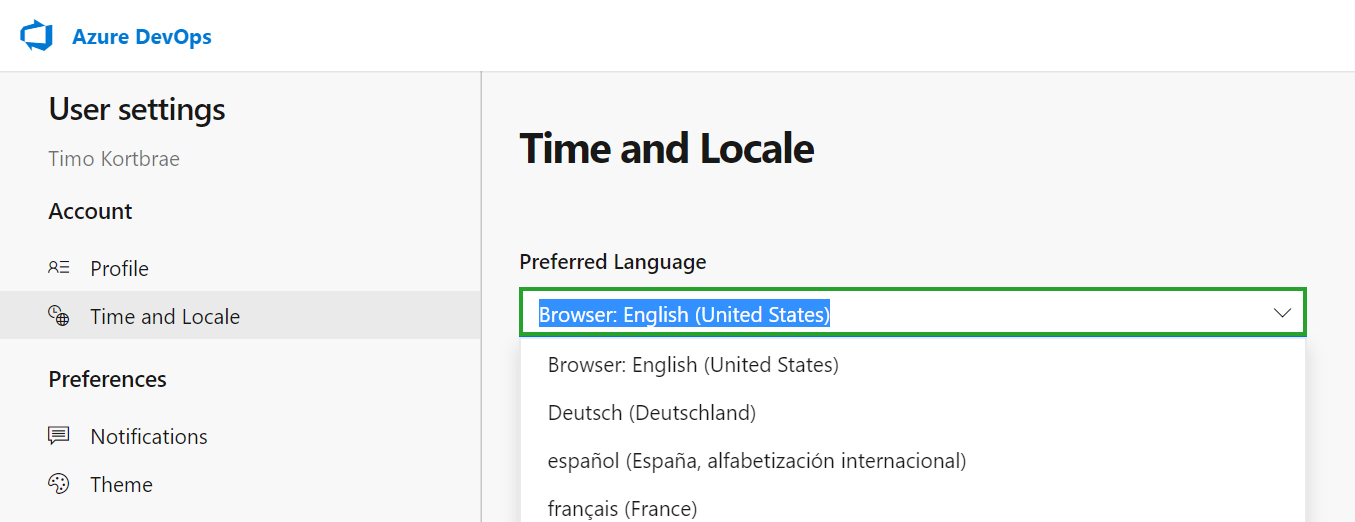
The extension SMIT TestCaseHub can be used in the languages English and German. This depends on your profile language which can be configured.
By selecting any other language than 'Deutsch (Deutschland)' in the 'Time and Locale' settings the extension SMIT TestCaseHub will be displayed in English.
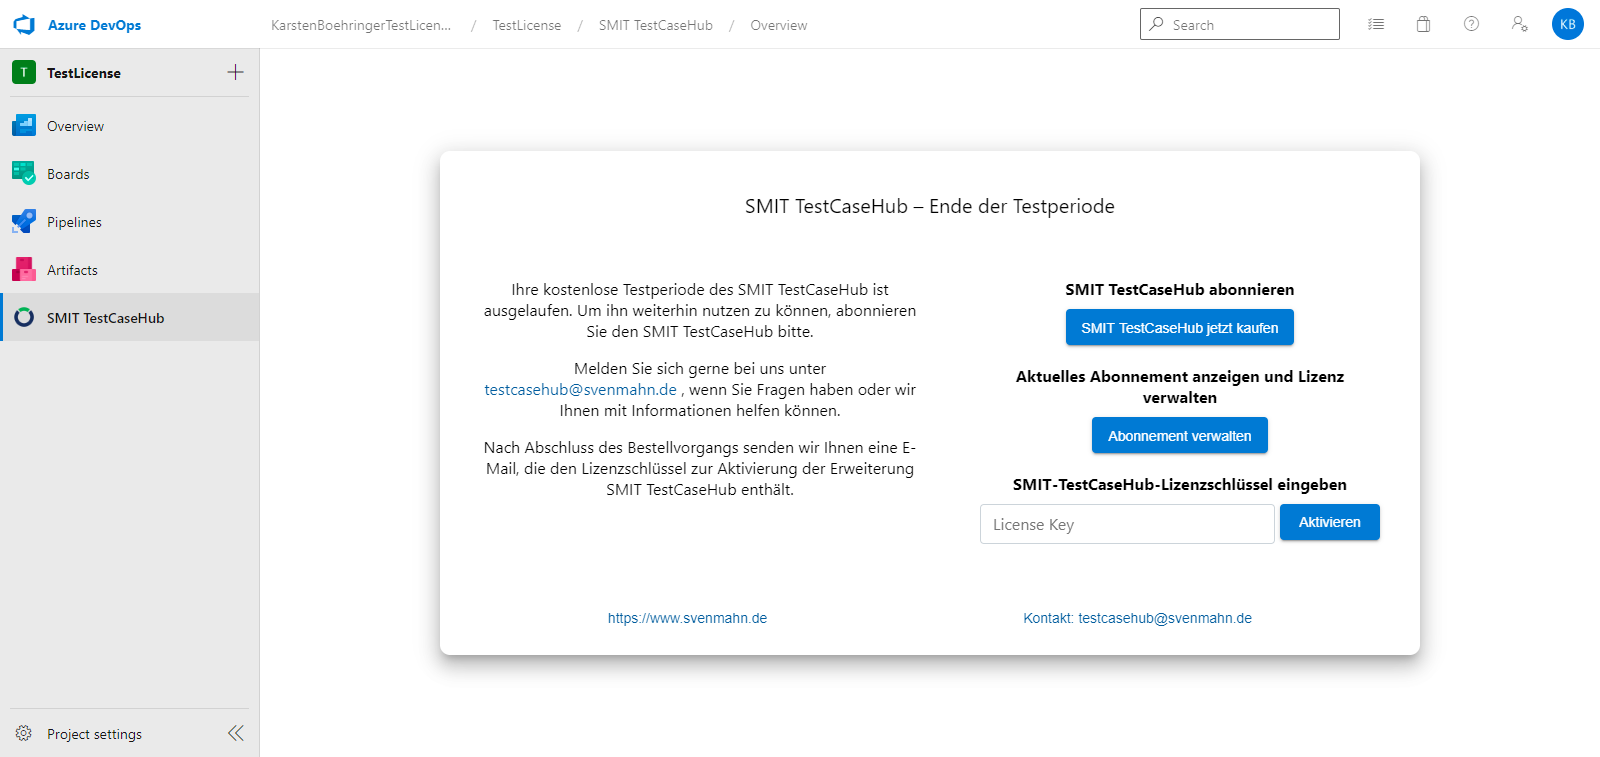
In the following cases the extension will show a dialog providing help and contact information:
- A license is not available
- A previous trial license ended
- The current user is not activated and no free users are available within the license
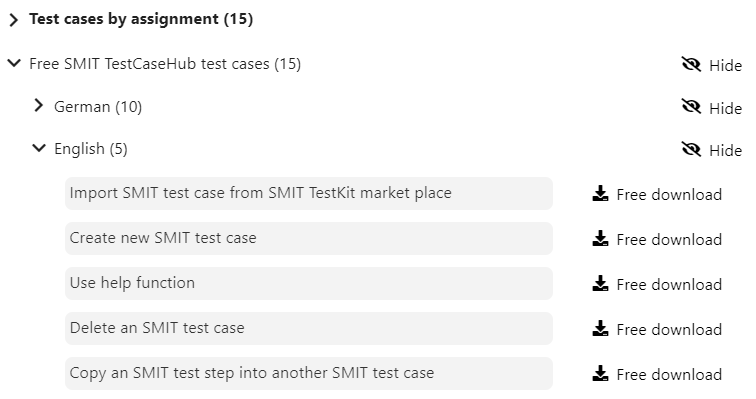
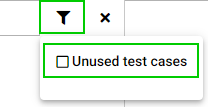
After installation of the SMIT TestCaseHub a set of free test cases is added to the tree view. You can download the test cases by clicking on the button Free download and start using them. If you want to hide the tree view node you can click on the Hide button.
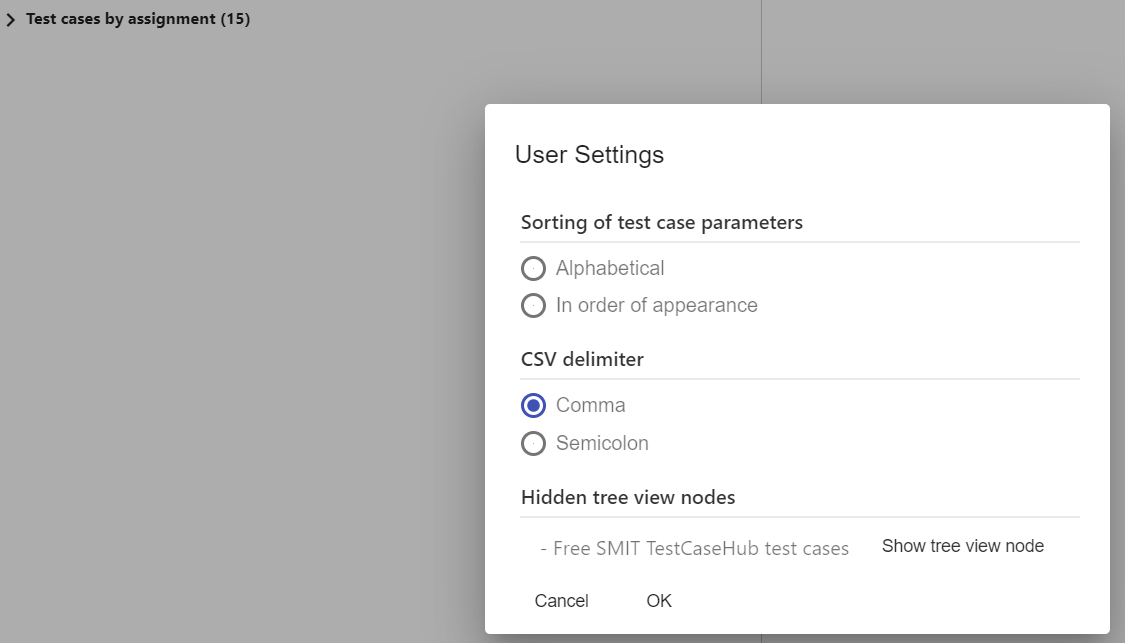
Hiding a tree view node can be made undone from within the user settings as shown on the second image.
1.2 SMIT TestCaseHub – Tree view
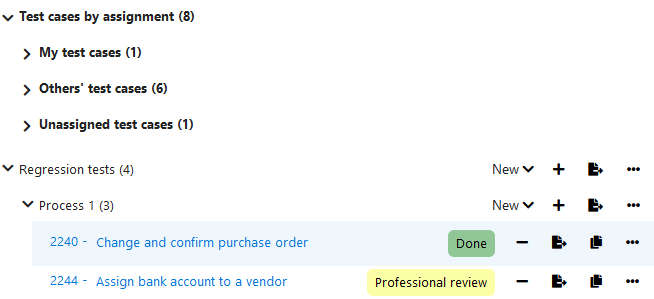
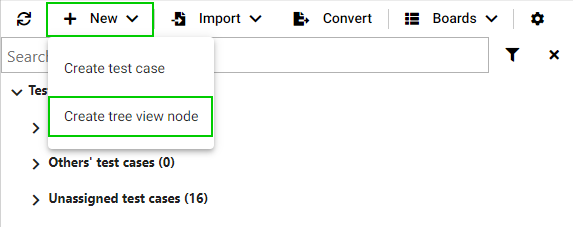
At the top of the tree view the node Test cases by assignment contains all SMIT Test Case work items grouped into the following three nodes:
- My
test cases – shows all test cases which are assigned to the user who is
currently logged in
- Others'
test cases – shows all test cases which are assigned to a user but not to the
user who is currently logged in and
- Unassigned test cases – shows all test cases which are
not assigned to a user
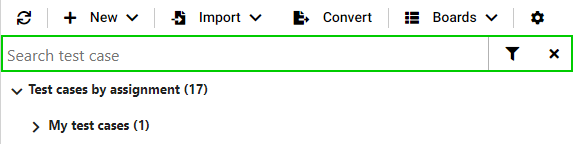
The test cases can be filtered using the text input
field ‘Search test case’ and sorted by using the icon in the menu bar.
The tree view displays the name of the tree view and the number of test cases inside the tree view.
A click on an SMIT Test Case will open the SMIT Test
Case preview on the right side.
A double click on the SMIT Test Case will open the SMIT
Test Case in the standard work item modification view.
The following actions are available in the menu bar above the
tree view:
- Refresh – updates the tree view manually
- New – adds a new SMIT Test Case or a new tree view node
- Import – provides the possibility to import test cases via XML template or via the
SMIT TestKit Shop
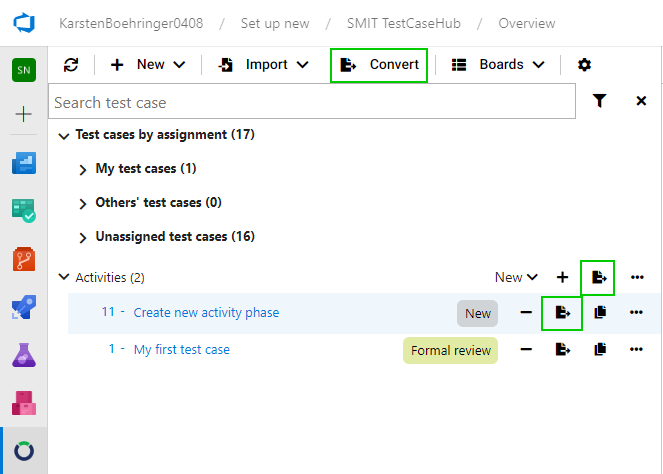
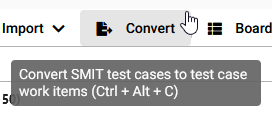
- Convert – creates standard Test Case work items from the selected SMIT Test Case work
items for the actual test runs
- Sort – supports four modes which can be switched
by clicking the icon multiple times
- Boards - forwards you to the Azure DevOps board for SMIT Test Case work items or the SMIT TestCaseHub queries
- Settings - provides the possibility to change user specific configurations
When exiting the SMIT TestCaseHub, the state of opened and closed tree view nodes is saved for every user individually.
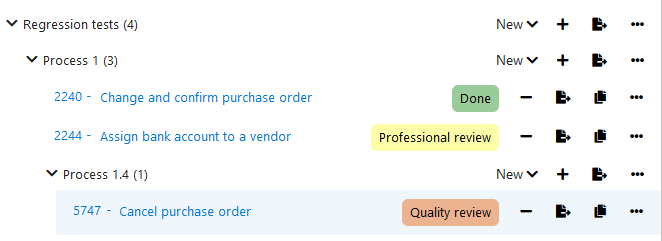
The state of test cases is shown in the tree view for each test case. Additionally it is highlighted in the color which is configured in the Azure DevOps process model.
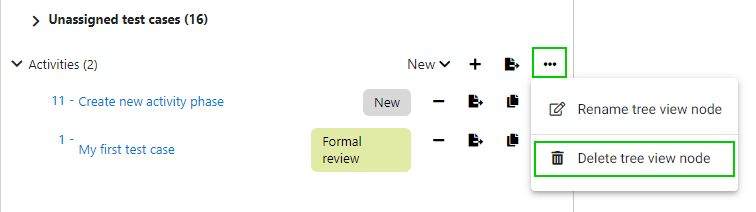
The following functions exists for working with tree view nodes:
- Create new test case or treeview node
- Add existing test case
- Convert the tree view node to test plan
- Rename tree view node
- Delete tree view node
By default the first three functions are placed in the fast access area.
The other ones are placed in the options menu.
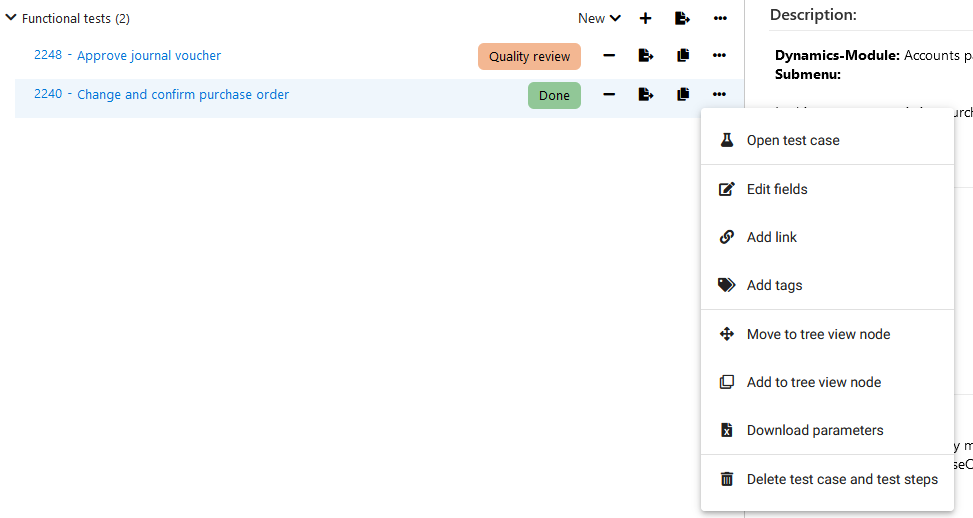
The following functions exist for the test cases:
- Remove from treeview node
- Move to tree view node
- Add to tree view node
- Convert
- Duplicate test case
- Edit fields
- Add link
- Add tags
- Download parameters
By default, the following functions are placed in the fast access area.
- Remove from treeview node
- Convert
- Duplicate test case
The other ones are placed in the options menu.
It is possible to change this via the user settings.
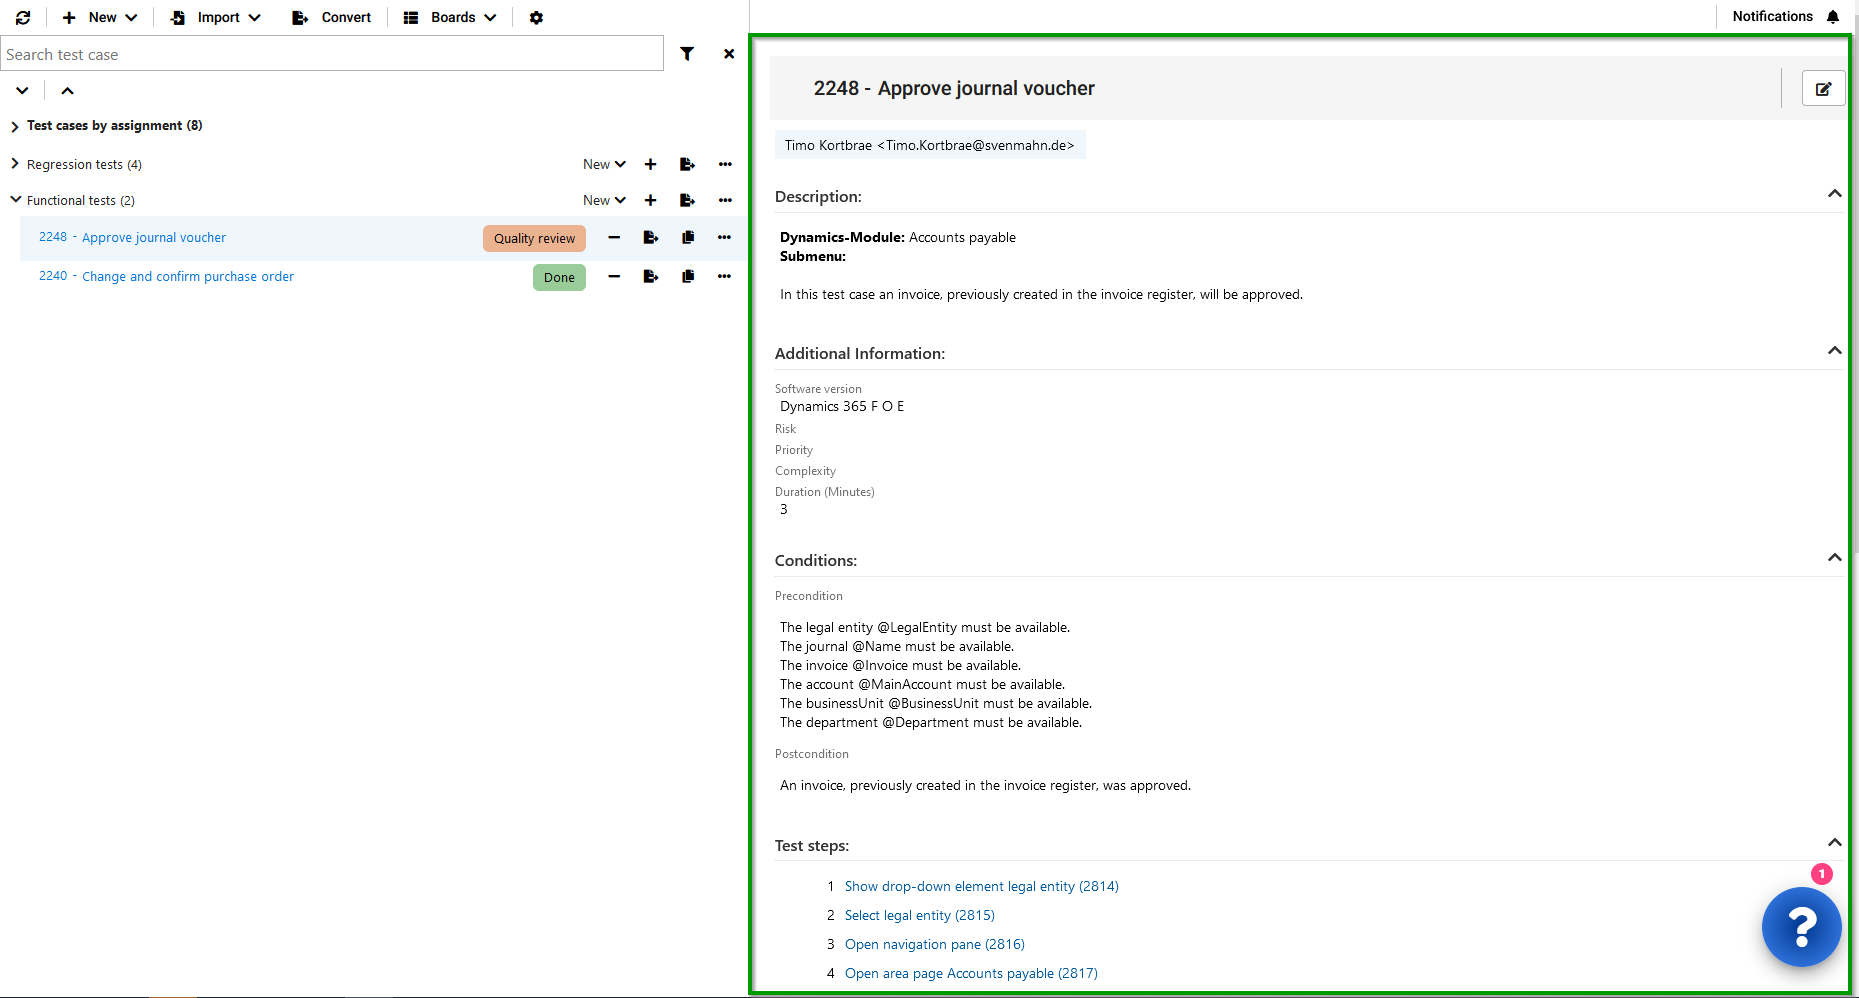
1.3 SMIT TestCaseHub – SMIT Test Case preview
In the preview area,
the header of the SMIT Test Case selected in the tree view is shown, as well as
a summary of the SMIT Test Steps and the parameters required for the test case.
Parameters in the SMIT TestCaseHub extension are identified in the same way as in the Azure DevOps default test case work item. Only the first occurrence of a parameter will be displayed in the parameter list. The parameters are sorted by appearance.
1.4 Clean up unrelated SMIT* work items
The SMIT TestCaseHub extension creates a folder 'SMIT TestCaseHub' in the 'Shared Queries' folder. You can find a query called 'SMIT Test Steps without parent' which returns all test steps that are not included into a SMIT Test Case by using a parent / child relation. These orphan SMIT Test Steps can be deleted.
2 02 - Search and sort test cases
02 - Search and sort test cases
2.1 Search and sort SMIT Test Cases in tree view
The text filter searches for test cases which contain the given string in their title, ID or associated tags.
The search results are presented in the opened areas of the tree view.
By default, the sort button in the menu bar sorts the test cases by their IDs in ascending order. The following sort modes are:
- by ID in descending order,
- by title in ascending order and
- by title in descending order.
The filter button openes an option to filter for SMIT Test Cases not included in custom tree view nodes.
By clicking the button 'Clear', the search field and filter options are cleared.
The state of tree view nodes (opened or closed) is not saved while searching or filtering for test cases.
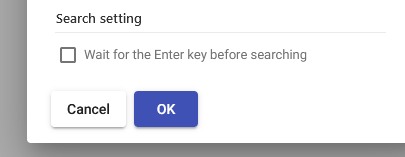
It is possible to change the default search behaviour, so that the search is only executed when pressing the enter key.
This option can be enabled in the user settings.
3 03 - Custom tree view nodes
03 - Custom tree view nodes
3.1 Create custom tree view nodes
Beside the three predefined tree view categories 'My test cases', 'Others' test cases' and 'Unassigned test cases' new custom tree view nodes can be created which act as parent nodes for test cases. The tree view nodes are shown for all users in the projects where they were created.
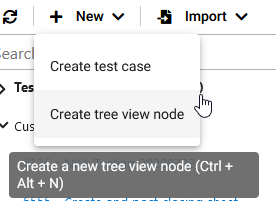
To create a new tree view node you can click on the button 'New' and 'Create tree view node' in the menu bar above the tree view.
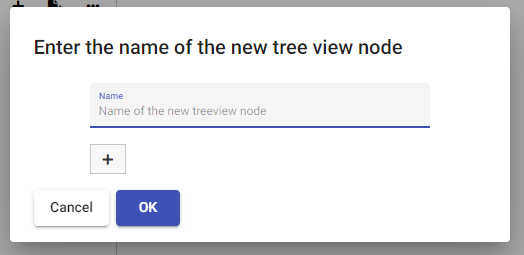
After clicking on the 'Create tree view node' option a dialog is shown where the name of the new node needs to be entered. To create more than one custom tree view nodes, the button '+' adds another text field to enter the name for the other node. By pressing on the 'OK' button the tree view nodes are created and added to the tree view.

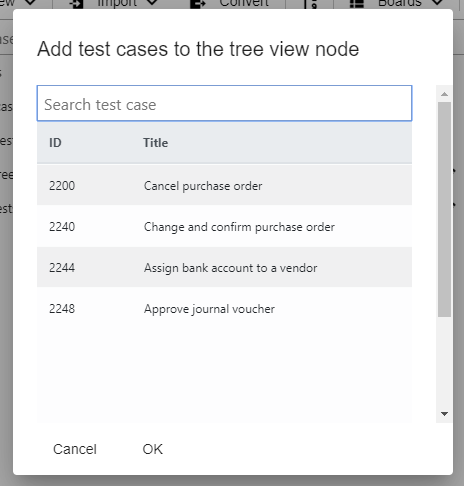
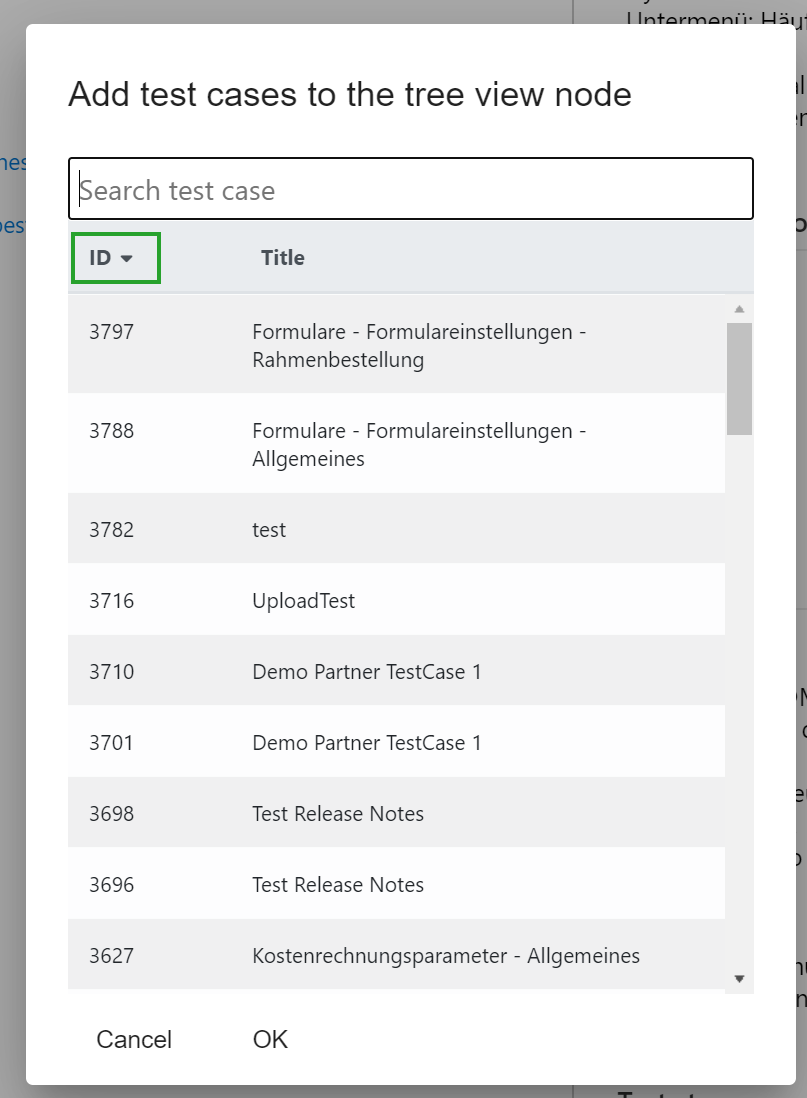
To add a test case to a custom tree view node you can click on the plus button next to a tree view node. Clicking on the add button will open a dialog where one or multiple test cases can be selected. The dialog also provides a filter option to search for test cases. The test cases are added to the tree view node after the 'OK' button was pressed.
Please note: This function adds all selected test cases even if the current filter state excludes selected test cases in the dialog.
To remove a test case from a custom tree view node you can click on the button with the 'minus' sign. The test case is only removed from the tree view node but not deleted. You can still find the removed test cases in the predefined tree view nodes.
3.2 Remove custom tree view nodes
To delete a custom tree view node, open the more menu of the node and click on the button 'Delete tree view node'. A dialog is shown where you need to confirm the deletion by clicking on the button Yes.
Please note: Deleting a custom tree view node will not delete the test cases which are assigned to the tree view node as they are still assigned to one of the predefined tree view nodes.
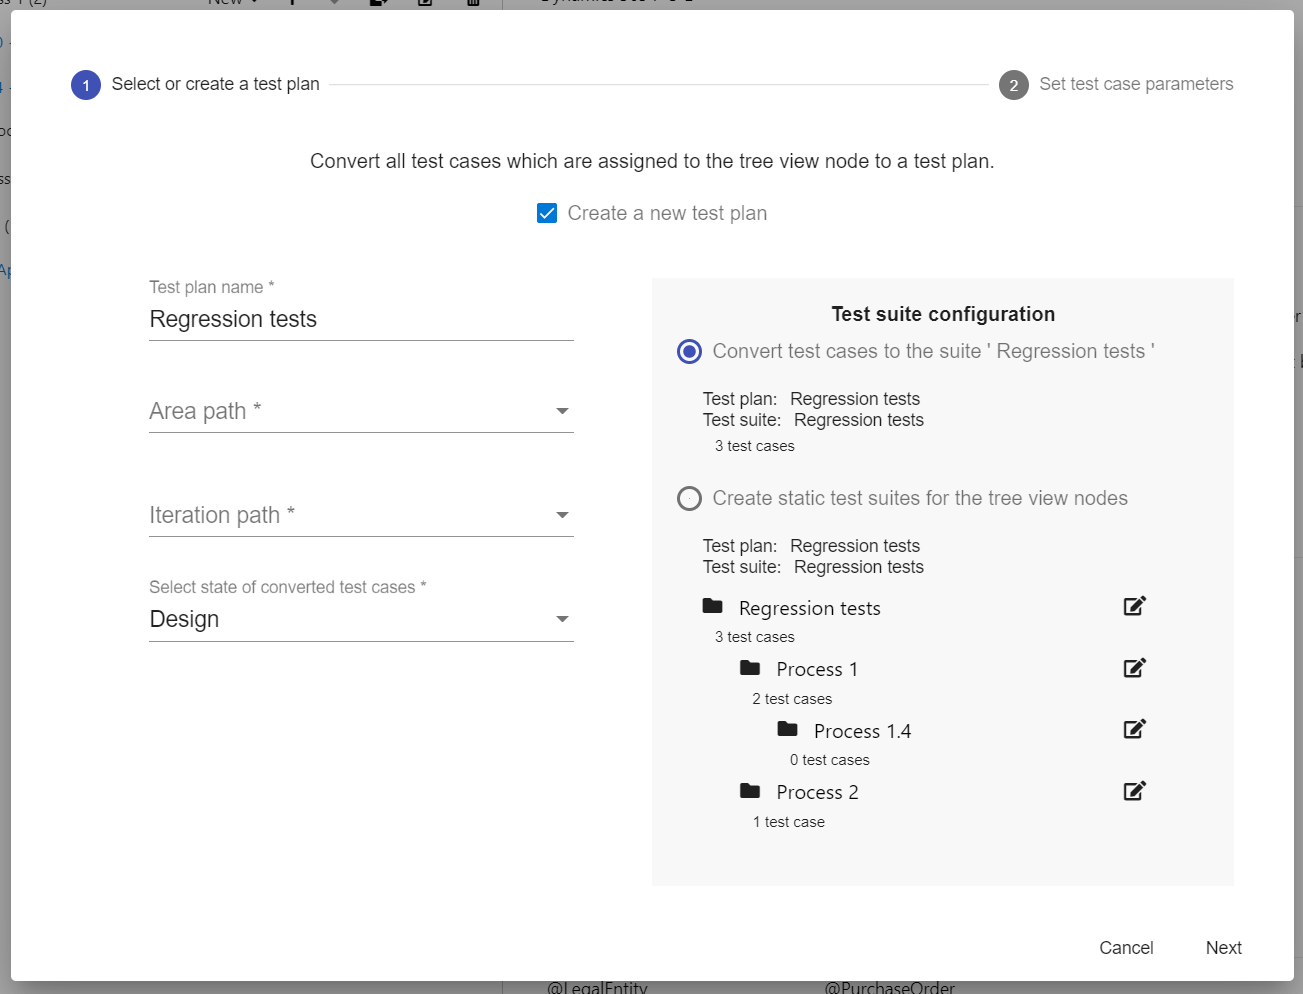
3.3 Create Standard Testplan from custom tree view node
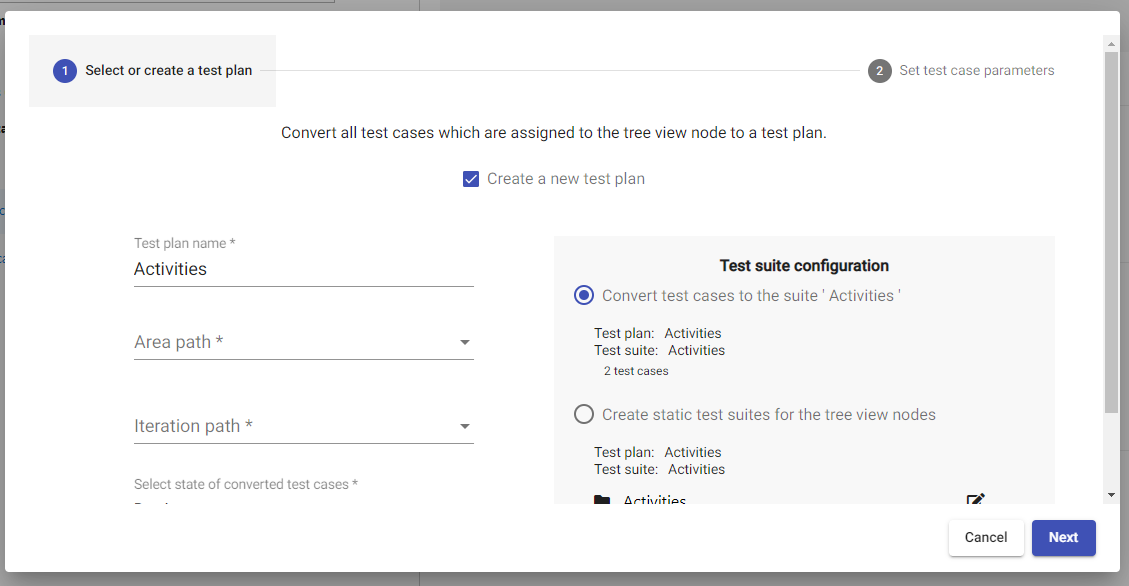
Custom tree view nodes have a button which can be used to convert the tree view node into a test plan.
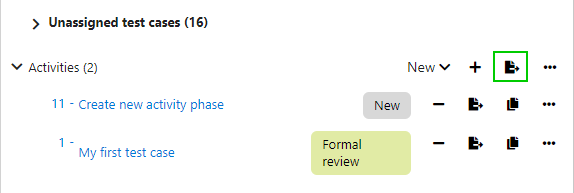
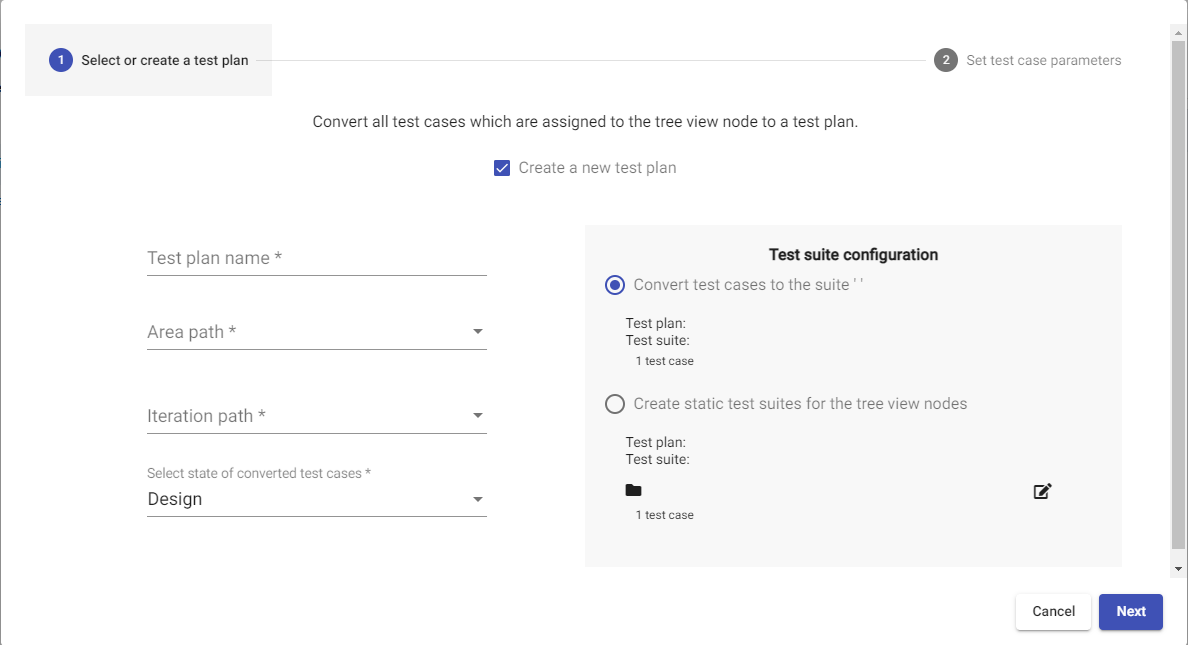
After clicking the button a dialog is shown where the name of the test plan, the area path and the iteration path can be selected.
The test cases of the tree view node are added to the new test plan in the order in which they are shown in the tree view. It is also possible to select an existing test plan in the dialog instead of creating a new plan.
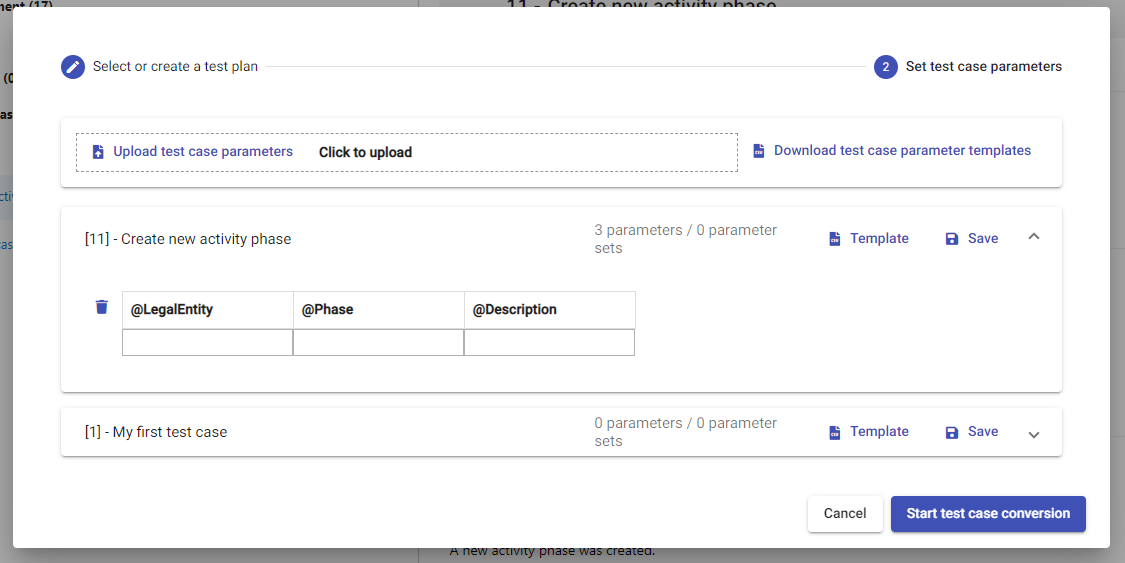
On the next page parameters can be added to the converted test cases.
The user receives a link to the converted testplan in the test plan convert info message. The test plan is opened in a new browser tab.
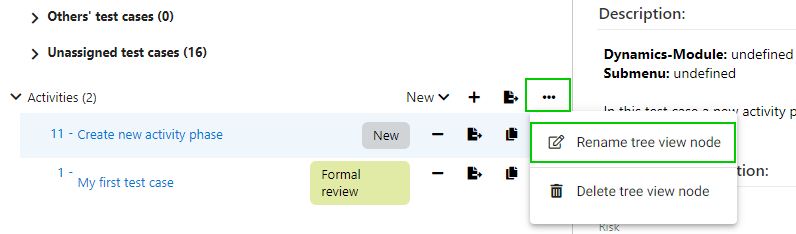
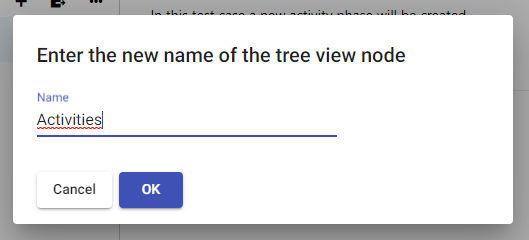
3.4 Rename custom tree view nodes
Custom tree view nodes can be renamed by clicking the more button of the node and selecting the option 'Rename tree view node'. After clicking on the button a dialog is opened. Enter a new name in the input field and click the button 'OK'.
3.5 Sort within the Add SMIT Test Case table
Adding a test case to a custom tree view node can be done by selecting them in the corresponding dialog.
The table can be filtered using the Search test case input field and the table can be sorted by the ID or the test case title.
To change the sort column or sort direction you can click on the table header for the corresponding column.
3.6 Tree View - Create Sub-Nodes for a Tree view node
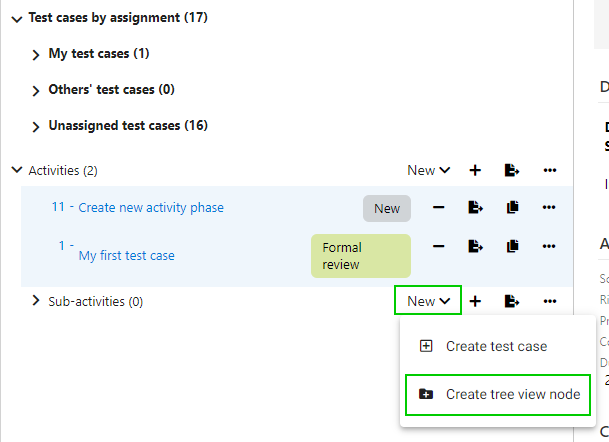
For custom tree view nodes you can create sub-nodes in as many levels as wanted.
You can use the drop down button 'New' to create sub-nodes or to create a new test case which is automatically assigned to the tree view node.
For the conversion of tree view nodes you can decide to convert the parent node or one of the child nodes.
Only test cases in the selected and childs of the selected node are used for the conversion.
While converting test cases to a test plan you need to choose the desired test suite configuration.
You can choose the first option 'Convert test cases to the suite XY' to convert the test cases to a single test suite which is either the selected suite or the test plan.
As a second option you can choose 'Create static test suites for the tree view nodes' to create a new static test suite for each tree view node that is converted.
By doing this test cases are only assigned to the static test suites if they were part of the tree view node which lead to the creation of the static test suite.
3.7 Sort SMIT Test Cases and tree view nodes
By default, test cases and tree view nodes in the tree view are sorted in the order of creation. You can change this order by using drag and drop to reorder items in the tree view. You can use drag and drop to move multiple test cases from the same tree view node to another tree view node. You can also drag and drop whole tree view nodes containing a set of test cases or other tree view nodes. The tree view nodes will be removed from the old tree view node and added to the new tree view node.
It is possible to drag and drop test cases from the nodes by assignment to custom tree view nodes. Drag and drop test cases or custom tree view nodes into nodes by assignment is prohibited.
4 04 - SMIT Test Case work item
04 - SMIT Test Case work item
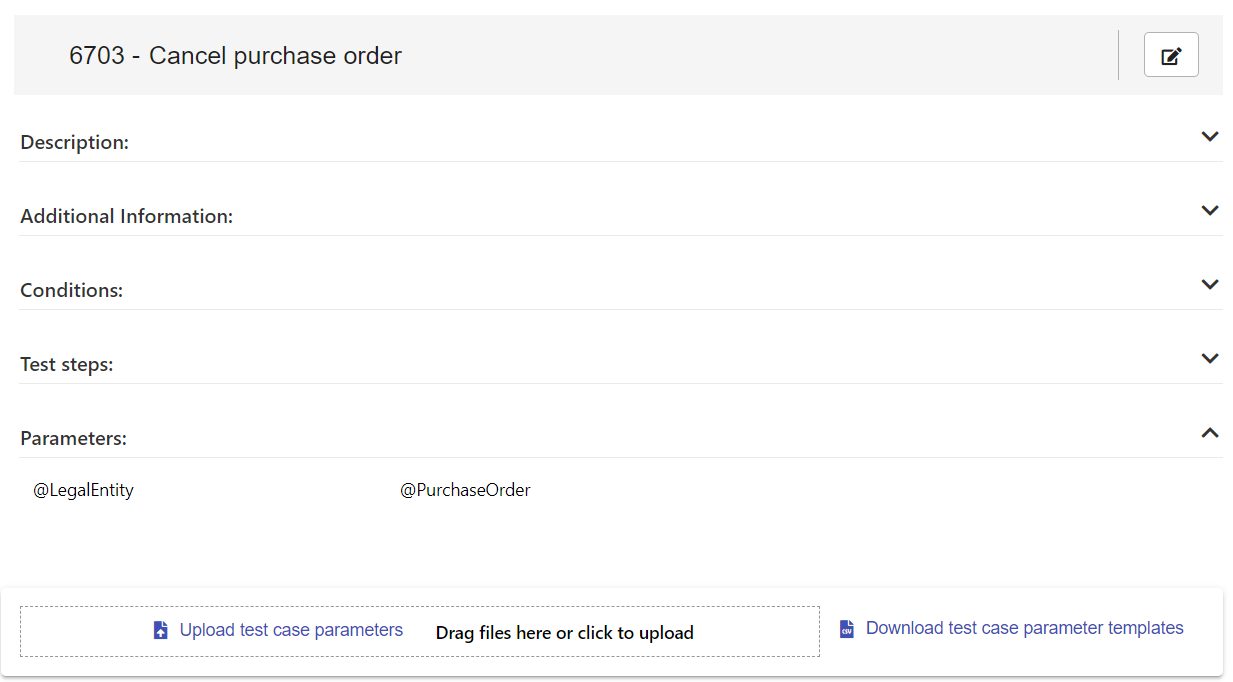
4.1 SMIT Test Case work item – Details
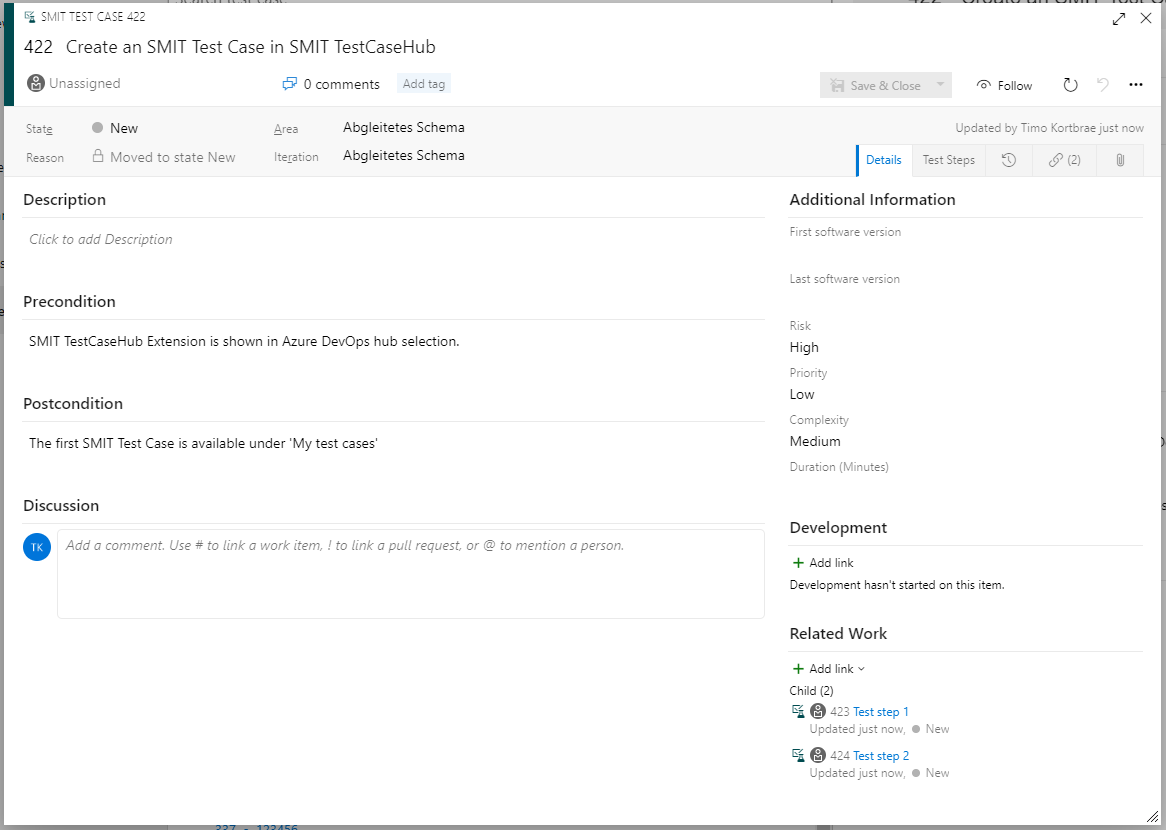
The ‘Details’ tab of
the SMIT Test Case work item contains the header of the test case with all the
required preconditions and postconditions of the test case.
In the 'Additional Information' group you can add further information
about the validity of the test case, its average duration and complexity.
A direct link to any test steps is provided in the 'Related Work' group.
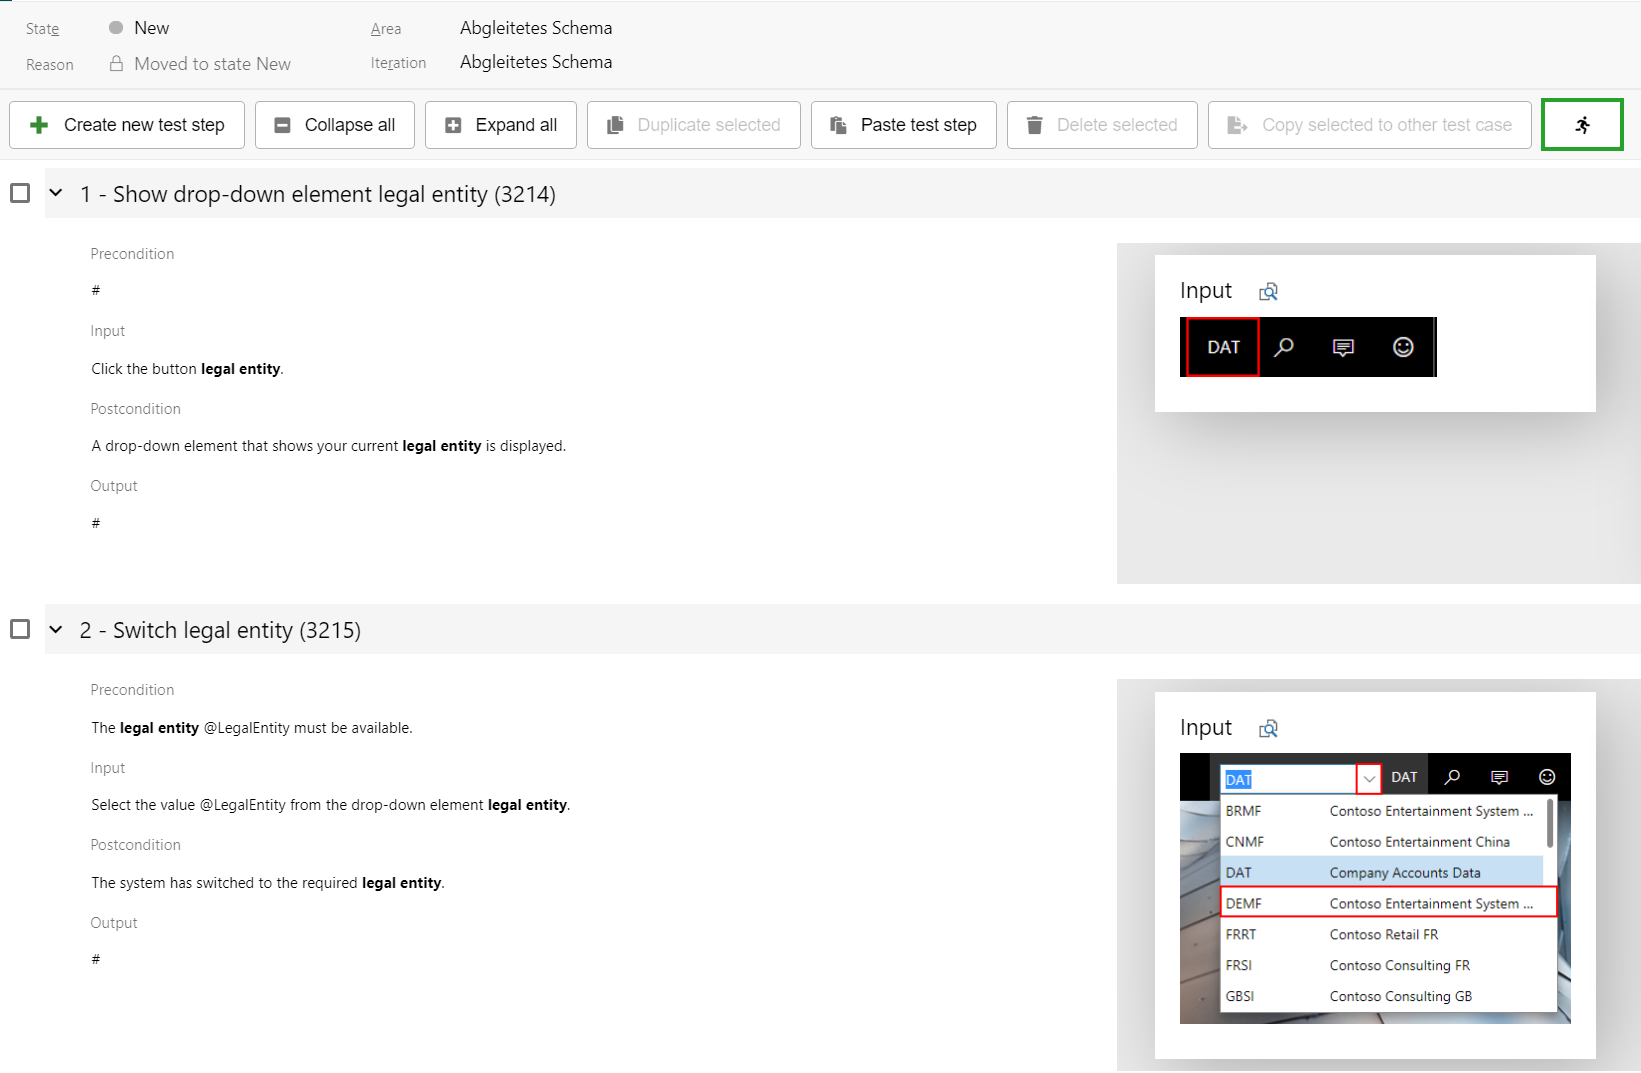
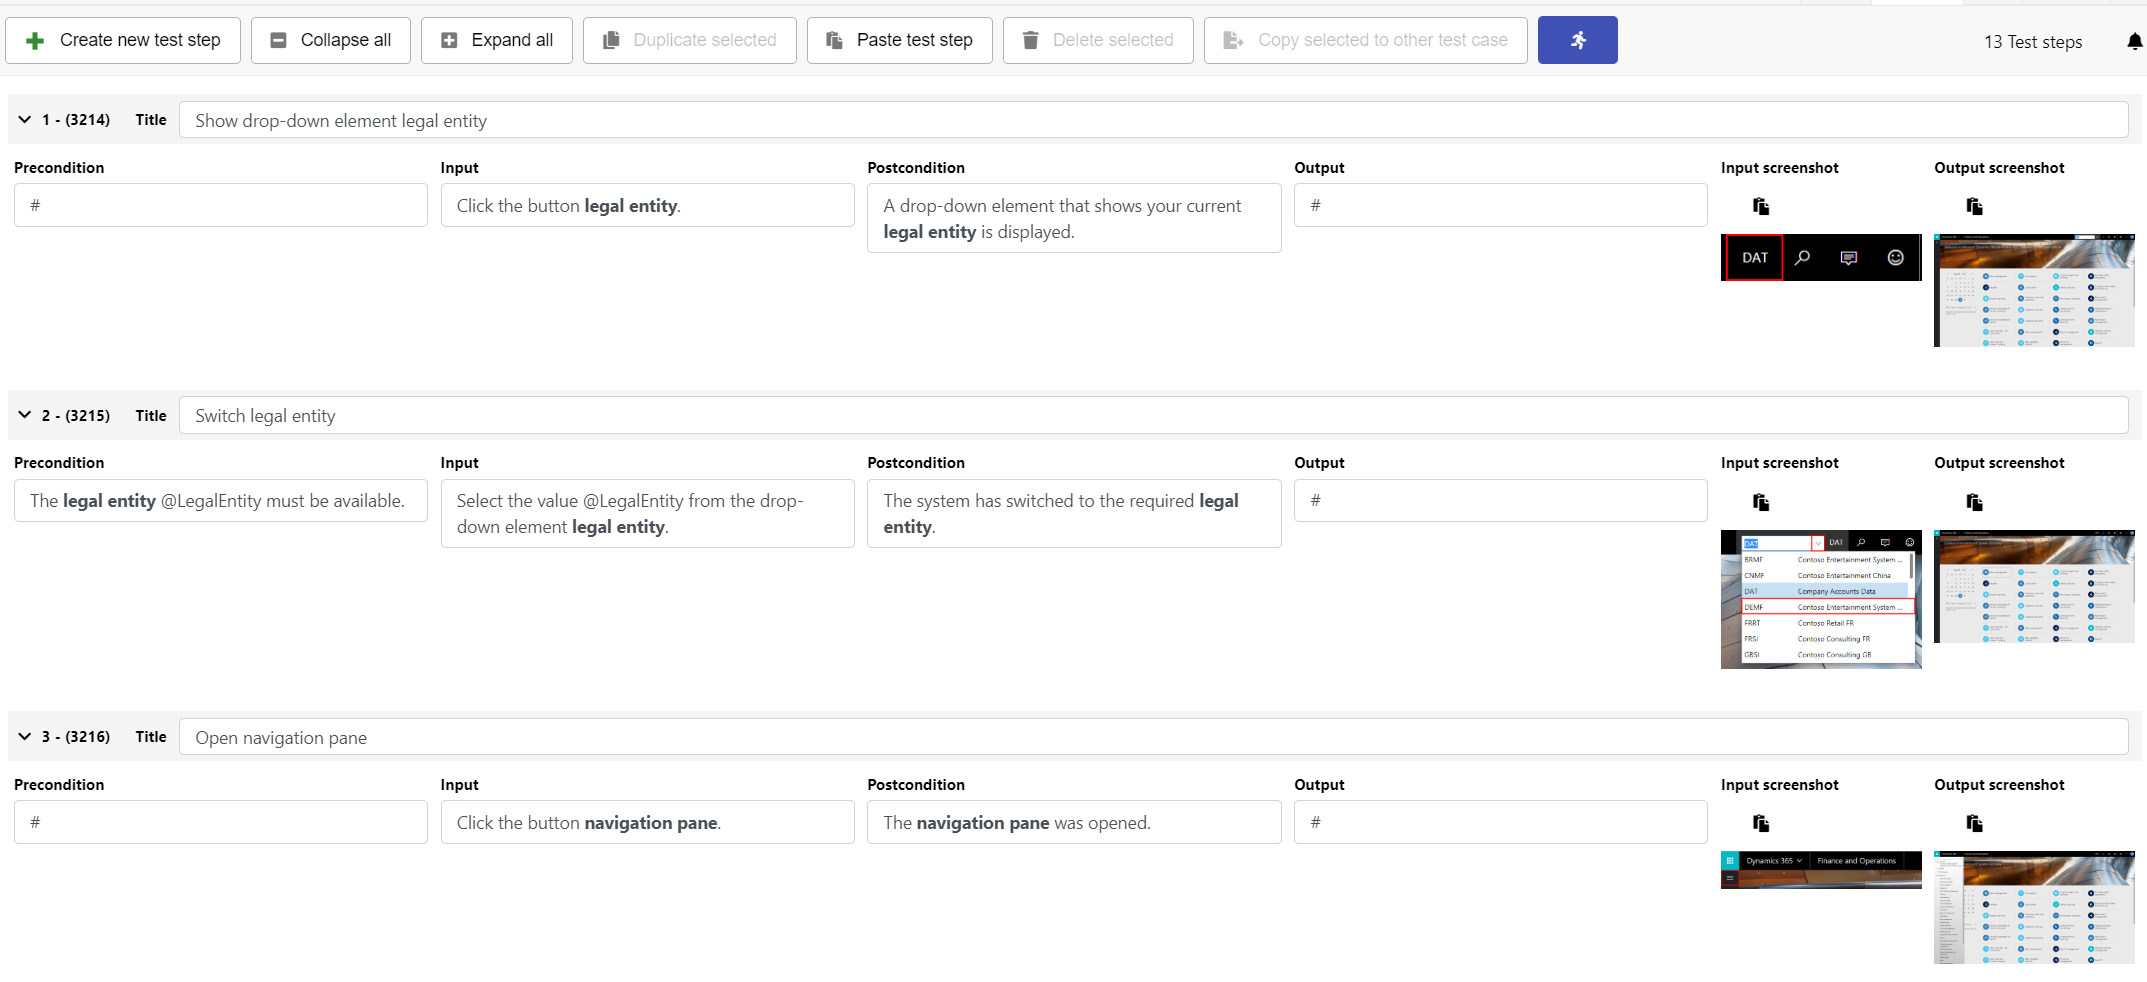
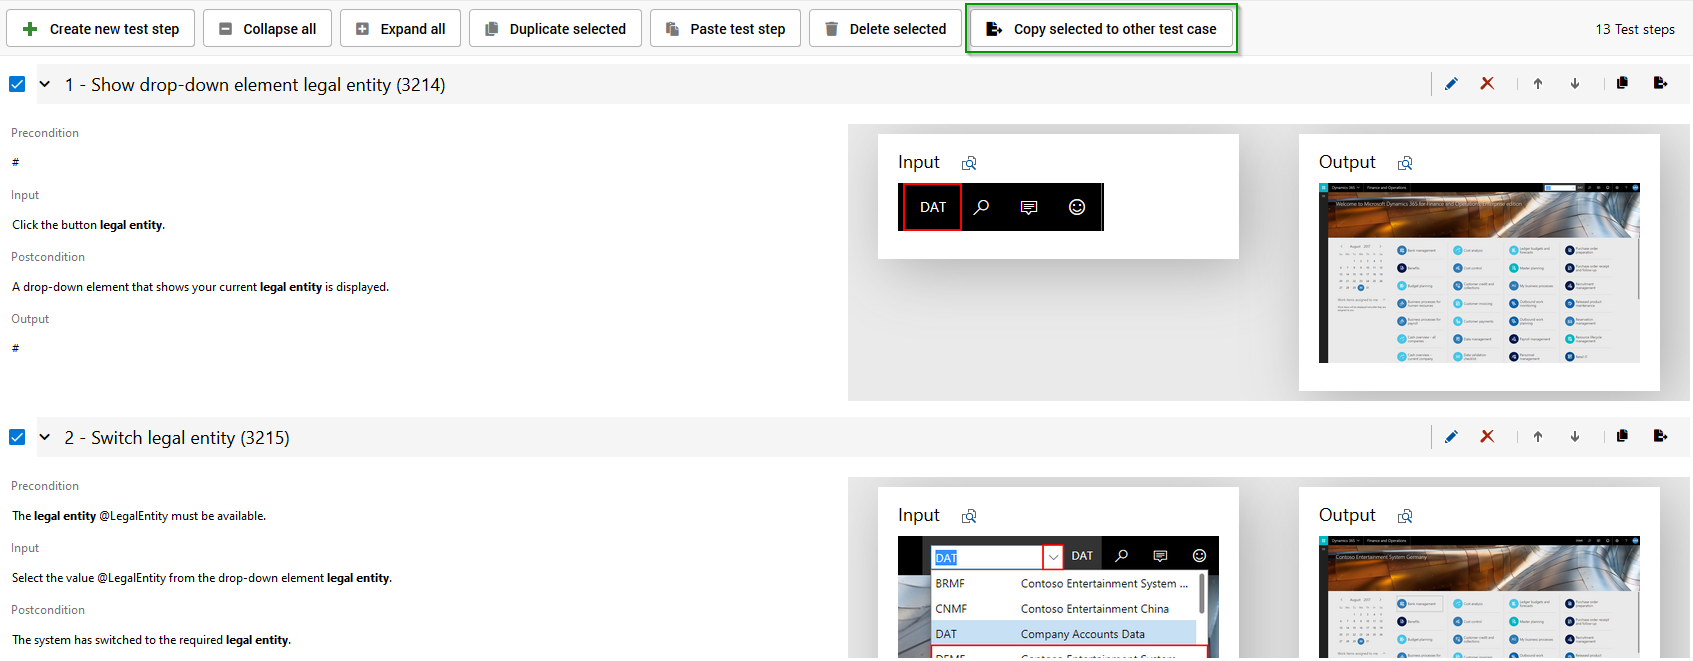
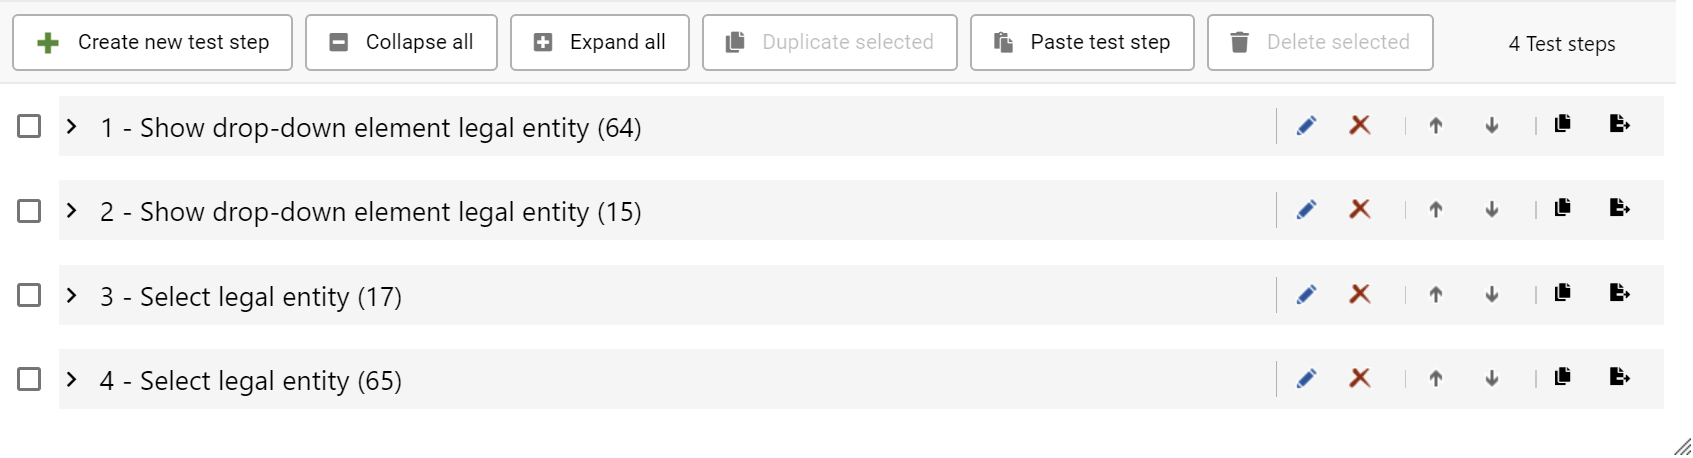
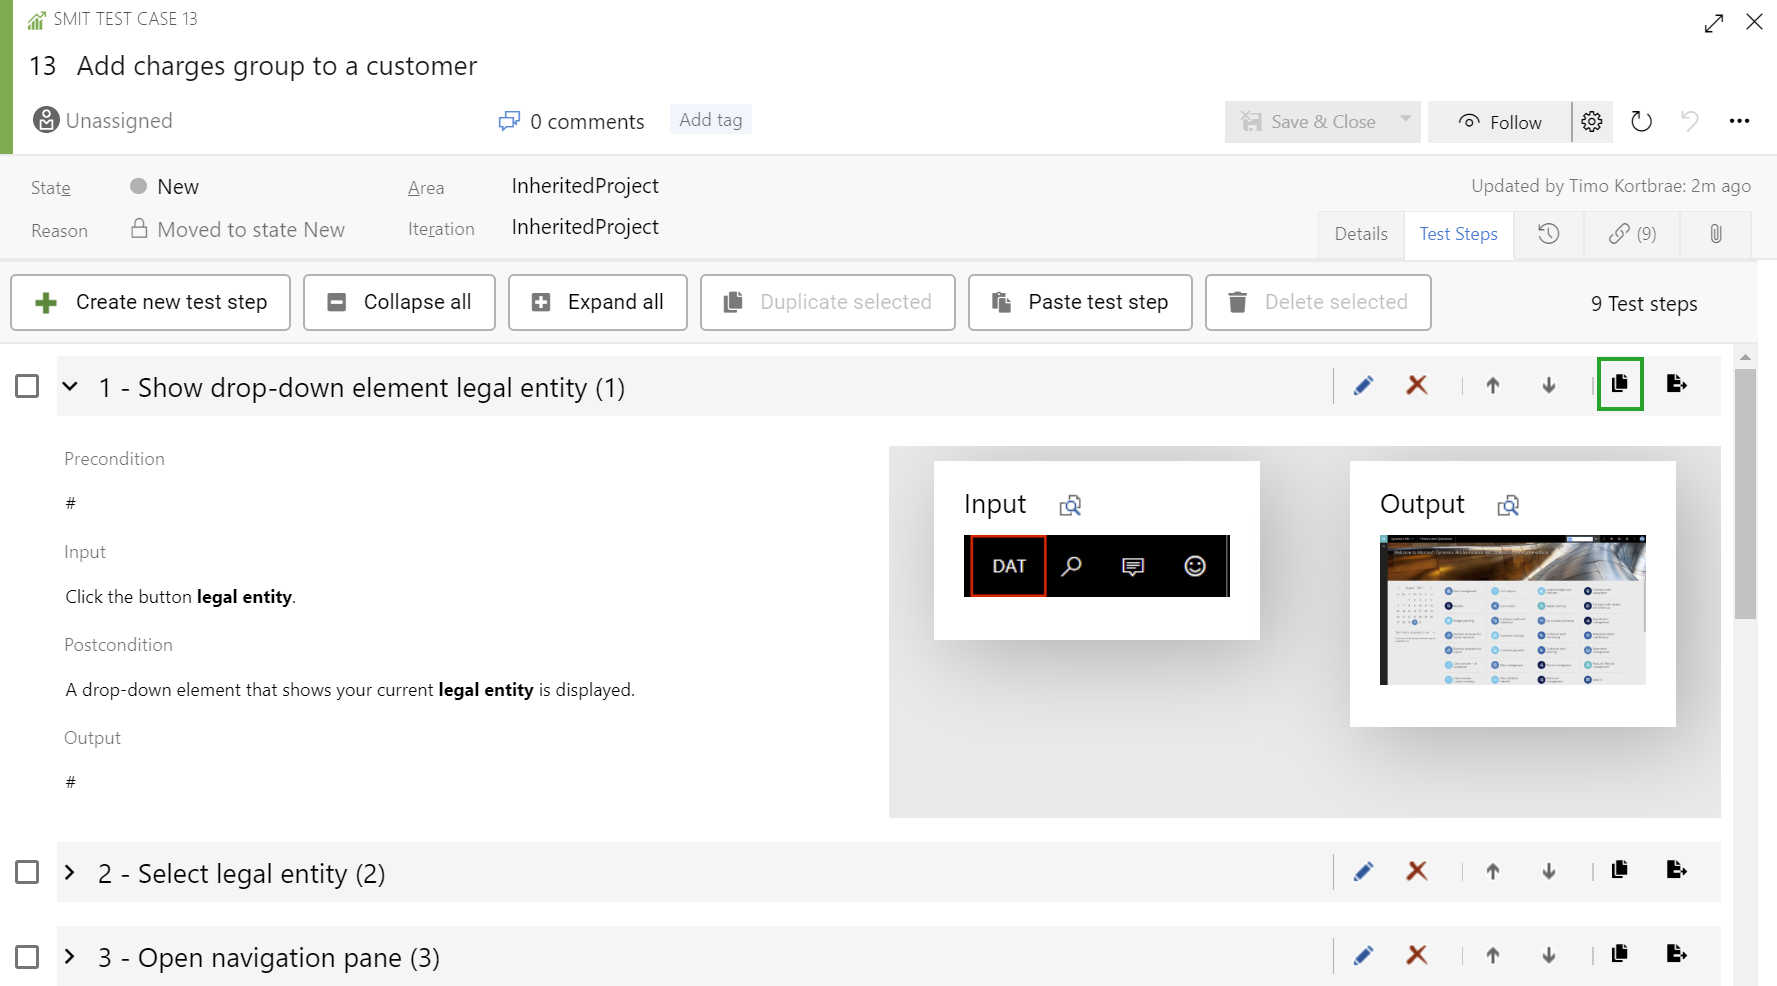
4.2 SMIT Test Case work item – Test steps
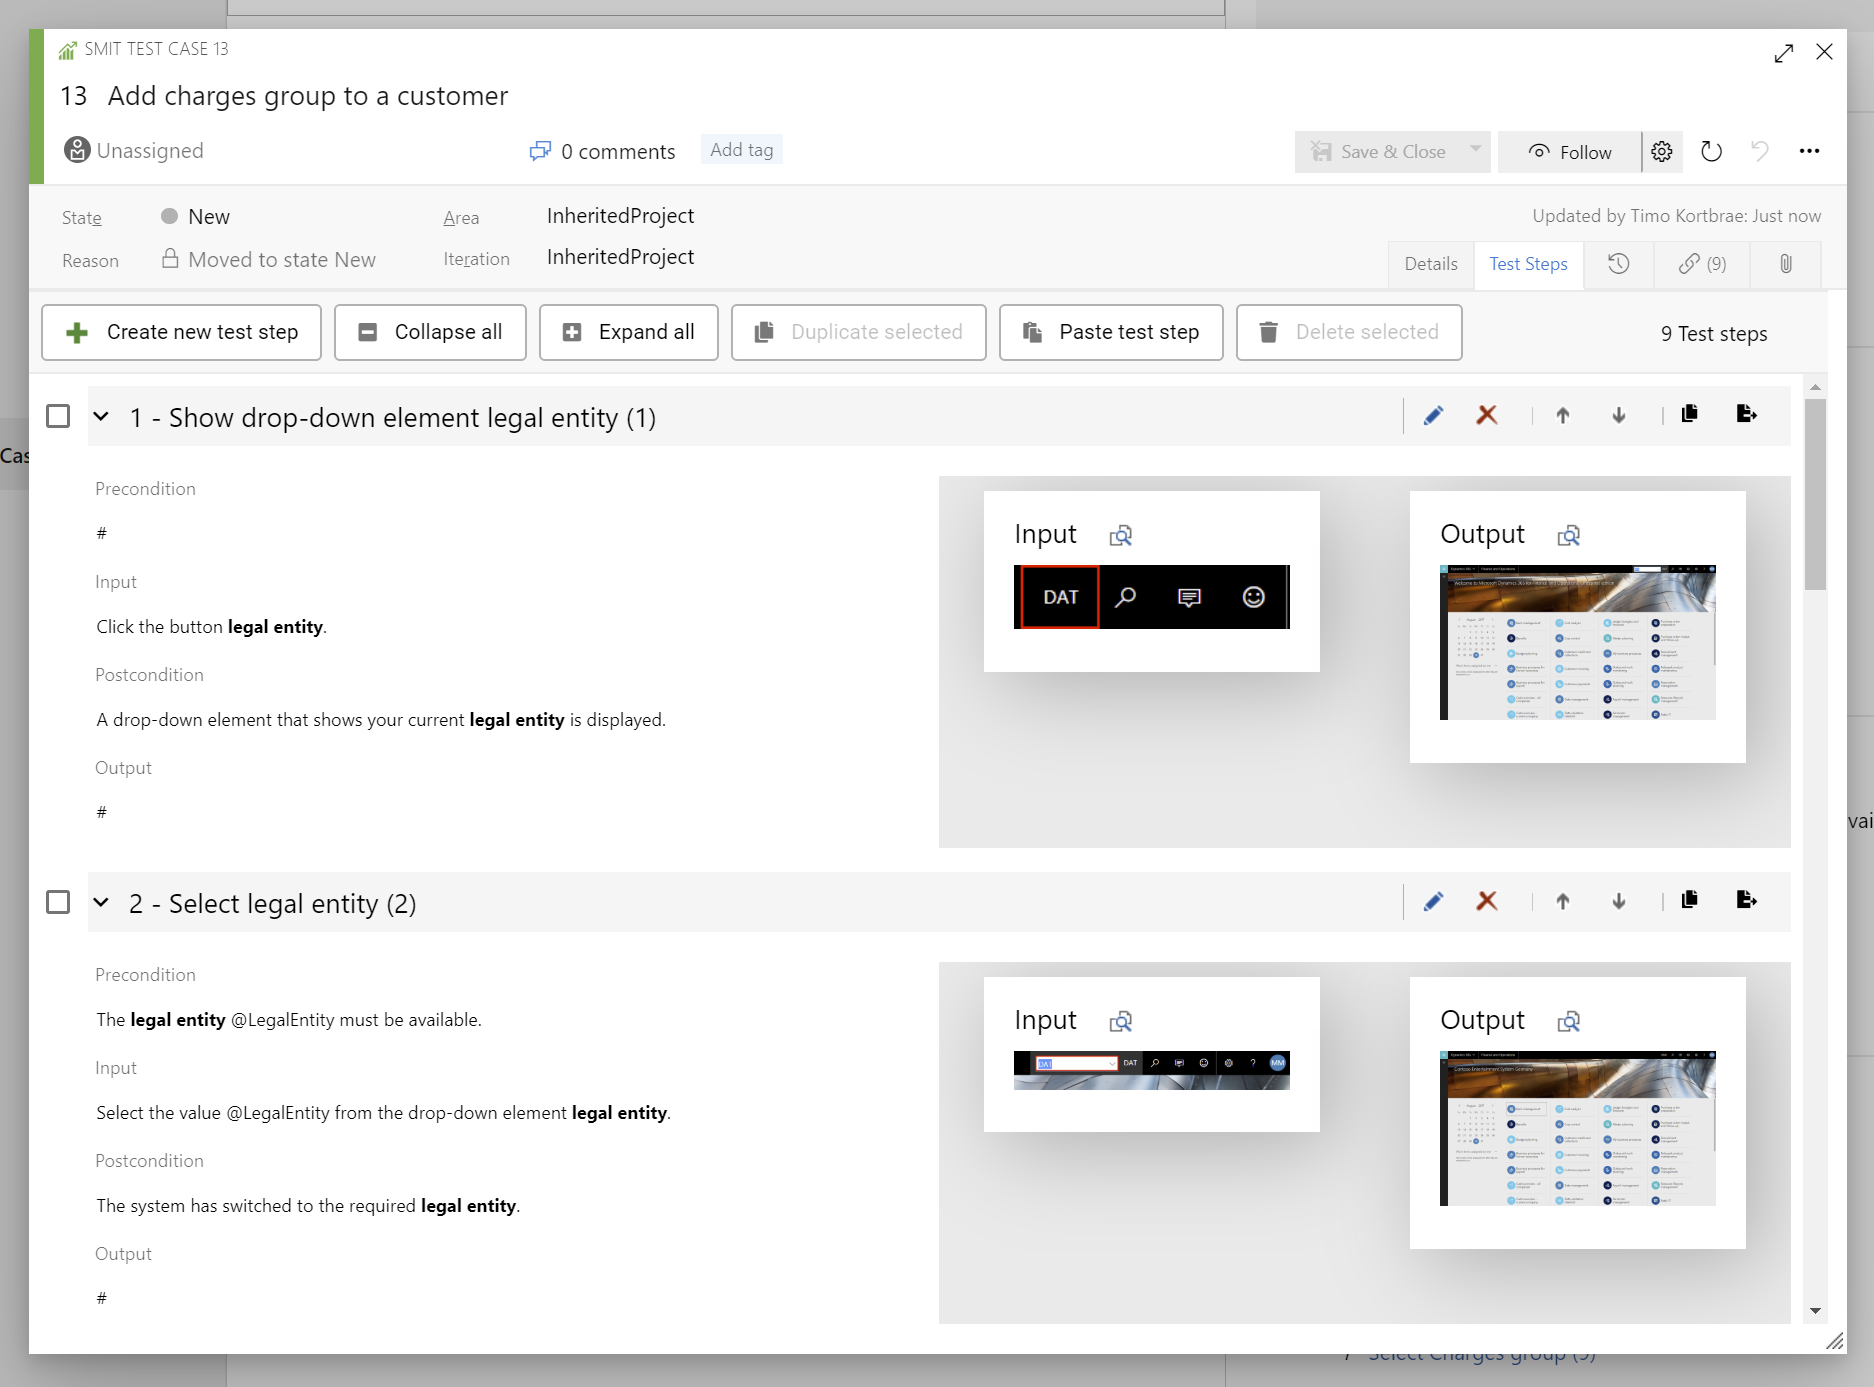
The 'Test Steps'
page provides you with the possibilities to manage all test steps associated
with the SMIT Test Case work item.The test steps are listed using the following format for the title:
@OrderNumber - @Title (@WorkItemID)
- OrderNumber – the position of the test step within the test case starting from 1 and ending
with the number of test steps which are associated to the test case
- Title – the title of the test step
- WorkItemID – the ID which is used by Azure DevOps to
identify the test step work item
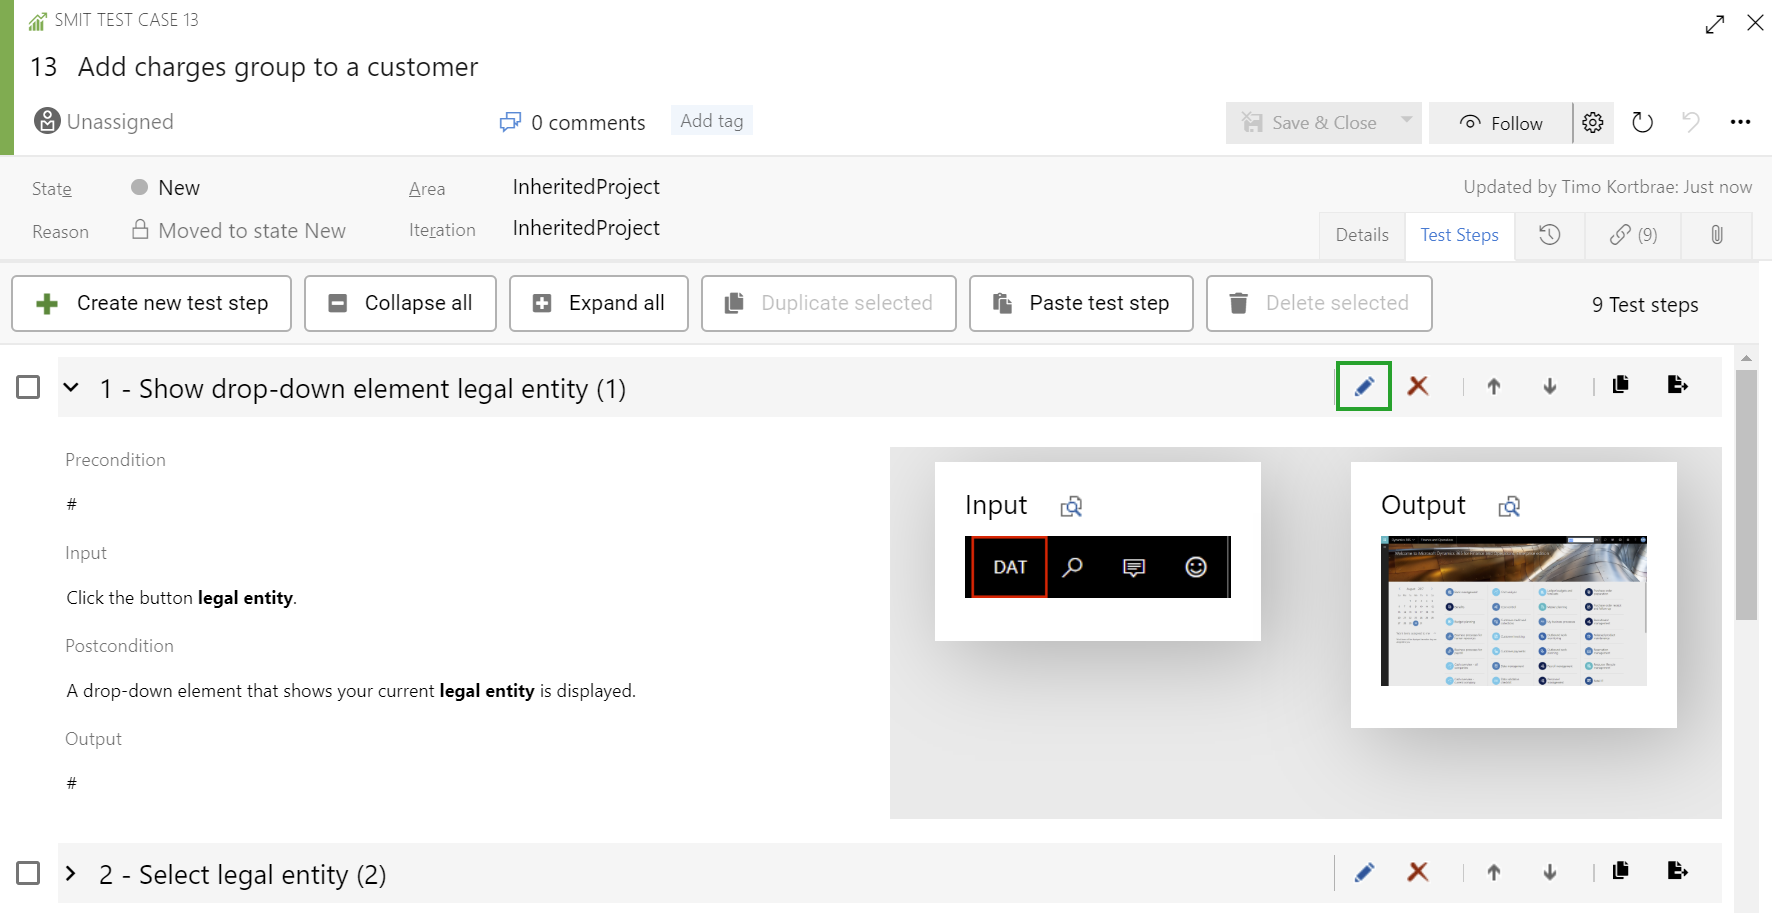
You can add, change or delete an SMIT Test Step in the
list. Each test step is presented as a collapsible list entry, showing
- Preconditions,
- input,
- postconditions,
and
- output
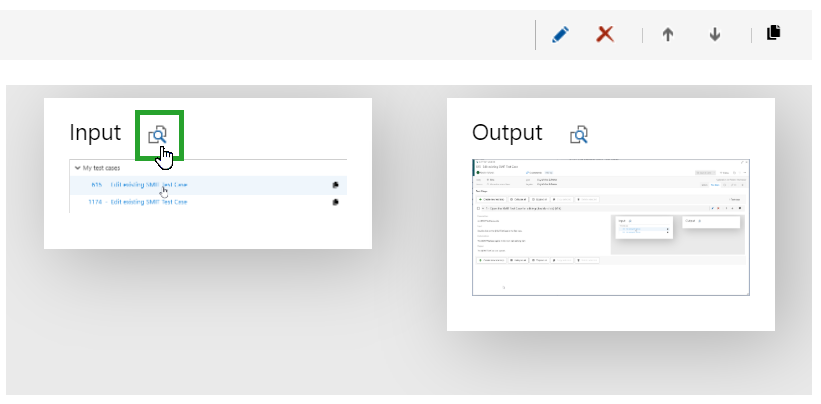
for the test step. Additionally, an input and an output screenshot can be
uploaded to clarify the position where the test step occurs. The screenshots
are presented in a preview window next to the test step details.
A click next to the
screenshot header in the preview opens the screenshot in full size.
Saving your changes
You can save your changes by using the 'Save' button of the work item form or by using the CTRL + S shortcut.
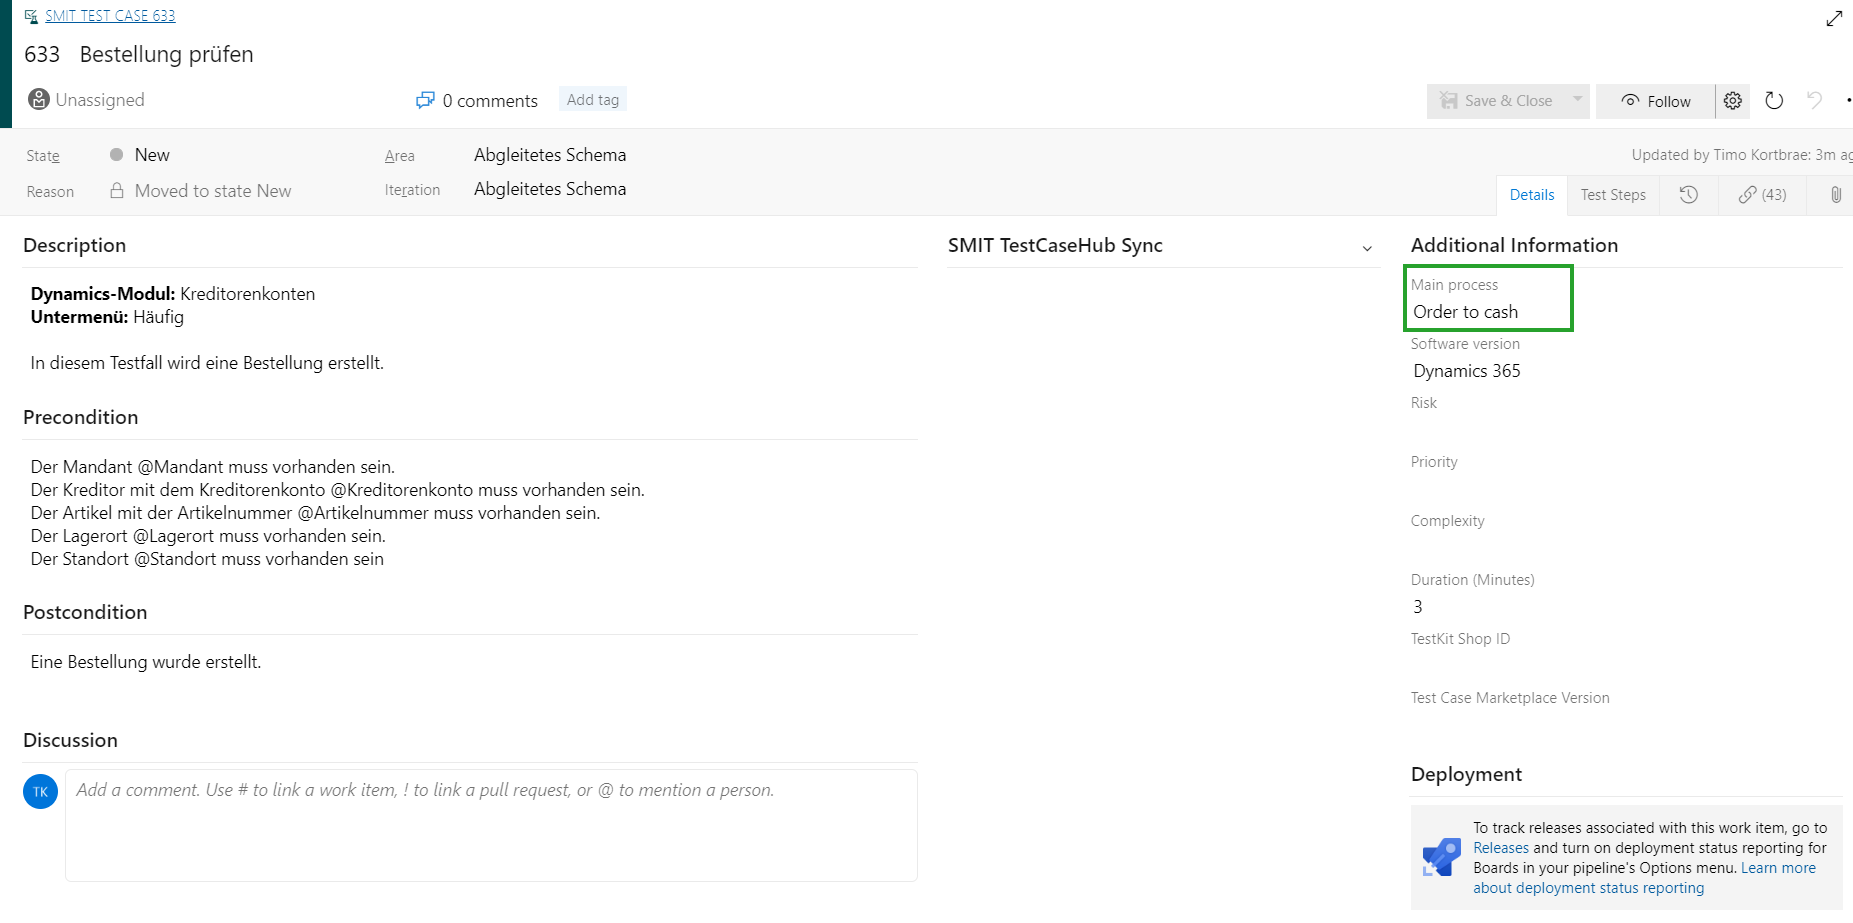
4.3 Main process field
A field for test cases exists which can be used to describe the business process the test case is created for. It is located in the Additional Information group and labeled with Main process.
The value is uploaded to the SMIT marketplace and a filter exists to search for test cases with a specific main process.
5 05 - Create, update and delete test cases
05 - Create, update and delete test cases
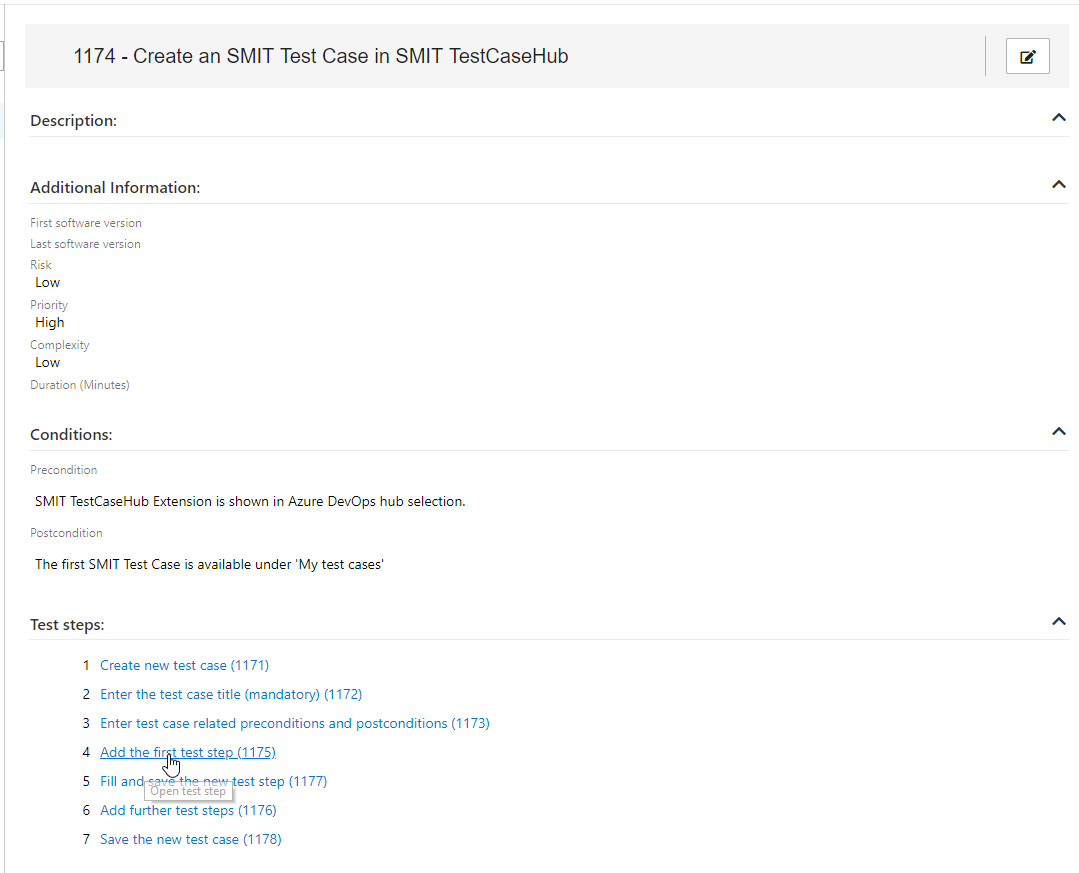
5.1 Create an new SMIT Test Case
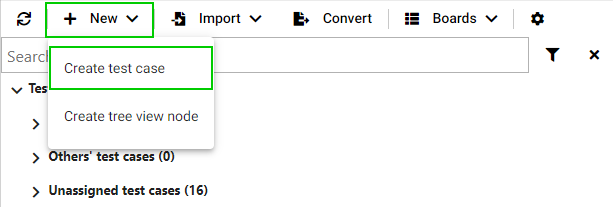
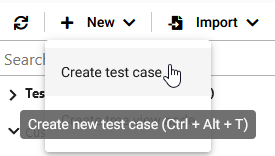
To create an new SMIT Test Case, select 'New' in the menu bar of the tree view and click the option 'Create test case'. The standard work item modification view opens for the new SMIT Test Case.
5.2 Change an SMIT Test Case
Clicking the more options button in the tree view and selecting the option 'Open test case' opens the work item form of the currently selected test case in the standard work item modification view.
Alternatively, when you double click any test case in the tree view this test case will be selected and the work item form will be opened for it.
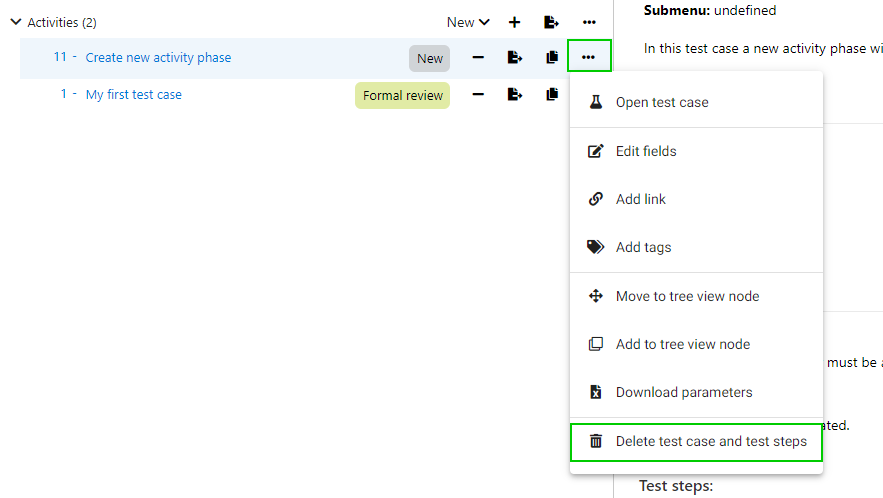
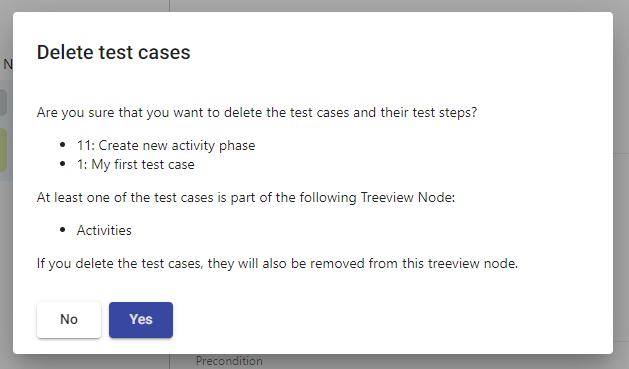
5.3 Delete an SMIT Test Case
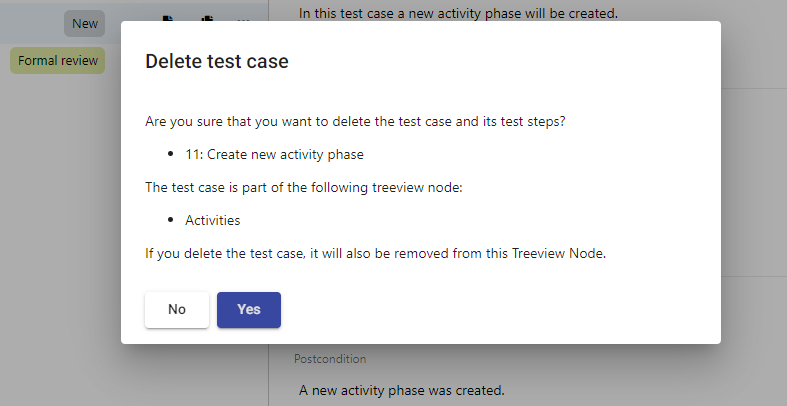
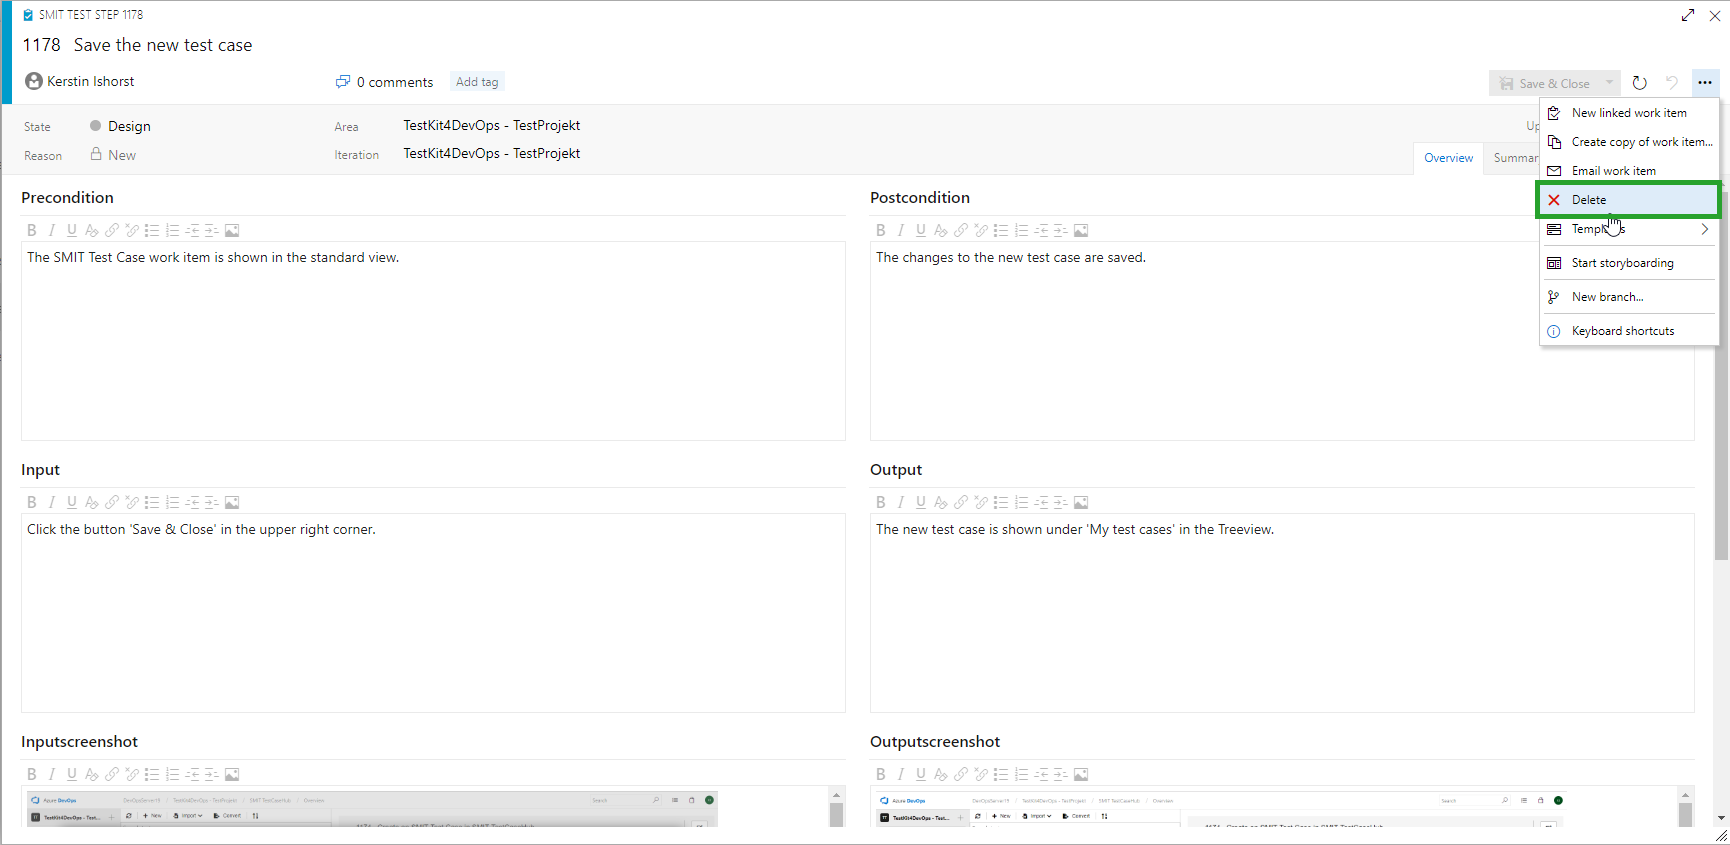
To delete an SMIT Test Case, click the more button of the test case and select the option 'Delete test case and test steps'.
An opening dialog lists the tree view nodes the test case is included. When confirming the dialog, the SMIT Test Case and it's test steps will be deleted in all listed tree view nodes.
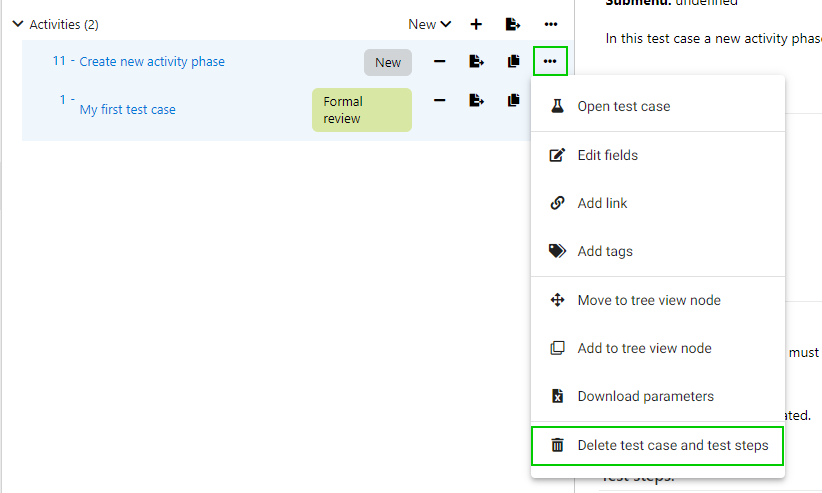
5.4 Delete SMIT Test Cases in tree view
You can delete test cases from within the tree view by clicking the more button and selecting the option 'Delete test case and test steps' for the selected test cases.
By holding the control key and clicking on test cases in the tree view you can select multiple test cases at the same time.
If you open the more menu and click the delete button of one of the selected test cases all test cases that are selected are going to be deleted.
The test case deletion needs to be confirmed by clicking on Yes in the opened confirmation dialog. In the dialog the tree view nodes are listed that include the selected test cases.
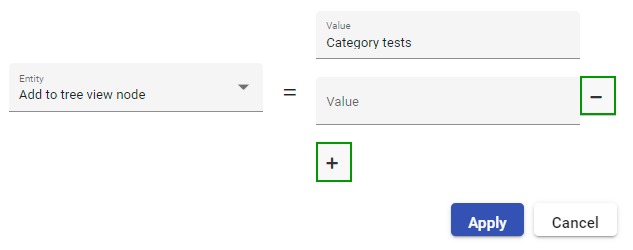
5.5 Edit multiple SMIT Test Cases at once
To edit the assigned user or the state of multiple test cases, select the test cases. Work items can also be linked as related to the test cases. Click the button Bulk edit marked test cases of one of the selected test cases.
Select the entity to edit in the opened dialog. Available entities are:
- Assigned user
- State
- Tags
- Add to tree view node: Test cases can be added in the order they were selected to an existing or to a new node by entering the name of the new node. (Only test cases from the parent node were the button was clicked are added)
- Move to tree view node: Test cases can be moved in the order they were selected into an existing or a new node by entering the name of the new node. (Only test cases from the parent node were the button was clicked are moved)
- Child work item (add relations to a work item)
- Duplicate work item (add relations to a work item)
- Duplicate of work item (add relations to a work item)
- Parent work item (add relations to a work item)
- Predecessor work item (add relations to a work item)
- Related work item (add relations to a work item)
- Successor work item (add relations to a work item)
- Test work item (add relations to a work item)
- Tested by work item (add relations to a work item)
A value can be selected in the list underneath the field value. In this field the available values can be filtered.
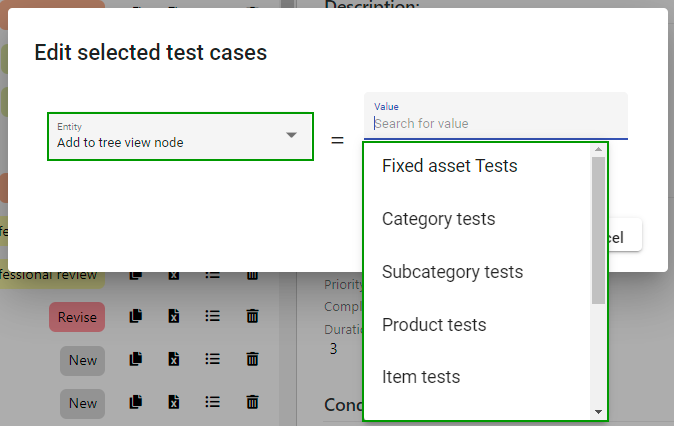
The entities Add to tree view node and Move to tree view node enable the selection of multiple nodes. By clicking the button +, another node can be selected or entered in the added field. the button - will remove an added field.
To apply the changes click the button Apply.
6 06 - Copy and paste SMIT Test Cases
06 - Copy and paste SMIT Test Cases
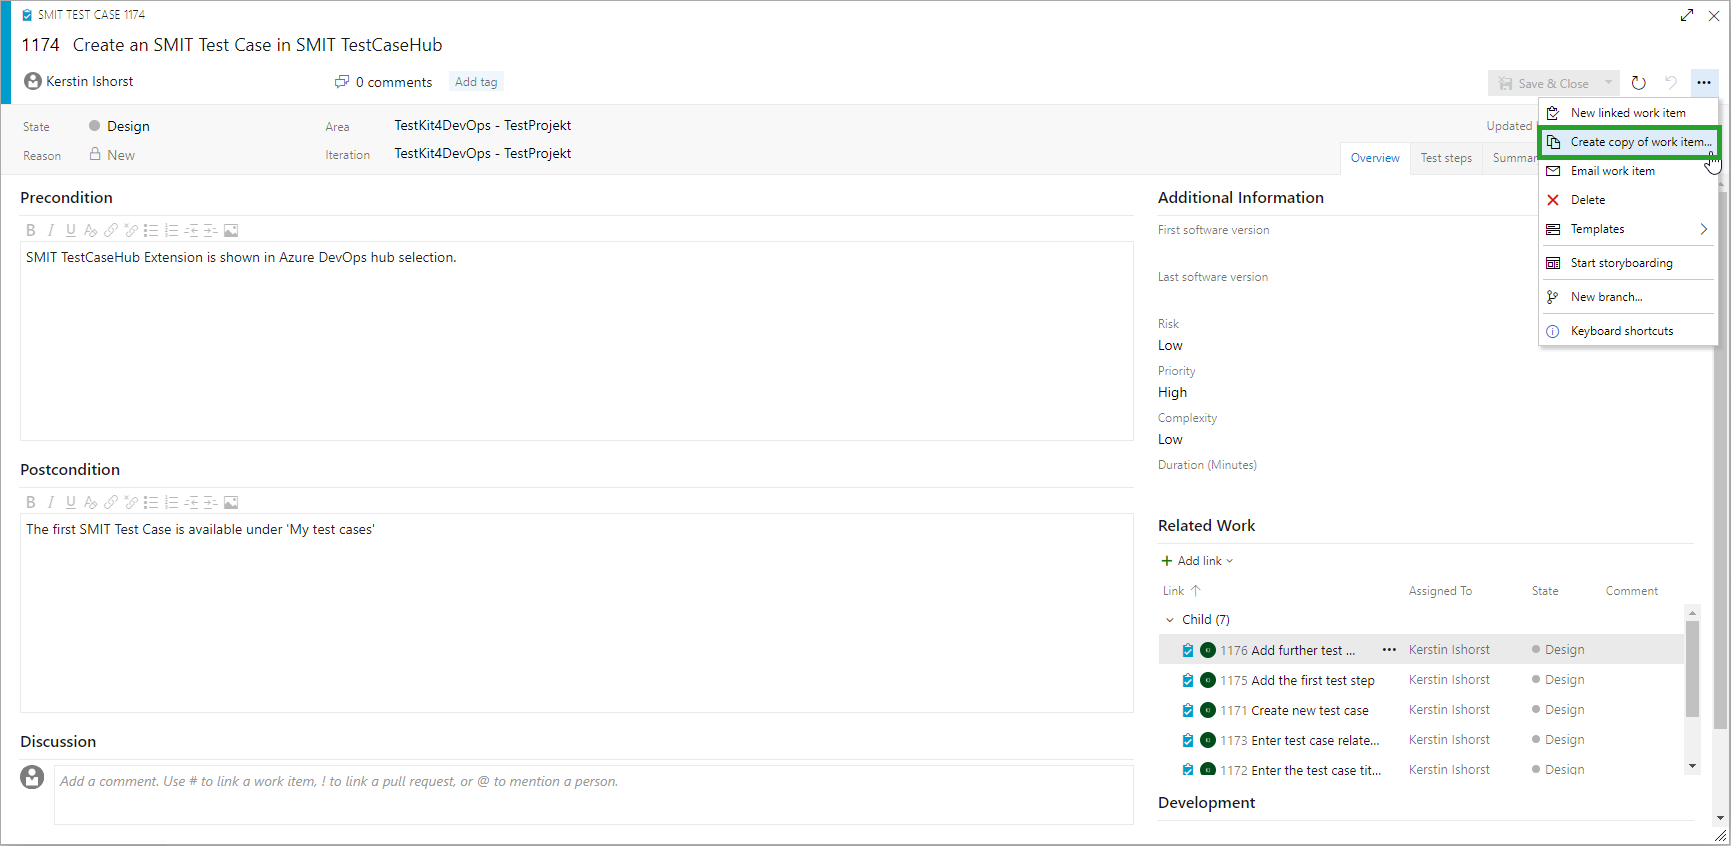
6.1 Copy an SMIT Test Case work item (Azure DevOps standard)
For copying an SMIT
Test Case, the Azure DevOps standard functionality applies.
Please note: The standard copy
functionality does not allow for 'deep' copies (including child work items).
Thus, the related SMIT Test Steps have to be copied separately at the moment.
6.2 Duplicate an SMIT Test Case including SMIT Test Steps
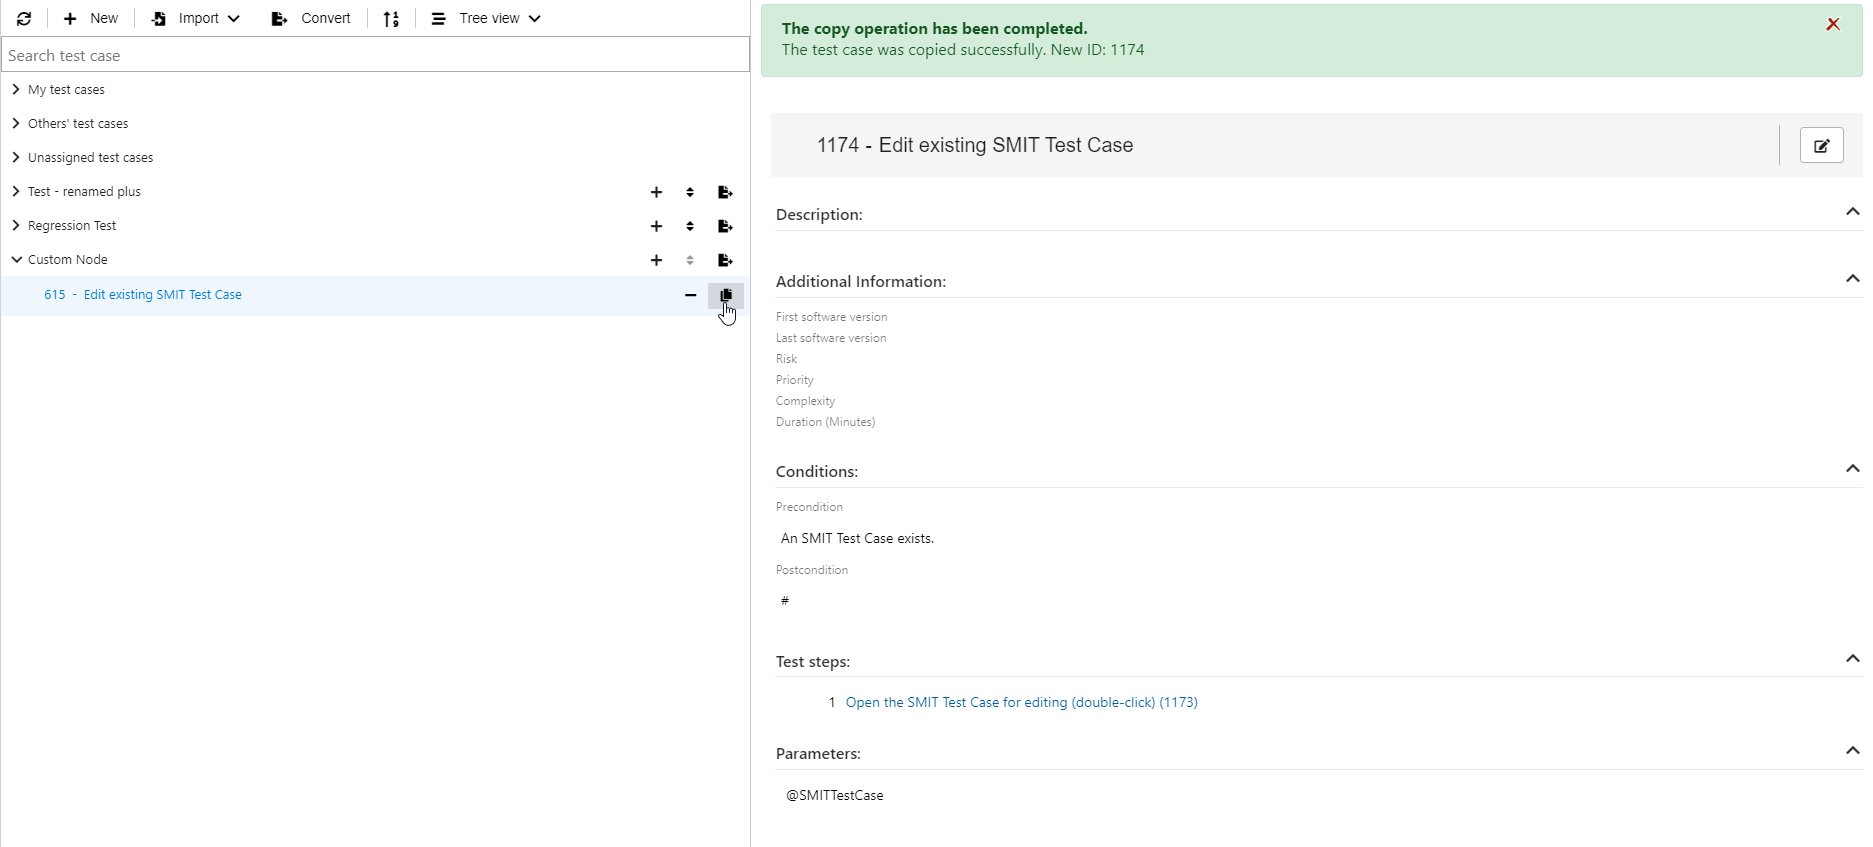
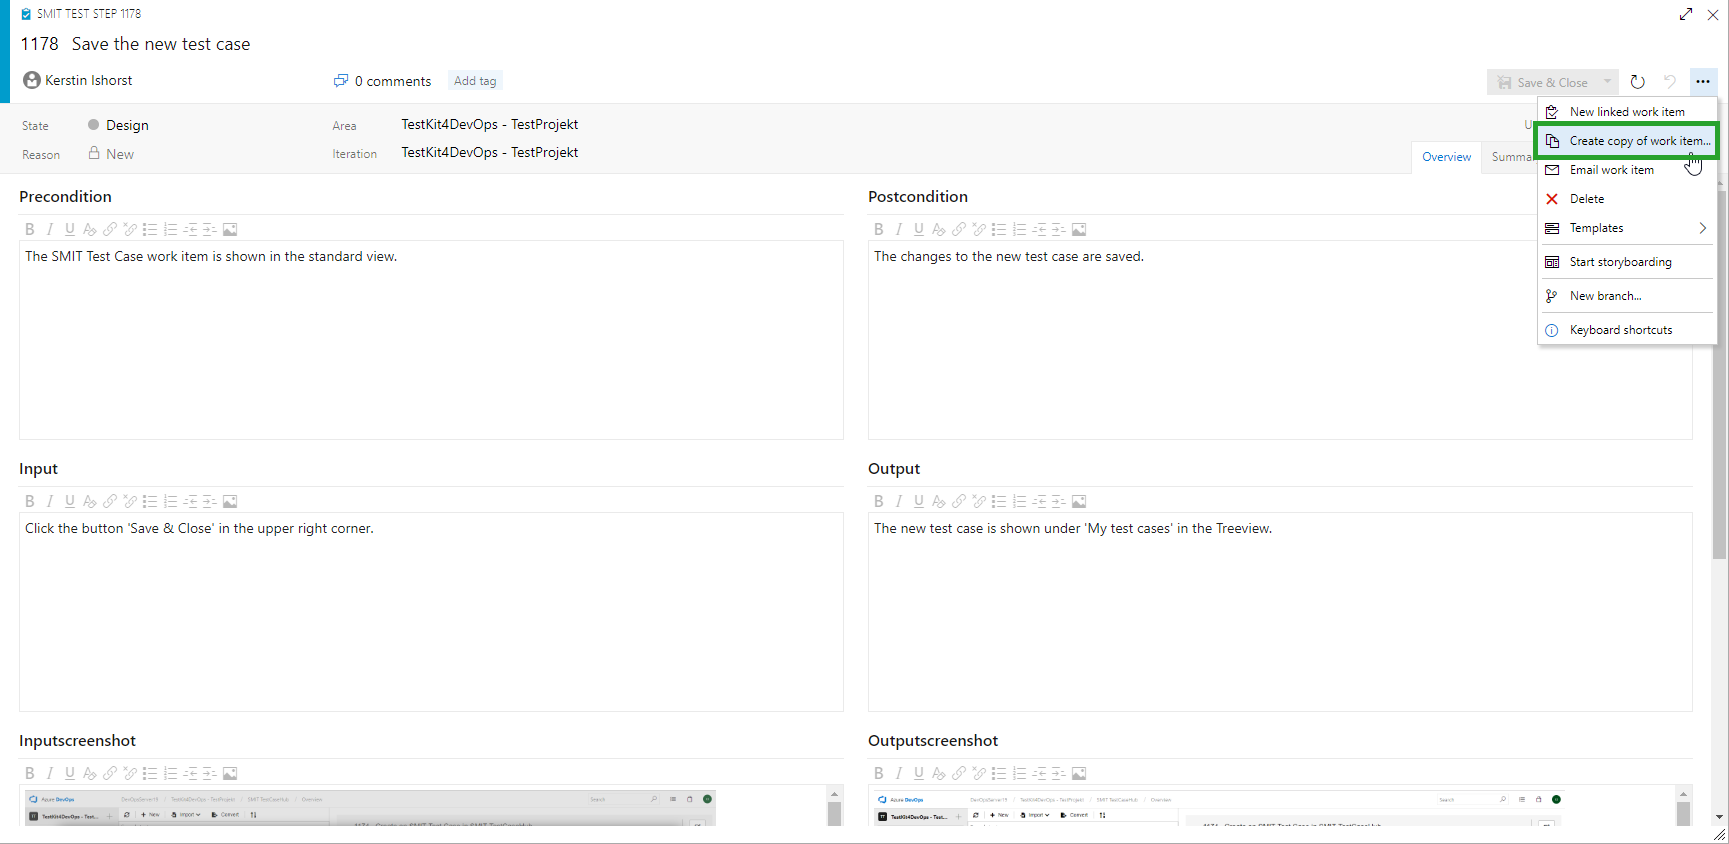
The user can select a test case from the tree view and duplicate it. The duplicated test case includes all SMIT Test Case related fields, the test steps and the work item relations.
The test case is added to one of the three default tree view nodes and is opened in the work item form modification view.
7 07 - Test case conversion
07 - Test case conversion
7.1 Convert SMIT Test Case work items to standard Test Case work items
The work items of type SMIT Test Case are not accessible within the Azure DevOps test functionality. To use them there you need to convert the work items to standard Test Case work items.
Clicking the button 'Convert' in the tree view menu bar or the 'Convert SMIT Test Case to test case work item' button opens the conversion area with the selected test case. The button 'Convert the tree view node to test plan' opens the conversion area with all SMIT Test Cases in the tree view node.
Click the button Next to open the dialog to create a new test plan or select a new test plan.
The conversion will create new Test Case work items with the default Test Case work item type and insert all the information of the SMIT Test Case and the associated SMIT Test Steps.
Additionally, it associates the created Test Case work items with a test suite which needs to be specified before the conversion can be started.
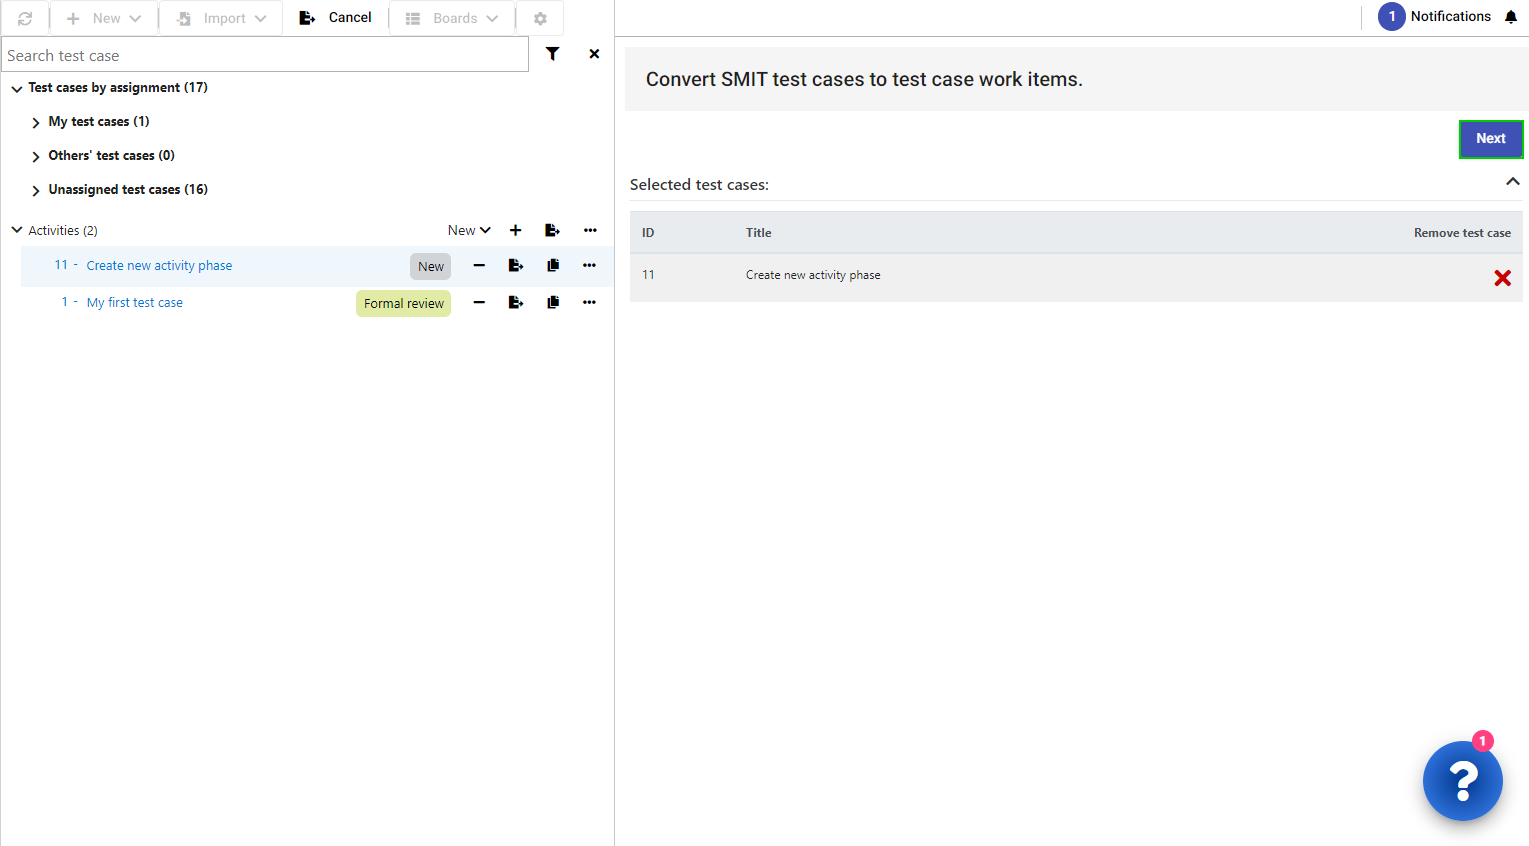
The SMIT Test Cases you would like to convert can be selected by clicking the test cases in the tree view. To remove a test case from the selection you can click on a selected test case in the tree view again or you click the ‘Remove test case’ button in the ‘Selected test cases’ table on the right side of the page.
7.2 Set the status of the Azure DevOps Test Case upon conversion
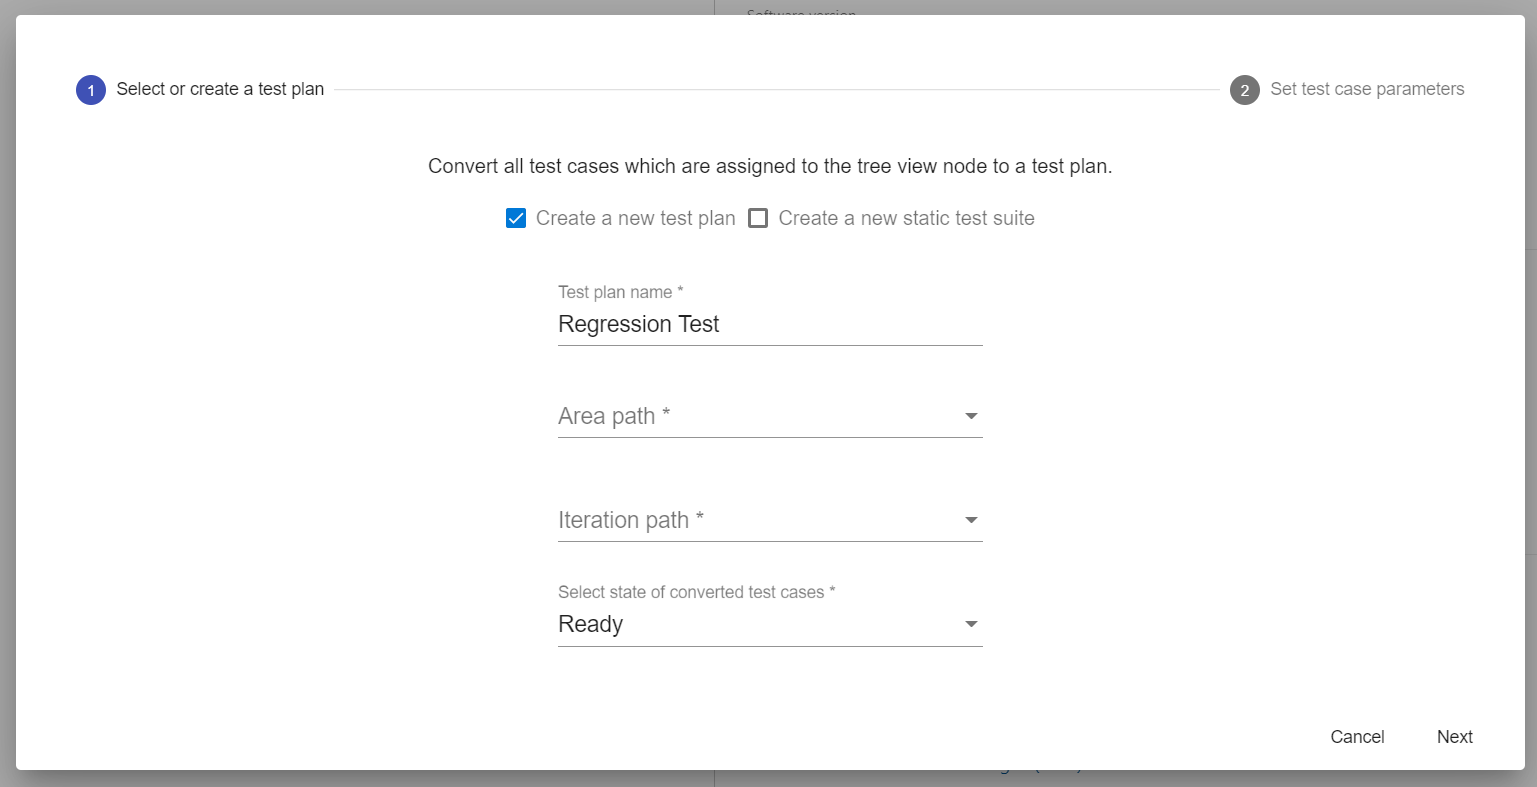
During the conversion of test cases you can choose to select the state of the converted test cases. Initially the configured Azure DevOps default state for test cases is selected.
You can select another state using the Select state of converted test cases field in the Select or create test plan dialog.
7.3 Create Parameter set if SMIT Test Case is converted to Azure DevOps Test Case
Test case parameters can be set either during conversion or before the conversion using CSV files that are attached to the test case work items.
By default a comma is used as delimiter for the CSV file. Depending on your operating system region settings programs like Microsoft Excel may not load the file correctly because another delimiter is expected.
You can choose to change the used delimiter in the SMIT TestCaseHub user settings or to import files into excel using a custom delimiter.
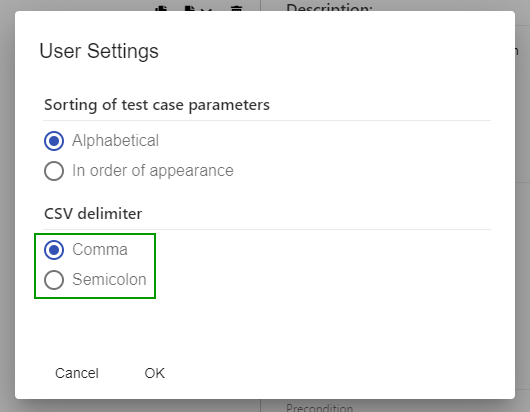
To get a correctly formatted parameter file you have to set the CSV Delimiter in the User settings.
Select Comma for english Microsoft Office version or Semicolon for german Microsoft Office version.
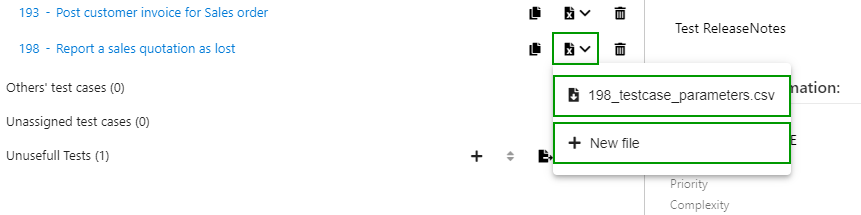
In the tree view you can download a new CSV template of parameters for a SMIT TestCase by clicking the buttons Edit test case parameter and New file. Existing parameter files attached to the SMIT TestCase are displayed in the menu and can be downloaded by clicking on the file.
When you convert a SMIT TestCase, parameters of attached parameter CSV files are automatically loaded. All changes in the dialog do just affect the created Azure DevOps test case, not the parameter files attached to the SMIT TestCase.
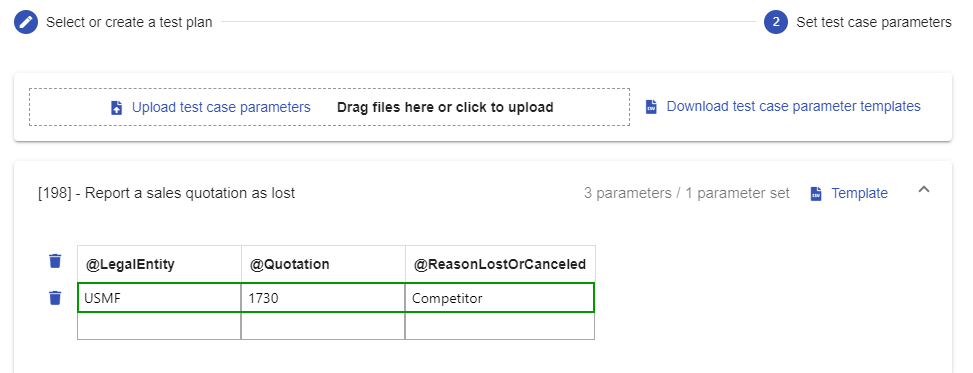
During the conversion of a test case or tree view node you can create parameters for the test case which are added to the converted Azure DevOps test cases. This can be done in the tables for the corresponding test cases or by using CSV files.
To download a CSV template for a test case you can click on the Template button for the test case to download a single CSV file or on Download test case parameter templates to download the templates for all test cases. You need one file per test case but you can add as many parameter sets as you want in the CSV files.
To upload the parameter sets you can click on the button Upload test case parameters or drag and drop the files in the target area.
It is also possible to download the parameter template from within the preview component. After adding the desired parameter sets to the CSV file you can also upload it in the preview component. For every uploaded file the extension checks if the file is valid. The file is automatically attached to the test case work item if it is valid.
8 08 - SMIT Test Step work item
08 - SMIT Test Step work item
8.1 SMIT Test Step work item
The SMIT Test Step work item provides a template for the structured
creation of logical test steps.
The 'Details' page
contains the SMIT Test Step fields based on the PIPO principle and the option
to add screenshots for the input and output.
Additionally, it contains a description field to add further details
about the test step.
8.2 SMIT Test Step work item – Details
The details page of the SMIT Test Step work item contains entry fields
for:
- Precondition – the conditions relevant before conducting the test step
- Input – the input required to conduct the test step
- Input
screenshot – a screenshot detailing the necessary action to conduct the test
step
- Postcondition – the conditions relevant after conducting the test step
- Output – the expected output of the test step
- Output
screenshot – a screenshot detailing the expected outcome of the test step
- Description – further details about the test step
9 09 - Create, update and delete test steps
09 - Create, update and delete test steps
9.1 Change the position of an SMIT Test Step
It is possible to sort test steps using either the 'Move up' or 'Move down' buttons on each test step row or by using drag and drop.
The buttons move the test step up or down by one position.
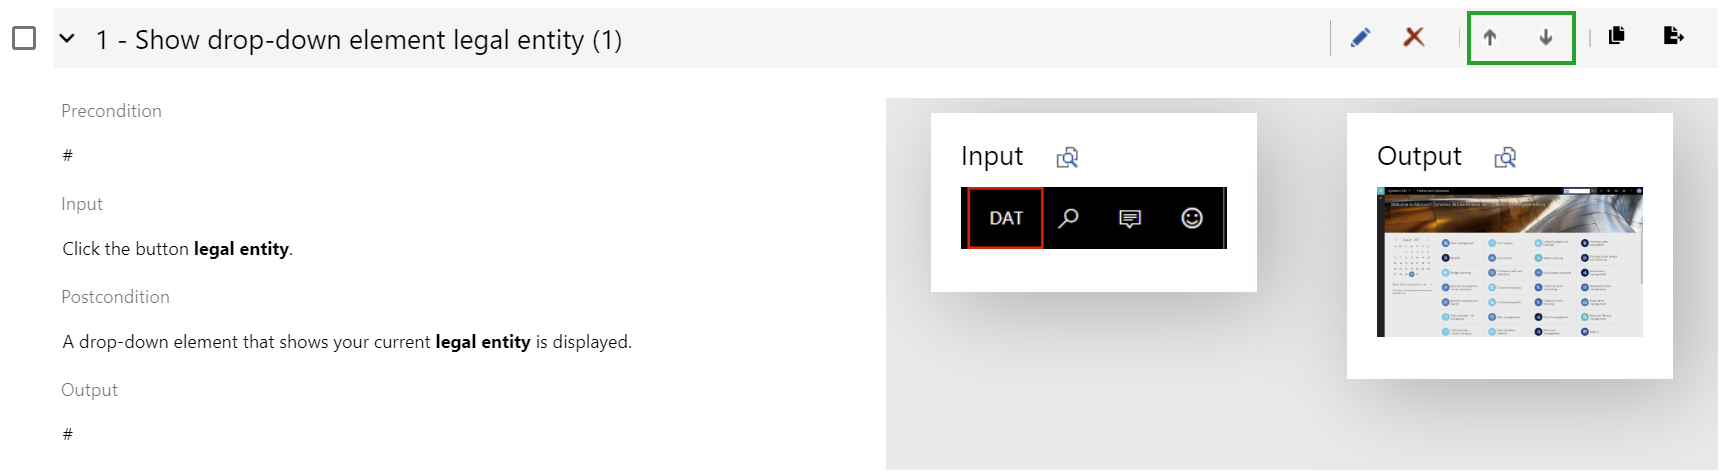
Using the drag and drop sorting you can move the test step to any position in the list.
You can activate the drag and drop by clicking on the test step header and starting to move the cursor.
9.2 Change an SMIT Test Step
To edit an SMIT Test
Step when the SMIT Test Case is shown in the preview, click the test step. The
SMIT Test Step will open in the standard work item modification view. The shown
test step in the test case preview page is automatically updated if you click
on ‘Save and close’ in the SMIT Test Step work item form.
To edit an SMIT Test
Step when the SMIT Test Case form is already open, use the pencil button ‘Edit
test step’ of the test step. The SMIT Test Step will open in the standard work
item modification view. After clicking ‘Save and close’ in the Test Step work
item form the test step in the SMIT Test Case work item form is updated so that the
new changes are shown.
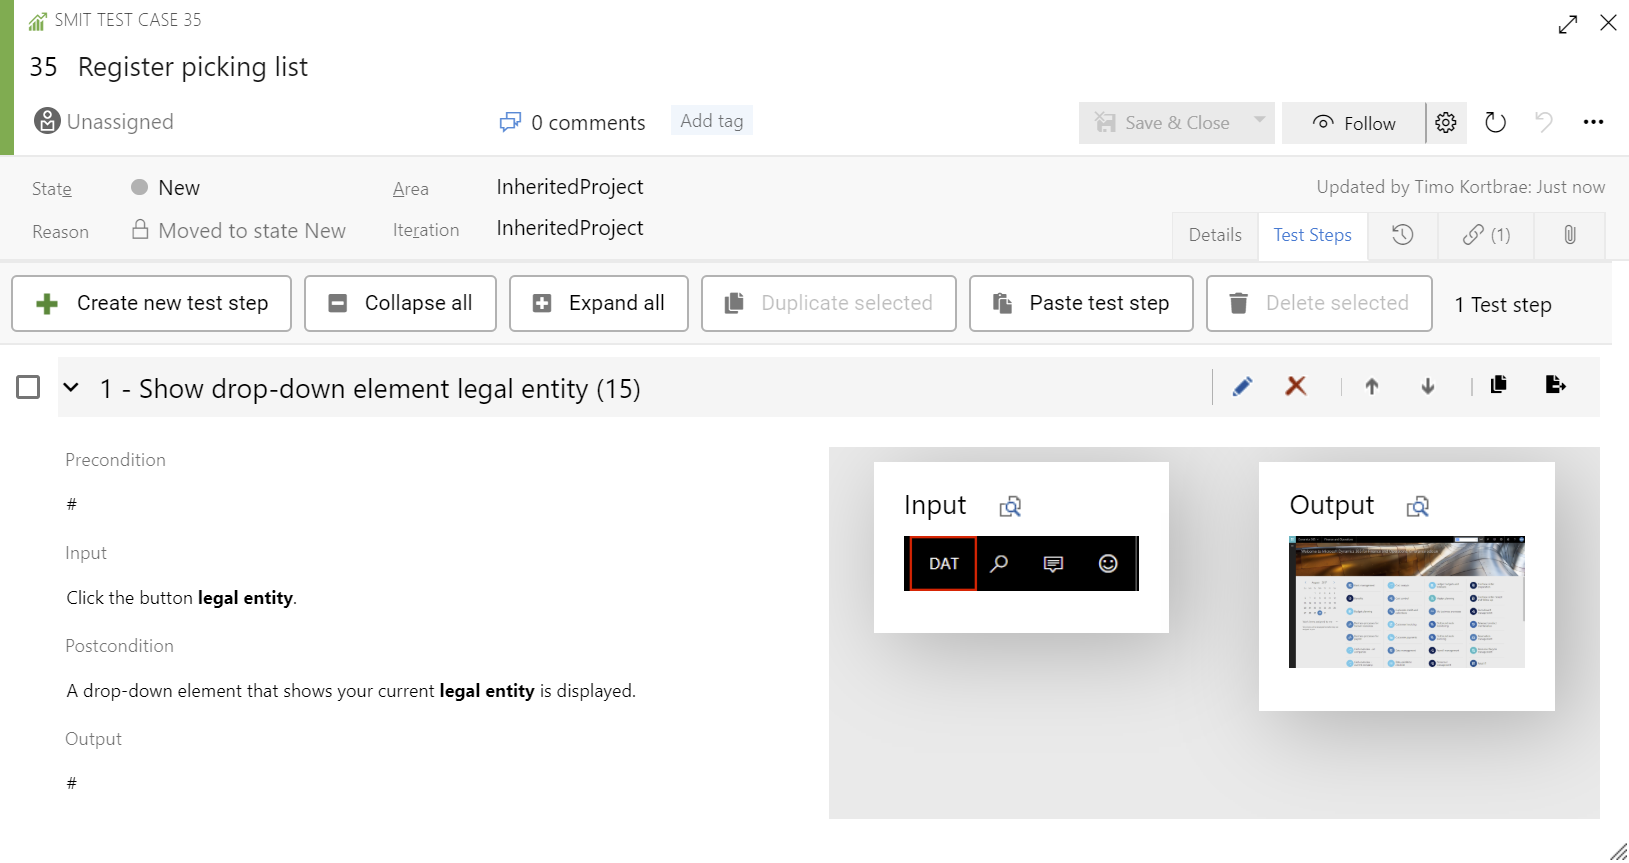
9.3 Delete an SMIT Test Step
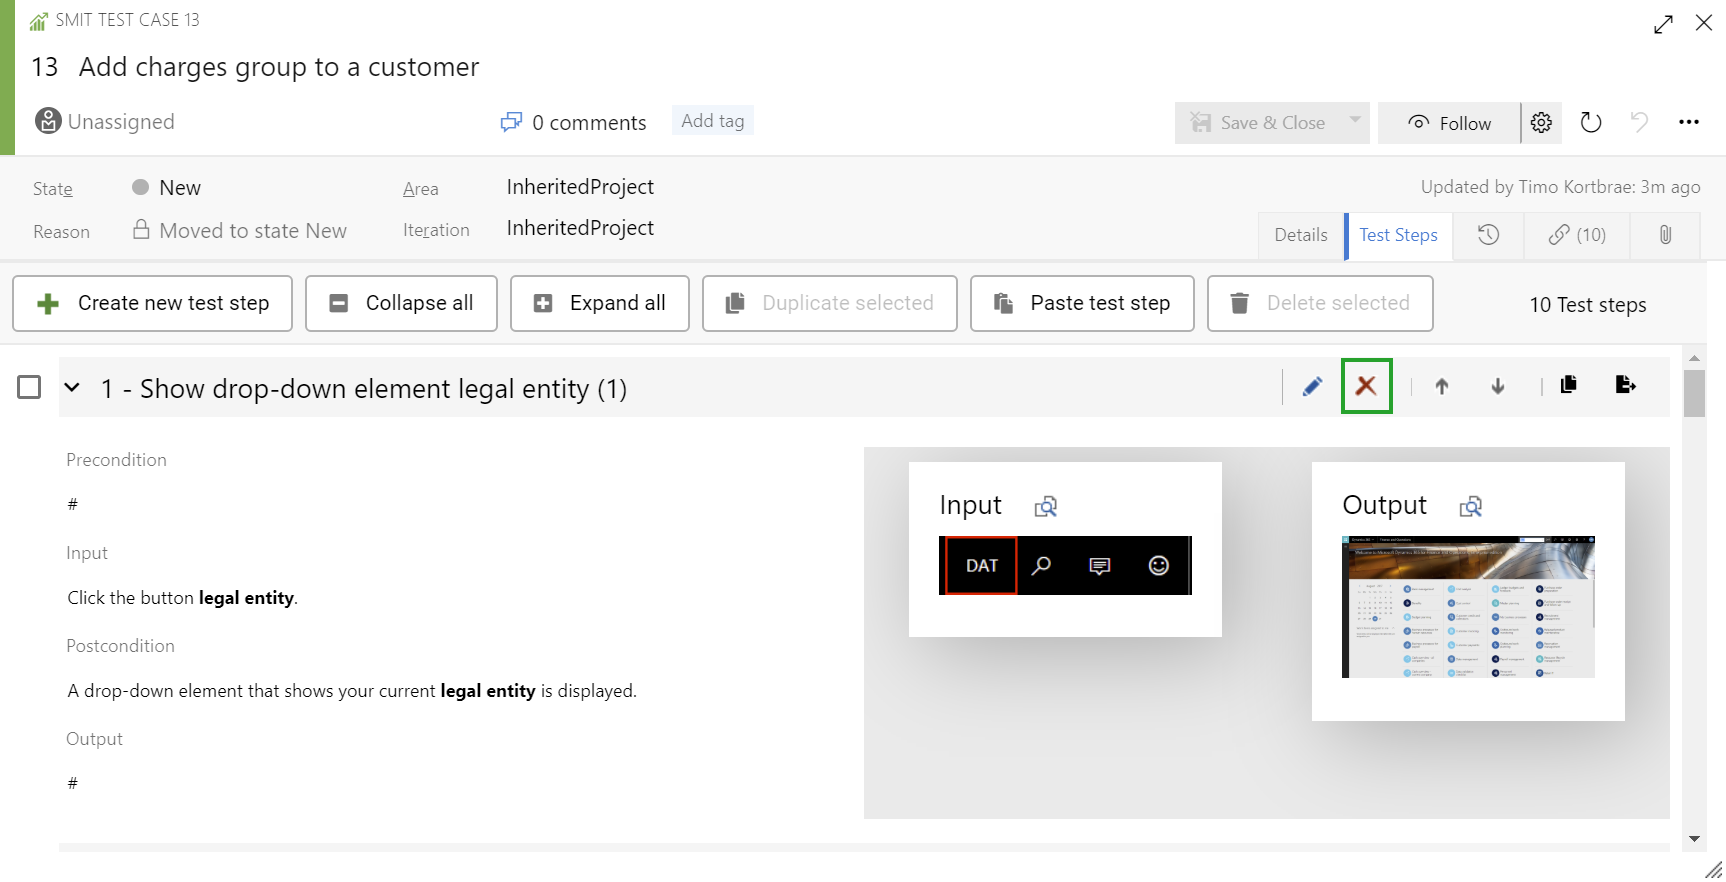
To delete an SMIT Test Step within an SMIT Test Case
click the red X icon of the test step.
You can also delete an SMIT Test Step opened in the standard work item form.
After clicking the icon, a dialog is shown in which the deletion needs
to be confirmed. Clicking ‘Yes’ deletes the test step and clicking ‘No’ keeps the test step intact.
Deleted work items can be restored using the default functions in Azure
DevOps. When the work item link is restored, the test step is added to the SMIT
Test Case as the last test step and not in the position where it was before.
9.4 Delete multiple SMIT Test Steps
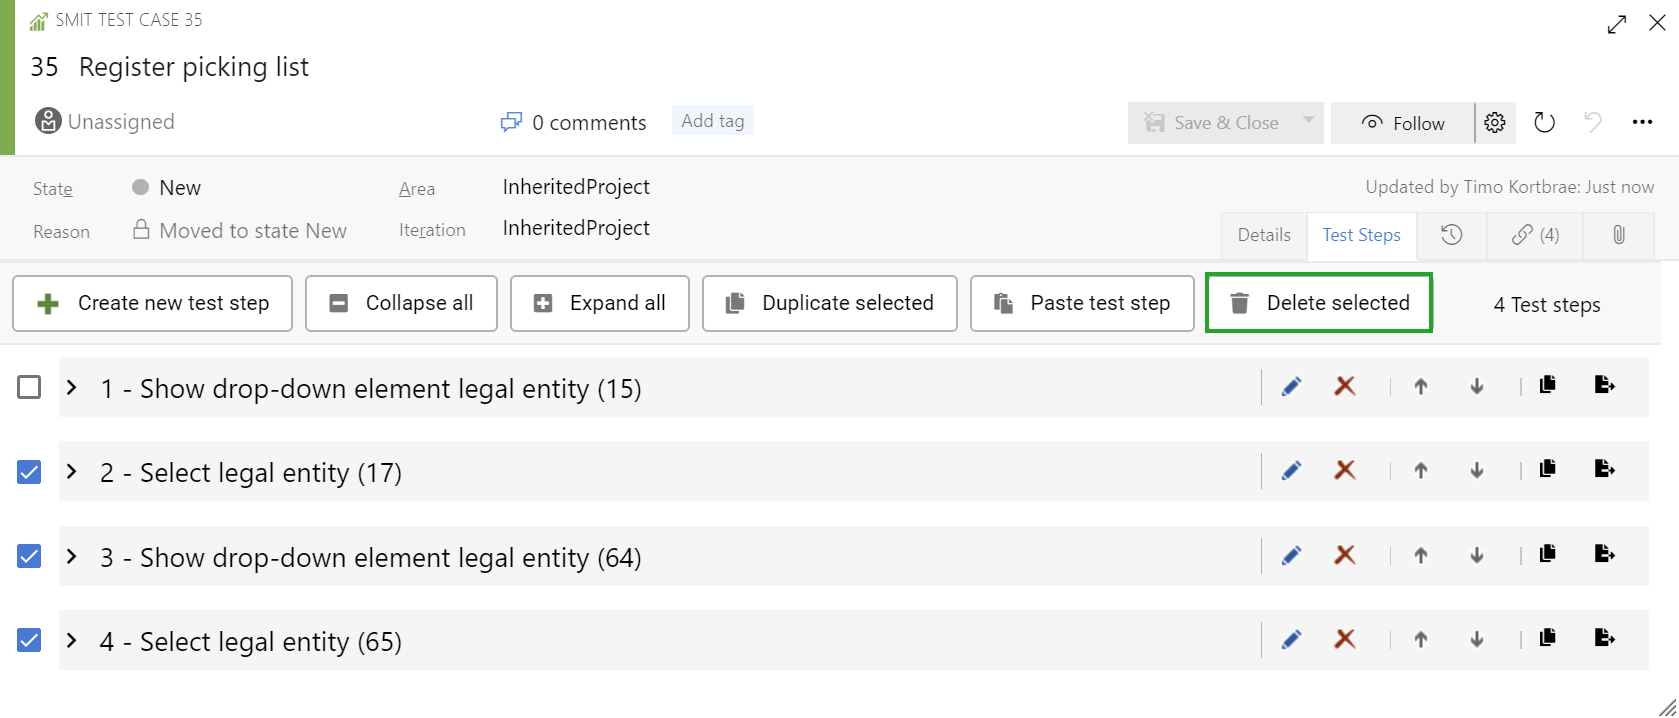
In the SMIT Test Case work item form multiple test steps can be selected by clicking on a checkbox in front of the test step row.
If one or more test step is selected the user can click on a button in the menu bar of the test step list to delete the selected test steps.
9.5 Quick Edit the SMIT Test Step in the SMIT Test Case
Instead of editing the test steps in the SMIT Test Step work item form you have the option to activate a quick edit mode in the test step list.
After activation of the quick edit mode you can edit and create test steps directly from within the SMIT Test Case work item form. The test steps are automatically created and saved after you are stopping to change the test case for one second.
9.6 Create an SMIT Test Step
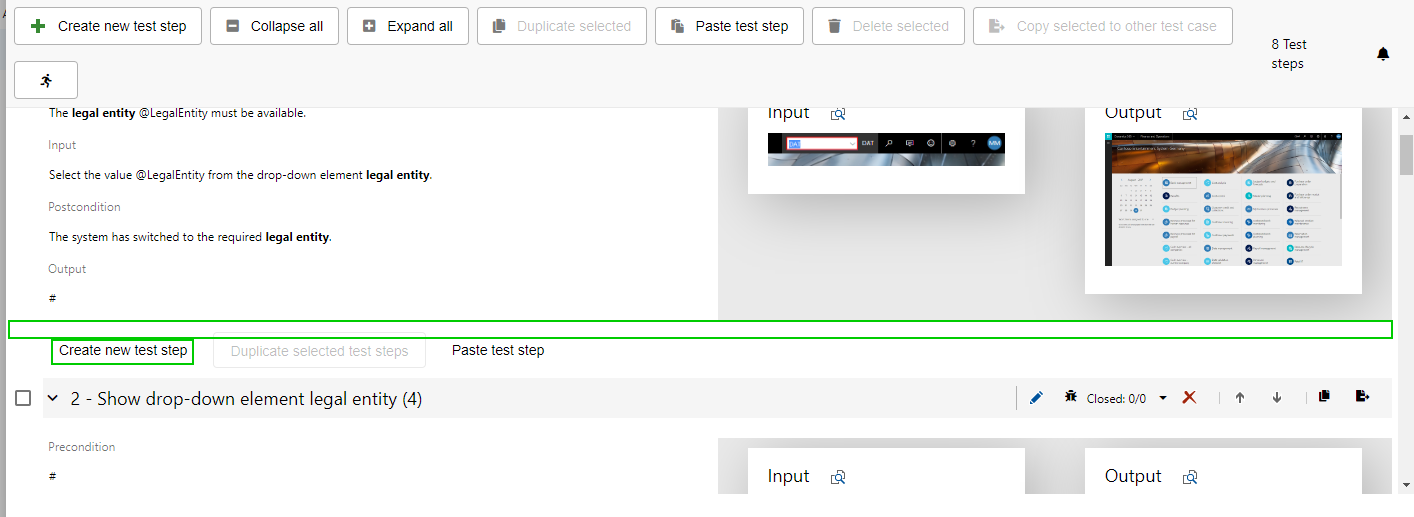
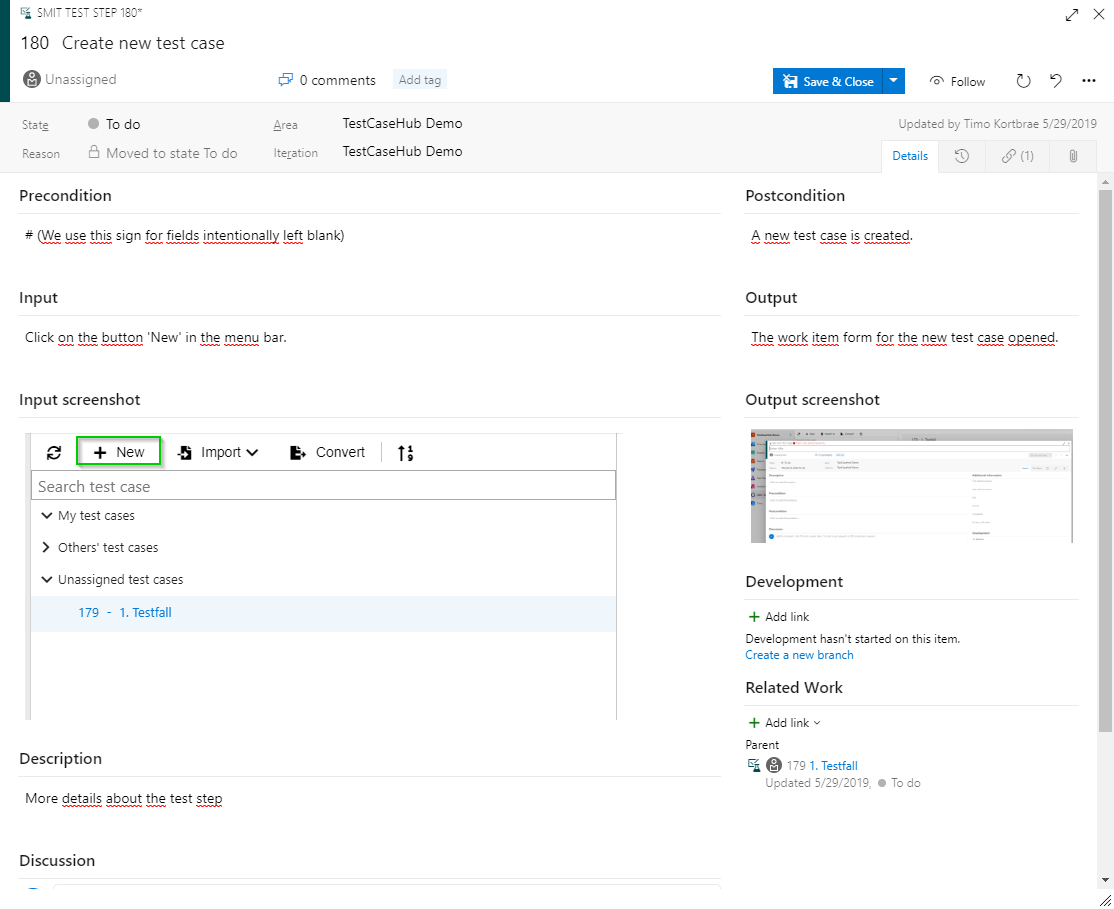
You can add an SMIT Test Step to the end of the step list by clicking the 'Create new test step' button in the SMIT Test Case 'Test Steps' page. The SMIT Test Step will open in the standard work item modification view.
To create a new SMIT Test Step at a distinct position, hover the cursor above the area between two test steps and click the button 'Create new test step'.
10 10 - Copy and paste SMIT Test Steps
10 - Copy and paste SMIT Test Steps
10.1 Copy an SMIT Test Step work item (Azure DevOps standard)
For copying an SMIT Test Step, the Azure Dev Ops standard functionality
applies.
If you want to
create a copied test step which is added as a test step to the same test case
as the original test step, you need to check the checkbox ‘Include existing
links’. If this checkbox is checked, the test step is added to the bottom of
the test steps list.
10.2 Copy an SMIT Test Step from another SMIT Test Case
In the Test Steps page of the SMIT Test Case work item form you can also copy test steps from another SMIT Test Case and paste it into the currently opened test case.
To paste a SMIT Test Step from another SMIT Test Case you can click the button "Paste test step" in the menu bar at the top of the test step list. The same button can be used in the menu bar at the bottom of the test step list if it is shown.
The dialog "Paste available SMIT Test Step" is opened. You can search for a test step by entering it's id or title using the format or clicking on the test step in the list below the field.
After clicking on the "OK" button the test step is copied and added as last test step of the opened "SMIT Test Case". The copy contains the content of the fields "Title", "Precondition", "Input", "Input screenshot", "Postcondition", "Output" and "Output screenshot" of the selected test step.
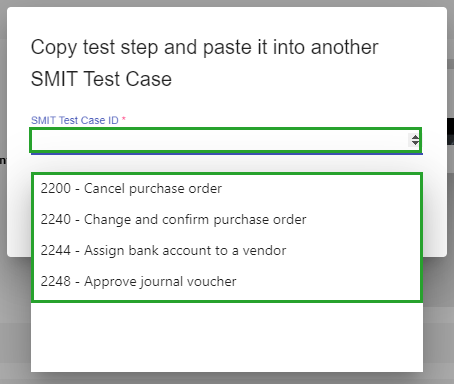
10.3 Copy one or more SMIT Test Steps to another SMIT Test Case
In the Test Steps page of the SMIT Test Case work item form you can choose to copy test steps and paste them into another SMIT Test Case or to copy test steps from another SMIT Test Case and paste it into the currently opened test case.
To paste a single test step to another SMIT Test Case you have to click on the export button in the header row of the corresponding test case.
To copy multiple test steps to another SMIT Test Case you first select the test steps and afterwards click
on the export button in the menu bar at the top of the test step list.
A dialog is opened where you can search for a test case by entering the ID or title of the test case. Alternatively, you can choose one of the test cases from the suggestions. Afterwards you can initiate the copy process by clicking on the button OK.
After clicking on the "OK" button the test steps are copied and added as last test steps of the selected "SMIT Test Case". The copy contains the content of the fields "Title", "Precondition", "Input", "Input screenshot", "Postcondition", "Output" and "Output screenshot" of the selected test step.
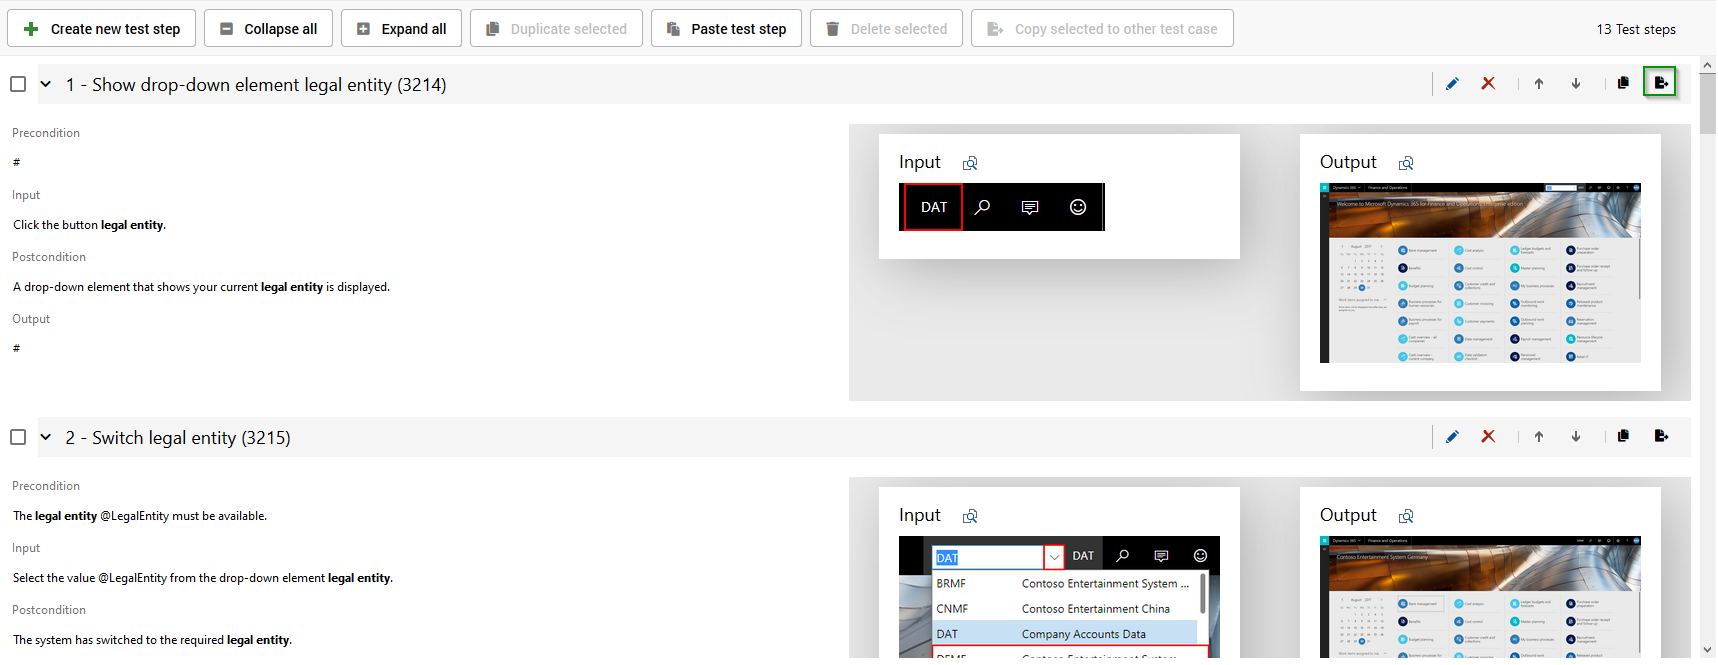
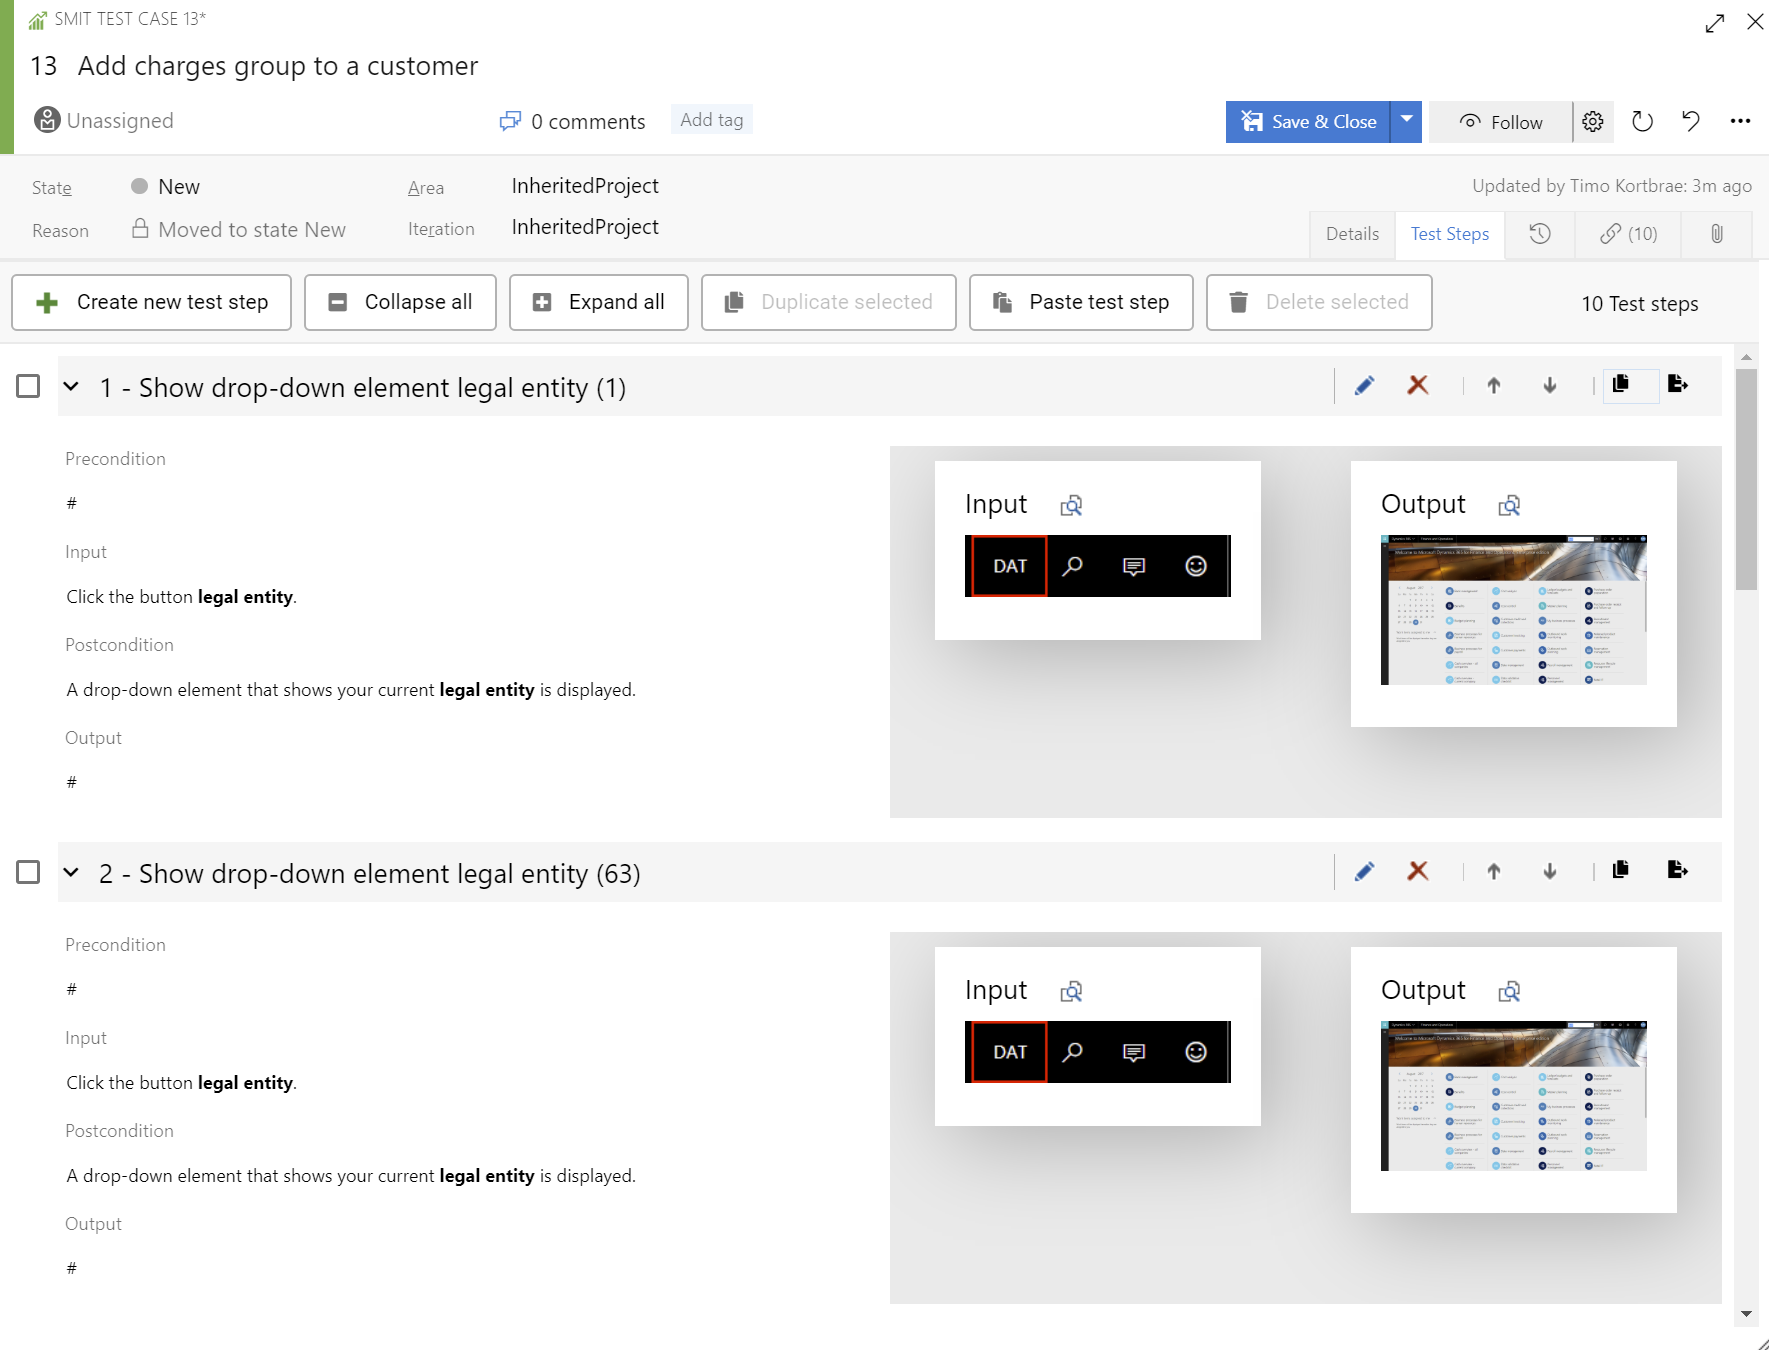
10.4 Duplicate an SMIT Test Step
An SMIT Test Step can be duplicated by clicking on the duplicate button in the Test Steps tab of the SMIT Test Case work item form. The duplicated test step is inserted into the test step list below the original test step.
10.5 Duplicate multiple SMIT Test Steps
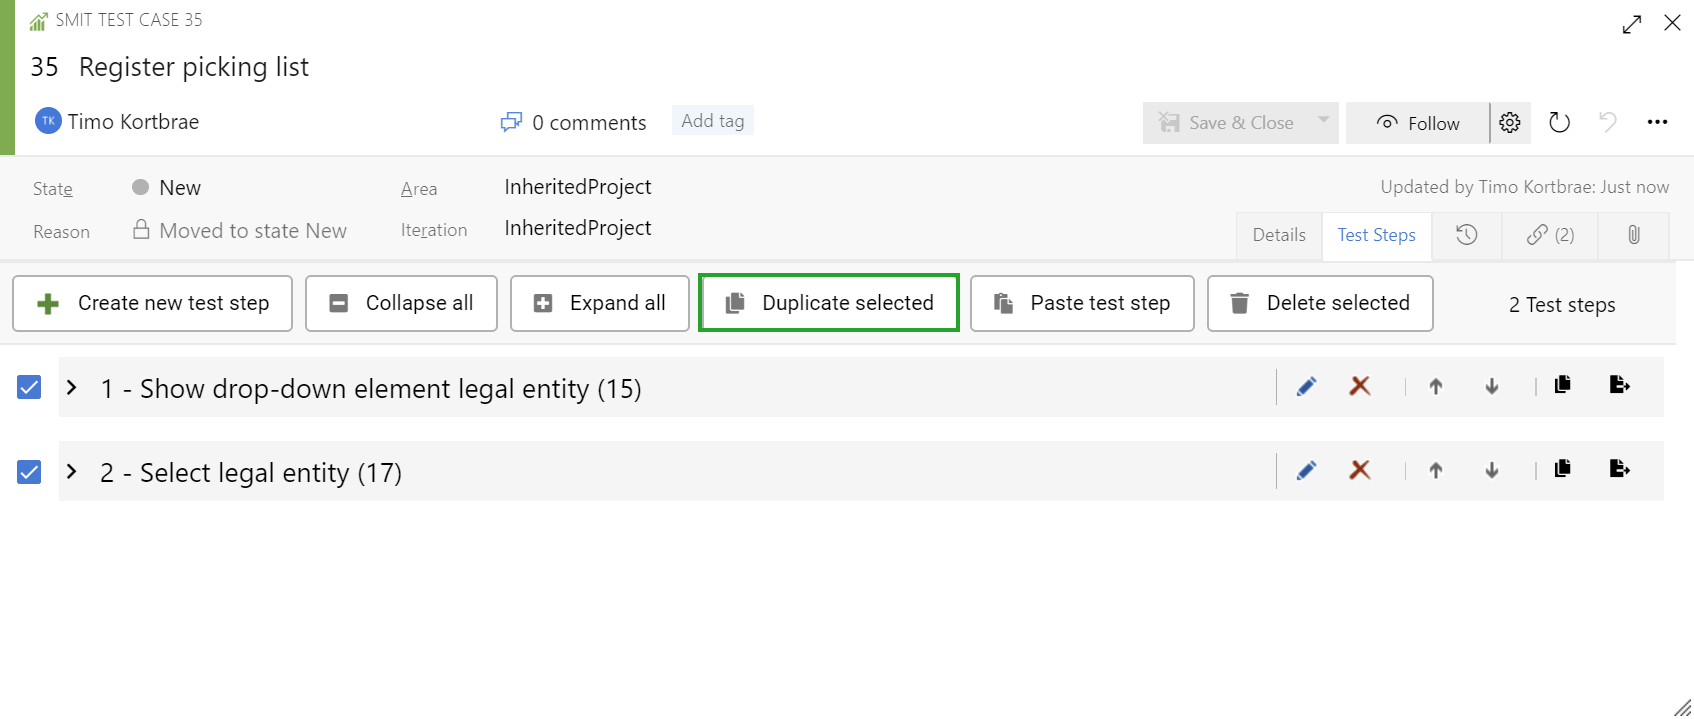
In the SMIT Test Case work item form multiple test steps can be selected by clicking on a checkbox in front of the test step row.
If one or more test step is selected the user can click on a button in the menu bar of the test step list to copy the selected test steps. The copied test steps are added to the back of the test step list.
11 11 - Test case import via XML
11 - Test case import via XML
11.1 TestKit XML import from AX2012
The XML import allows to import xml files of two different formats. The SMIT TestCaseHub import format and the TestKit AX Module export format. It will automatically detect which format is used by the XML files and use the corresponding import service to import the test case. In contrast to the XML import for SMIT TestCaseHub formatted xml test cases, the new import is not validating the xml file before starting the upload as this was already done in the AX module.
11.2 Import test cases via SMIT Test Case XML template
Test cases can be imported using the XML import format which is defined
below.
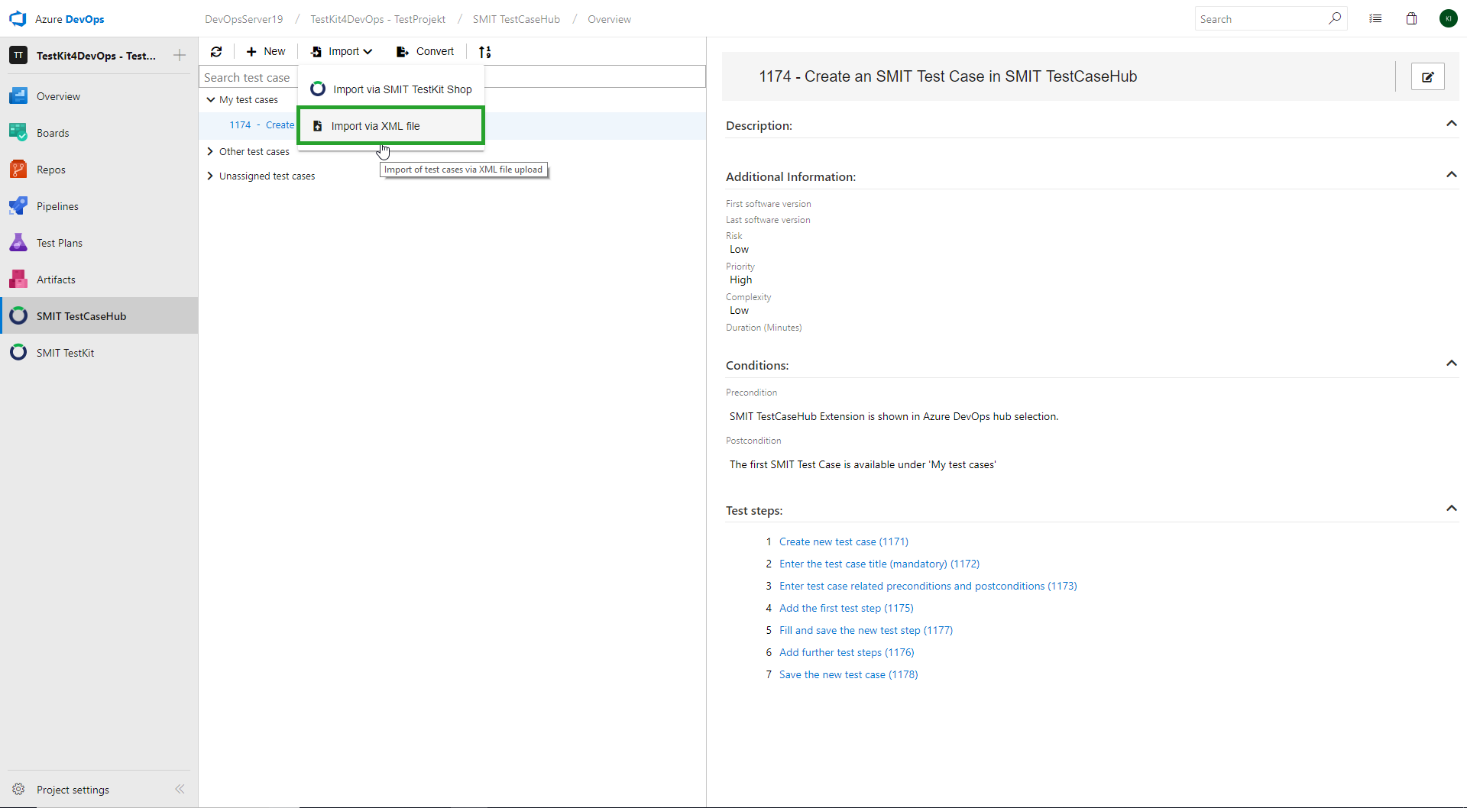
To import test cases via XML you need to click on ‘Import’ and then on ‘Import
via XML file’ in the menu bar.
A dialog opens in the preview area of the SMIT TestCaseHub.
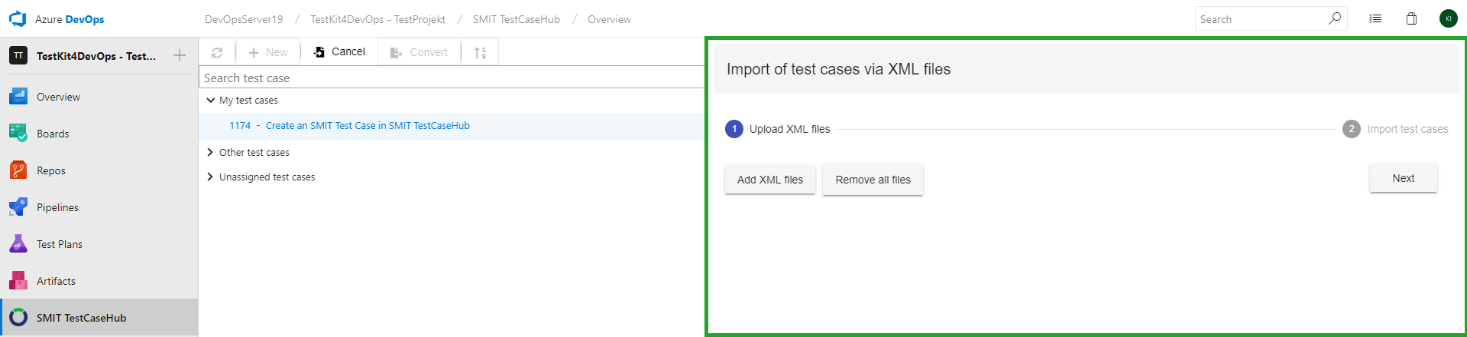
You can import
multiple XML files simultaneously.
After confirmation, a list of successfully imported test cases is displayed in the 'import completed' dialog.
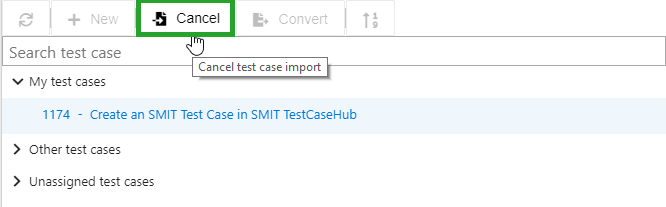
To cancel the import
workflow, click on the button 'Cancel' in the menu bar.
XML format:
<?xml version="1.0"
encoding="utf-8"?>
<TestCase>
<Description>Test
case description</Description>
<Postcondition>Test
case post condition</Postcondition>
<Precondition>Test
case precondition</Precondition>
<Title>Test
case title</Title>
<Language>de-DE</Language>
<FirstSoftwareVersion>First
software version text</FirstSoftwareVersion>
<LastSoftwareVersion>First
software version text</LastSoftwareVersion>
<Risk>High
/ Middle / Low</Risk> <!--
One of the 3 values High, Middle or Low -->
<Priority>High / Middle /
Low</Priority> <!-- One of
the 3 values High, Middle or Low -->
<Complexity>High / Middle /
Low</Complexity> <!-- One
of the 3 values High, Middle or Low -->
<Duration>10</Duration>
<TestSteps>
<!-- Each test step block represents one
test step -->
<TestStep>
<LineNum>1</LineNum>
<!-- Order in which the test steps are added
to the test case (no number should be used twice) -->
<Title>Test
step title</Title>
<Precondition>Precondition
text</Precondition>
<Input>Input
text</Input>
<InputScreenshot>
<Bitmap>base64
encoded png</Bitmap>
</InputScreenshot>
<Postcondition>Postcondition
text</Postcondition>
<Output>Output
text</Output>
<OutputScreenshot>
<Bitmap>base64
encoded bitmap</Bitmap>
</OutputScreenshot>
</TestStep>
</TestSteps>
</TestCase>
Please note: If your TFS or
Azure DevOps Server installation uses an XML process model you need to use
'Hoch', 'Mittel', 'Niedrig' instead of 'High', 'Medium', 'Low' if your work
item installation language is German.
12 12 - SMIT Marketplace test case import
12 - SMIT Marketplace test case import
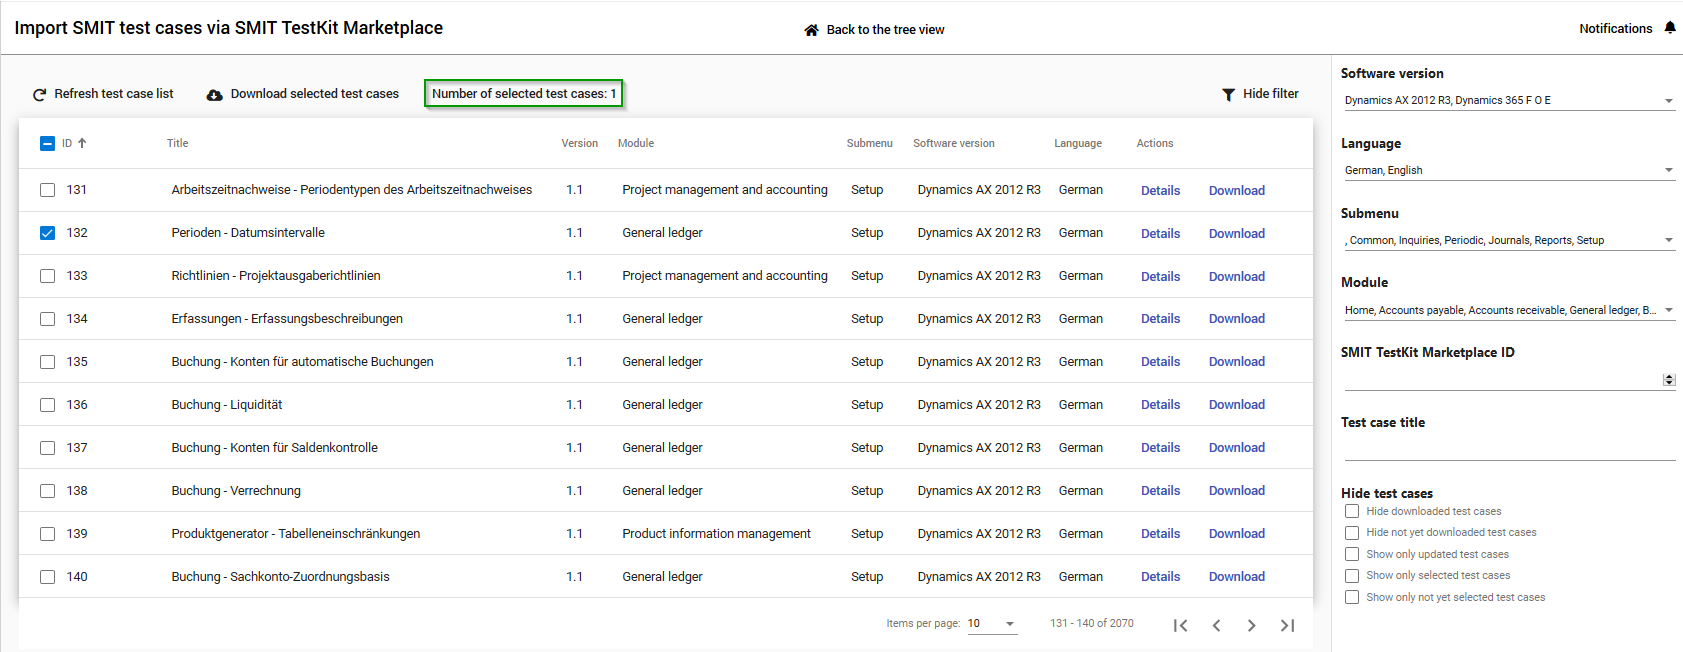
12.1 Import SMIT TestKit test cases from the SMIT TestKit Marketplace
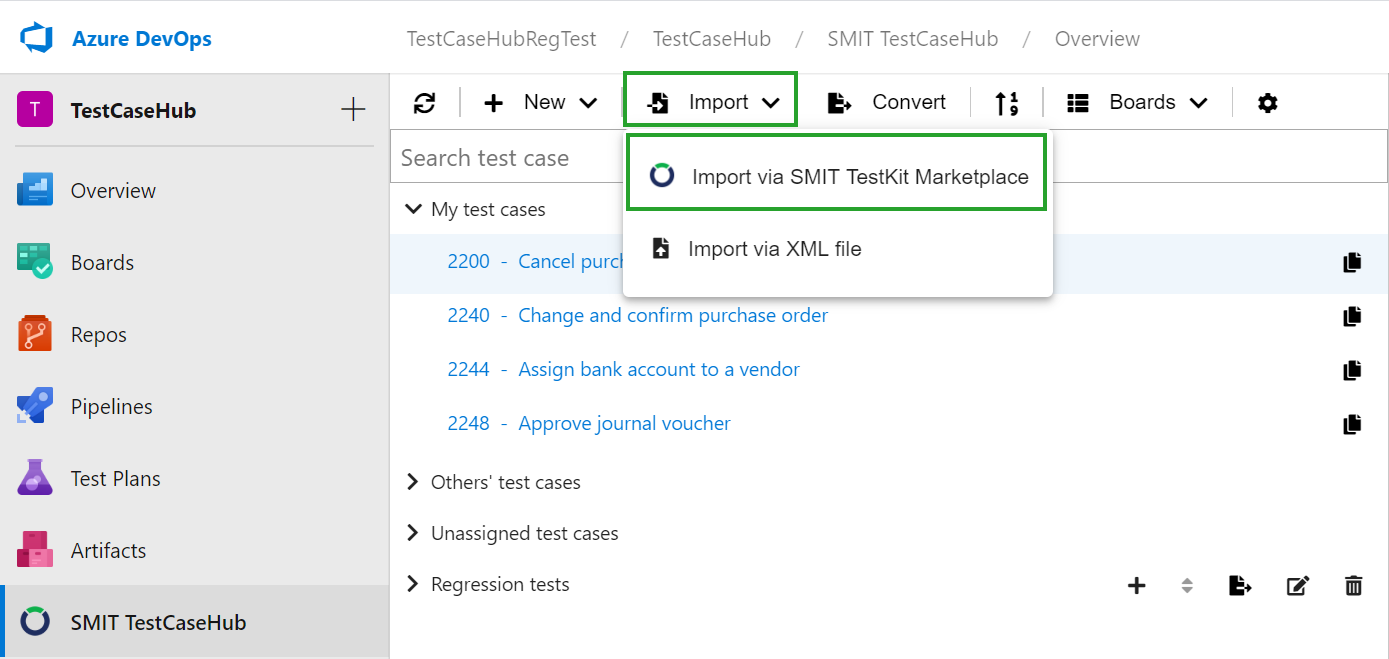
To import an SMIT TestKit Test Case for Microsoft Dynamics 365 Finance
and Operation or Microsoft Dynamics AX 2012 from the SMIT TestKit Marketplace, select
'Import via SMIT TestKit Marketplace' in the import drop down. The extension SMIT TestCaseHub will automatically do the SMIT TestKit Marketplace login using your license key.
After the login is finished you can select
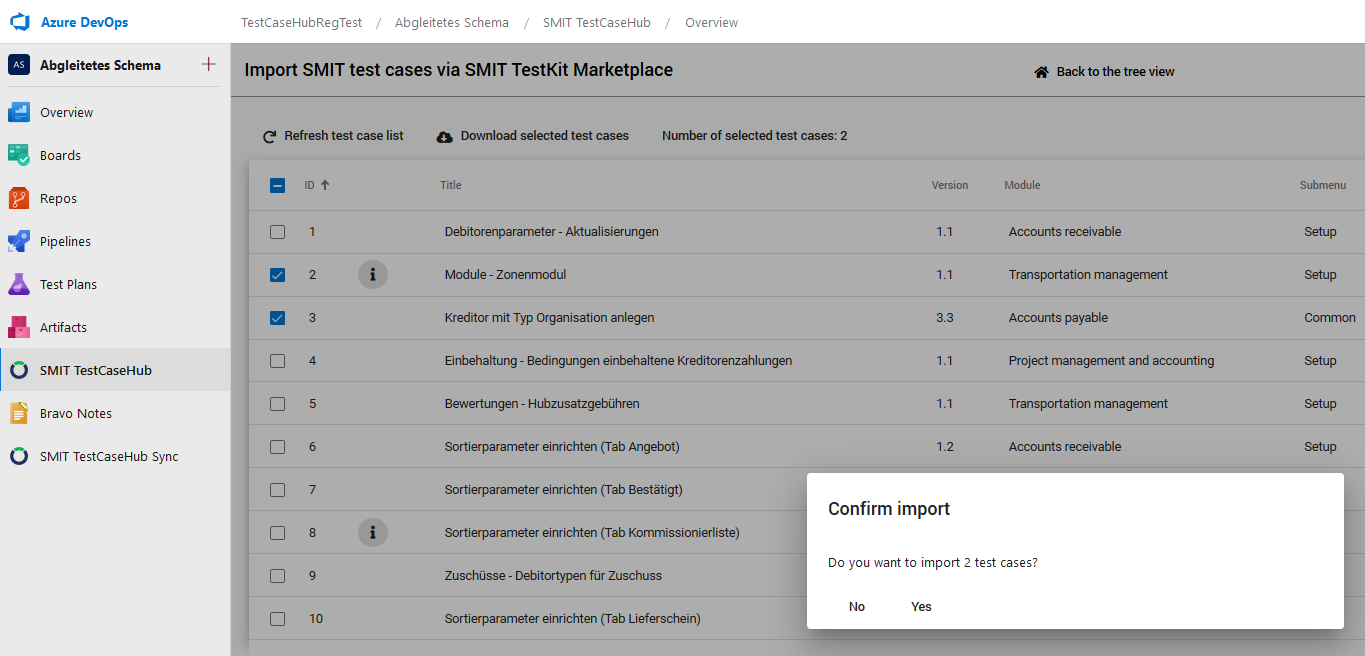
one, multiple or all test cases in the shown table. The currently selected number of test cases is shown within the button 'Number of selected test cases'. Clicking on 'Download selected test cases' or on 'Download' in the table row of a single test case will open a dialog where you have to confirm that the selected test cases should be downloaded.
In the last step you need to confirm that the selected test cases should
be imported. Clicking ‘Yes’ will download and create the selected test
cases in your system. This includes all screenshots, test steps and the test
cases. A progress bar indicates the progress of the download after it was started. While the import is running you need to stay on the page until it is finished but in the mean time you can continue to browse through the available test cases.
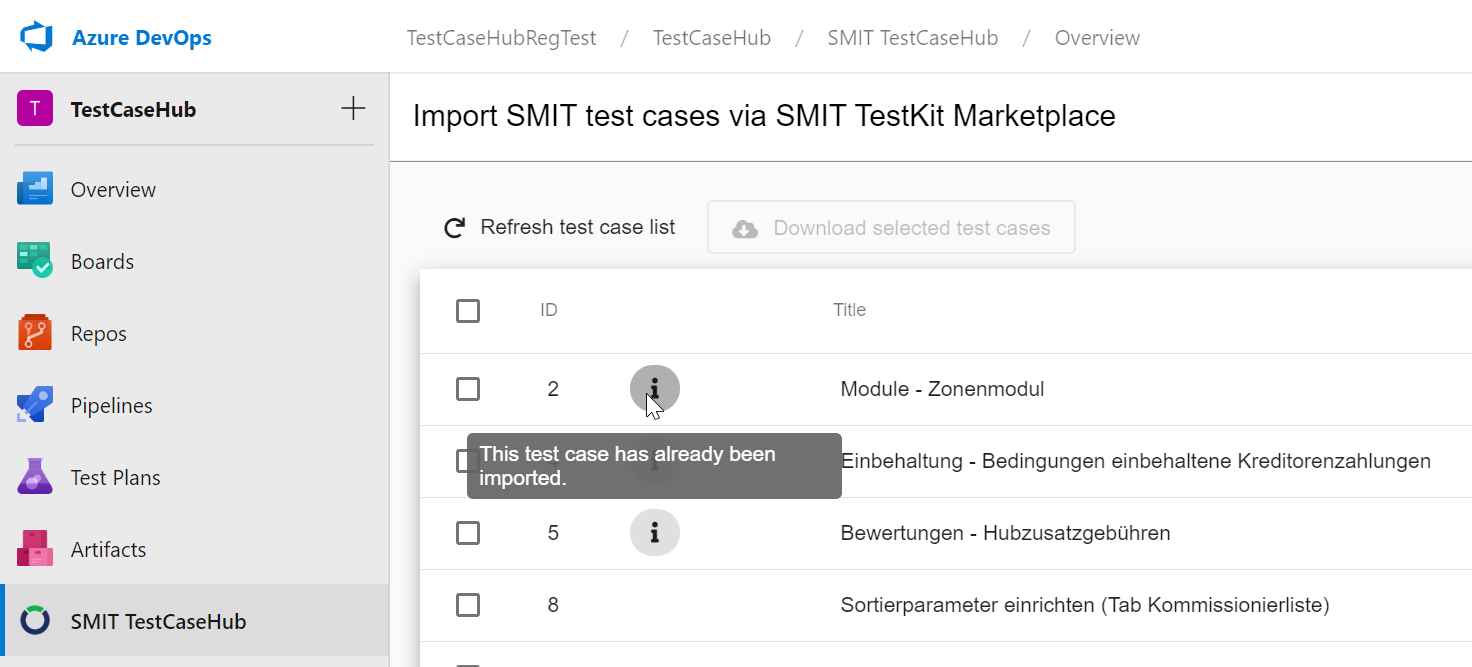
If you already imported test cases from the SMIT TestKit Marketplace you will
see an icon next to the test case id. You can still download the test case again in case a newer version is available or you changed the test case. The import always creates new SMIT Test Case work items. Therefore, already imported test cases will never be
overwritten if the same SMIT TestKit Marketplace test case is imported again.
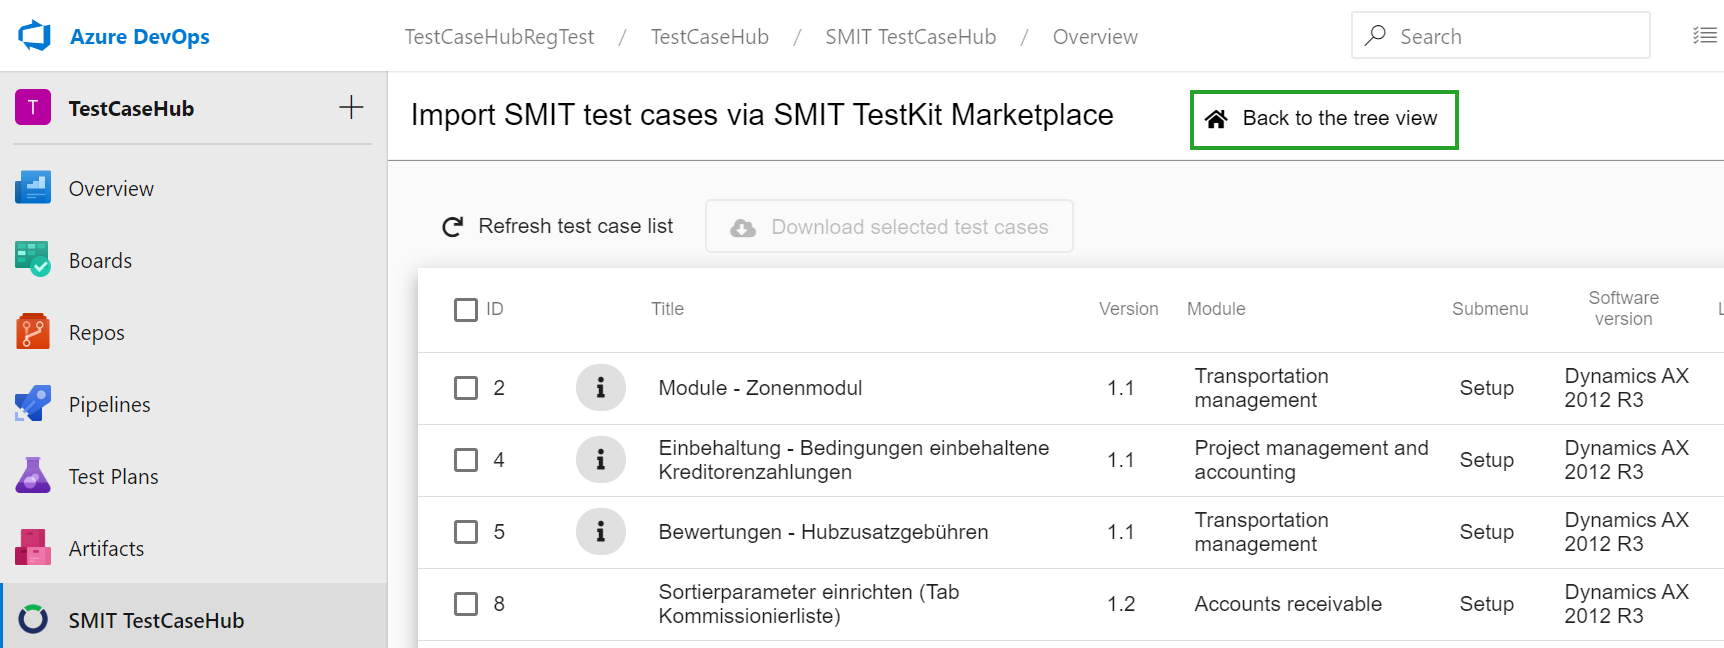
To go back to the tree view, click the button 'Back to the tree view' in the menu
bar.
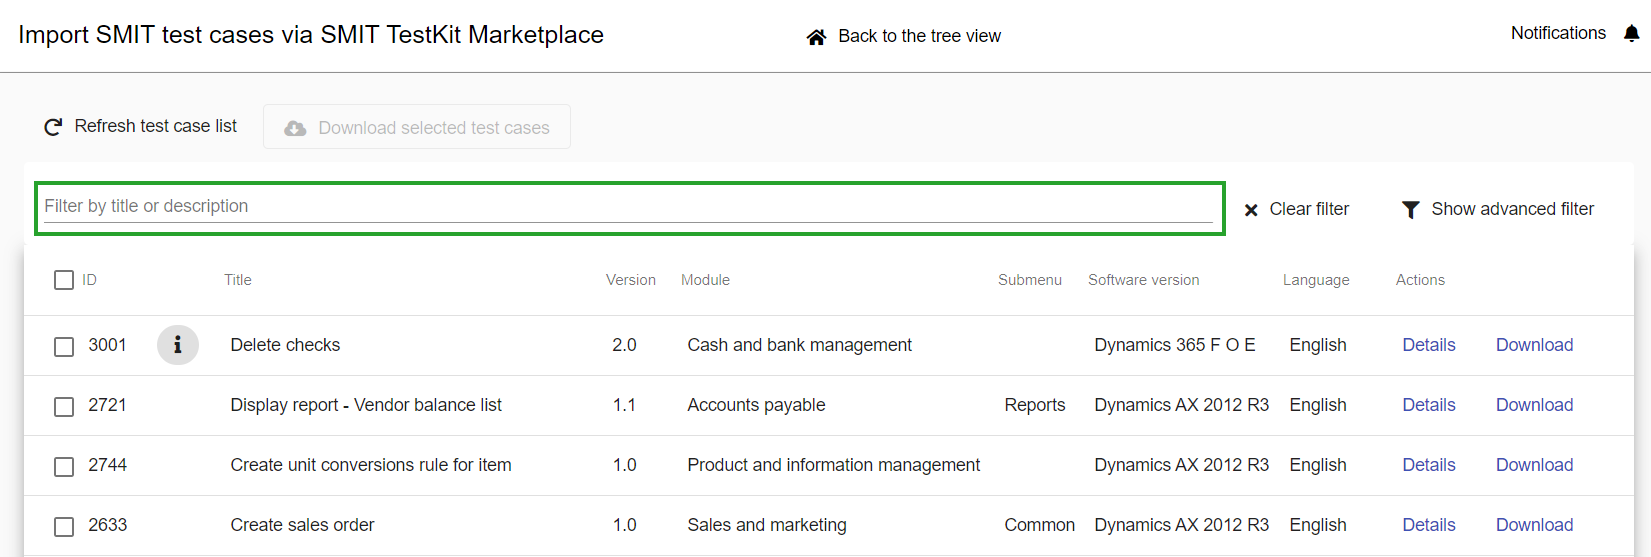
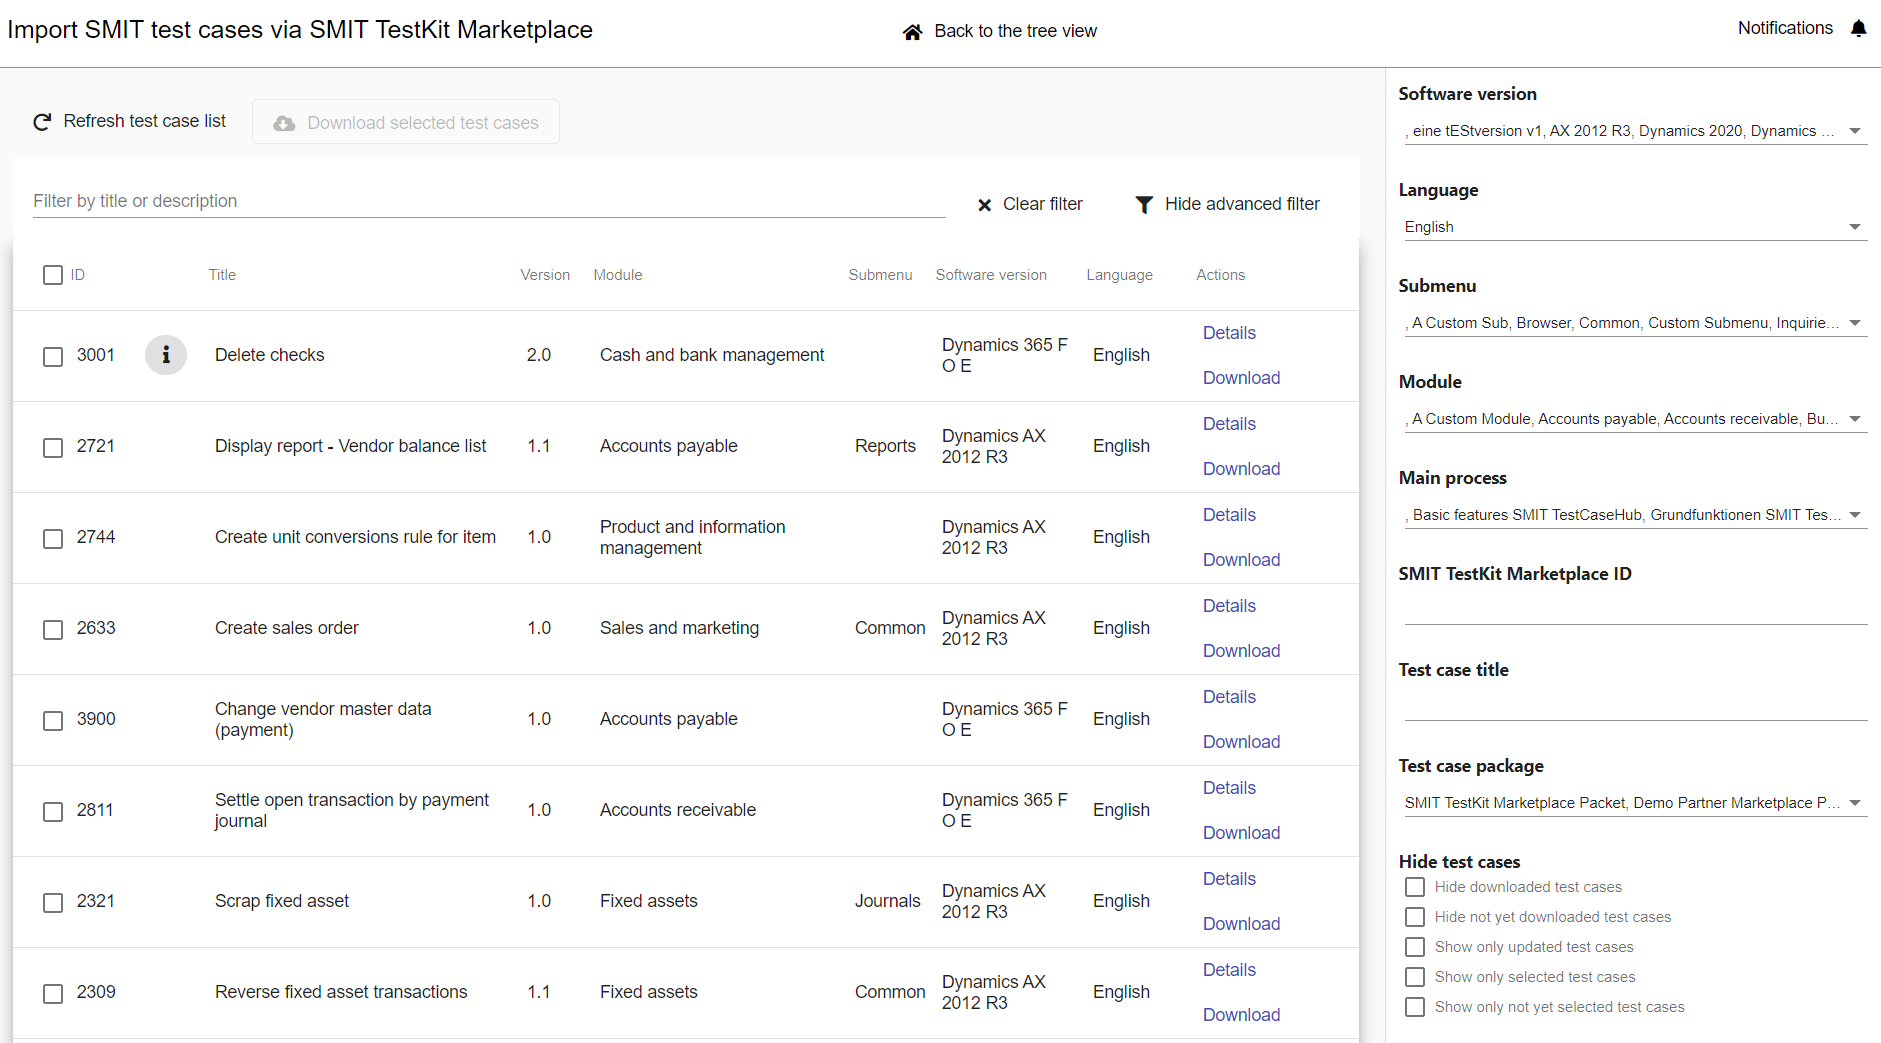
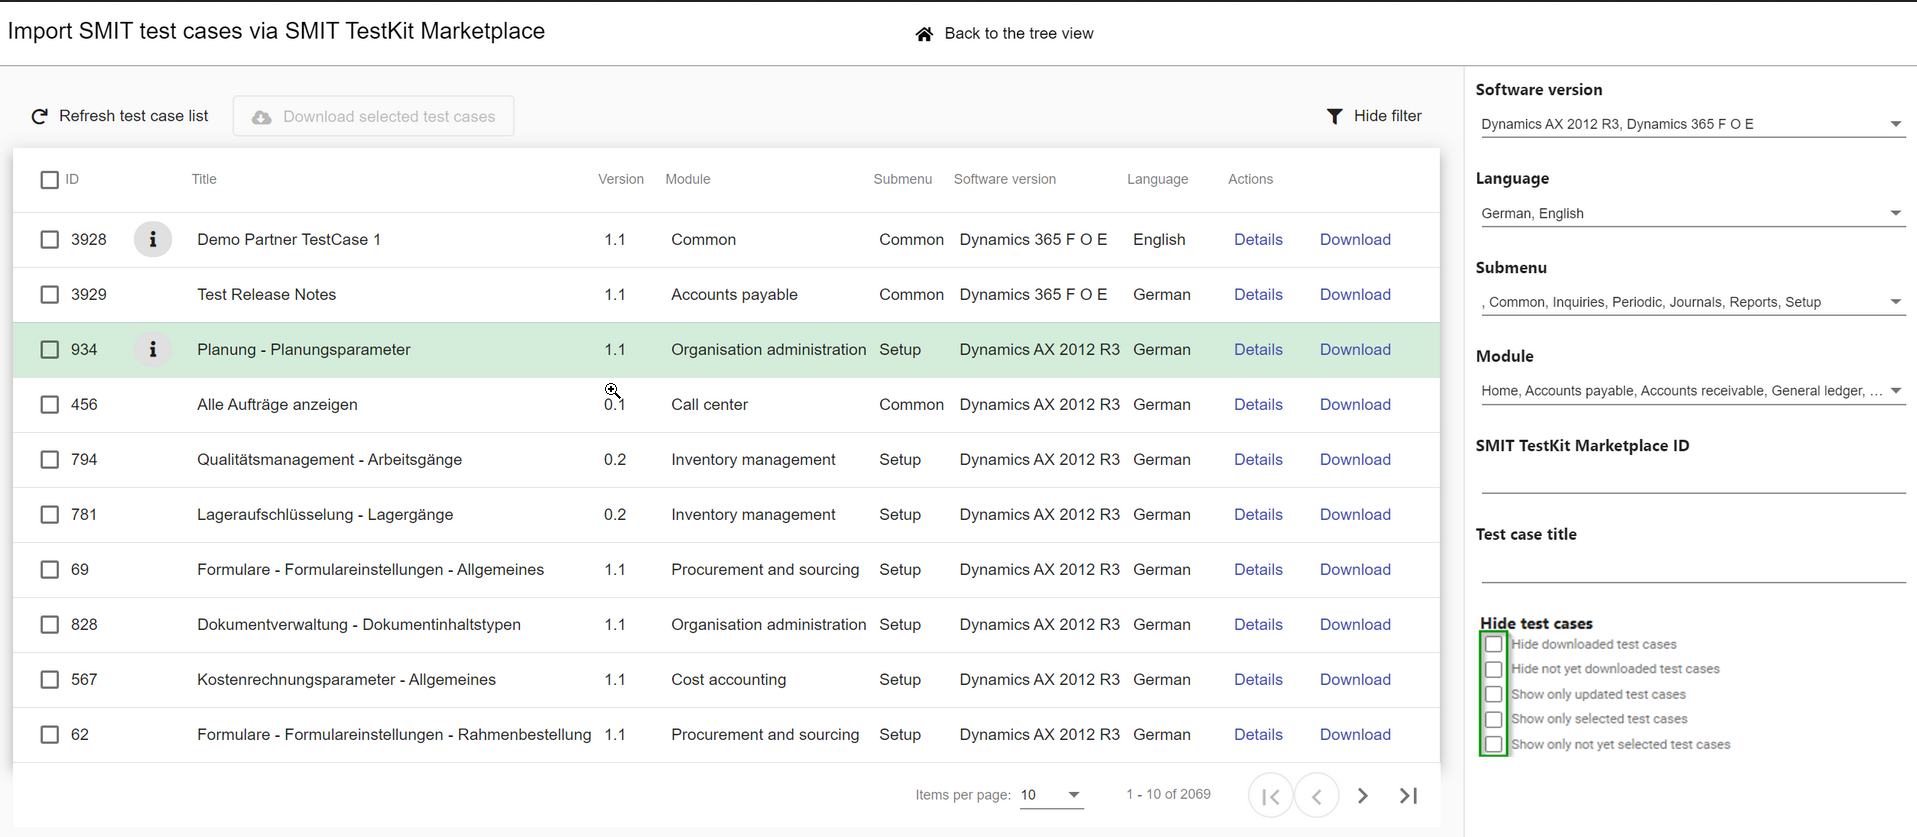
12.2 Import - Search and filter for a TestKit Test Case in the TestKit Shop Database
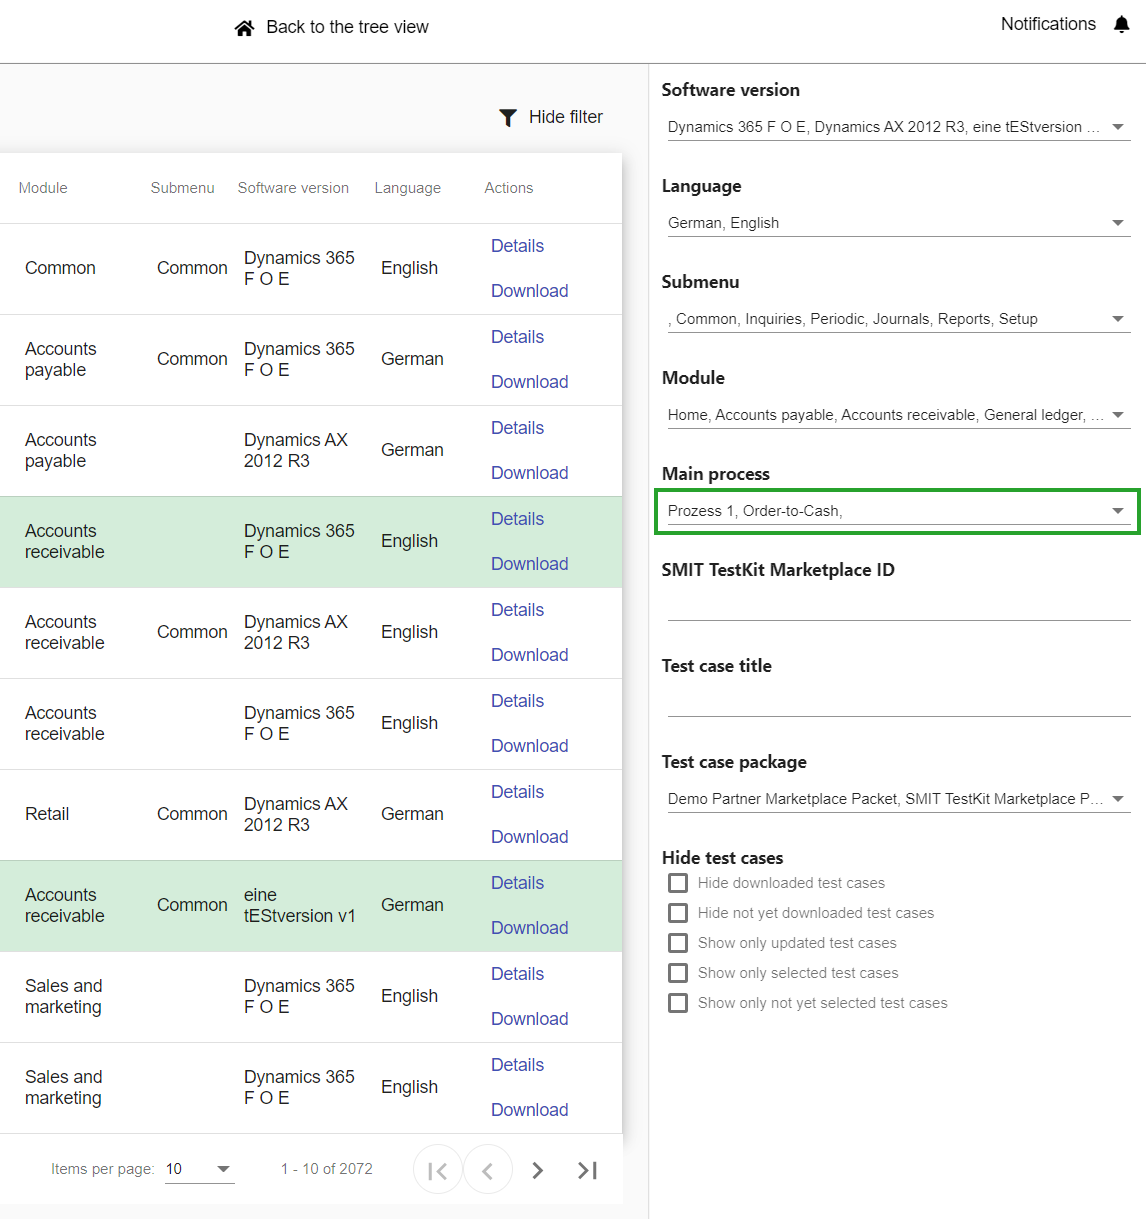
Several filter options can be used to find the desired test cases in the SMIT Marketplace.
On the start page, you can search for test cases directly by title or description.
In addition, an extended filter can be opened or the
Clear Filter button can be used to delete all currently set filters.
Clicking on Show advanced filter in the SMIT Marketplace import will display multiple filter options to make the test case selection easier.
With the filters 'Software version', 'Language', 'Submenu', 'Module' you can reduce the test case list so that only test cases containing the selected values are displayed. The 'SMIT TestKit Marketplace ID' and 'Test case title' filters will search for all test cases that contain the given filter value in the ID or title field.
You can choose to hide all test cases that are already imported or to hide all test cases that were not imported yet.
If a test case is updated in the marketplace it is highlighted with a green background in the list. It is possible to filter for all updated test cases to be able to download them again.
The Marketplace ID and TestCaseHub ID filters support the input of multiple IDs if they are seperated with a comma.
It is also possible to filter for only selected test cases or only not yet selected test cases.
The button 'Number of selected test cases' also allows to filter for only selected test cases.
12.3 Deliver tree view nodes and test cases
Additionally to single test cases you can download a set of test cases from the SMIT Marketplace. They are listed below the test case list in the section Tree view packets.
A tree view packet contains tree view nodes and test cases that are added to your local tree view after the download.
By clicking on the button Preview you can open a preview of the tree view packet. It shows which tree view nodes and test cases are part of the packet.
If you choose to download a packet you need to click on the button Download for the corresponding packet.
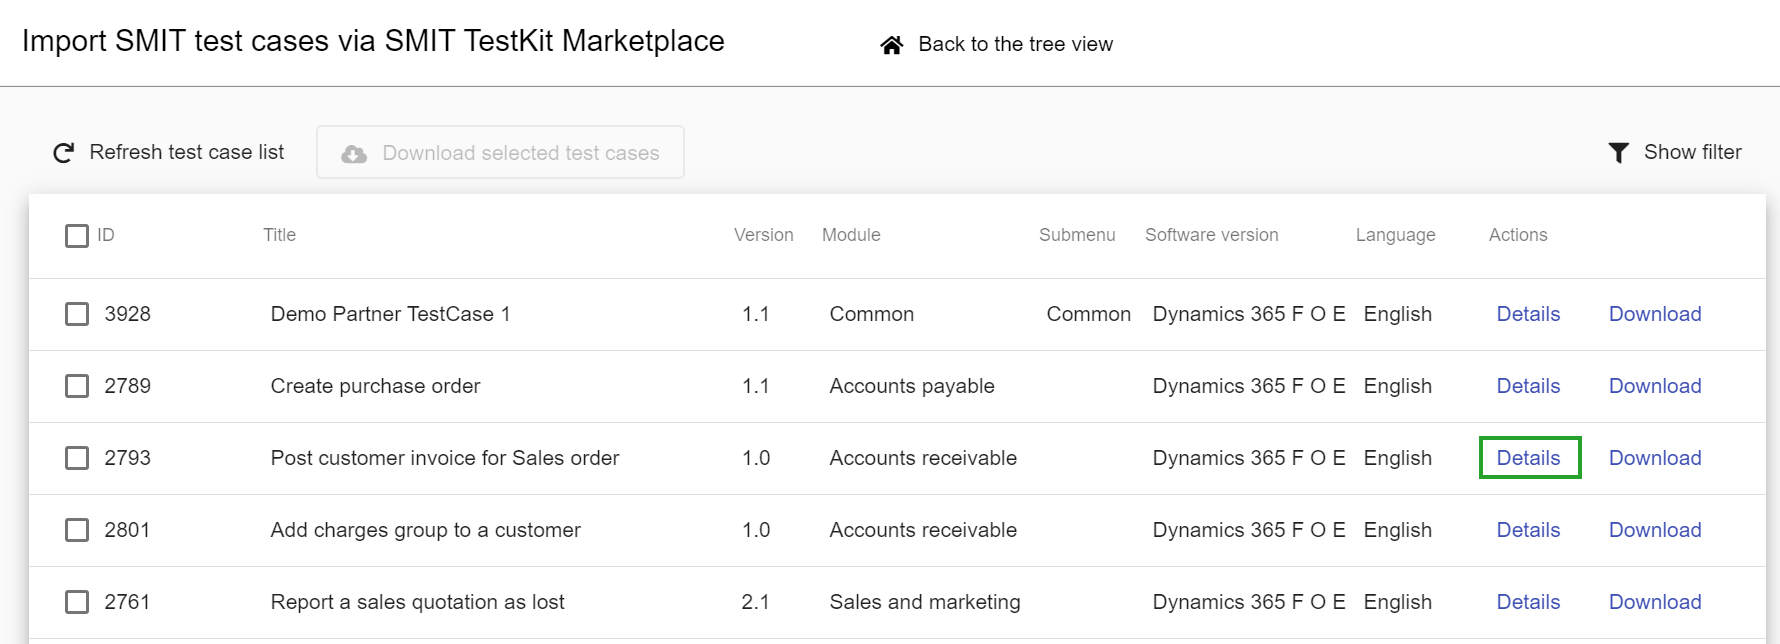
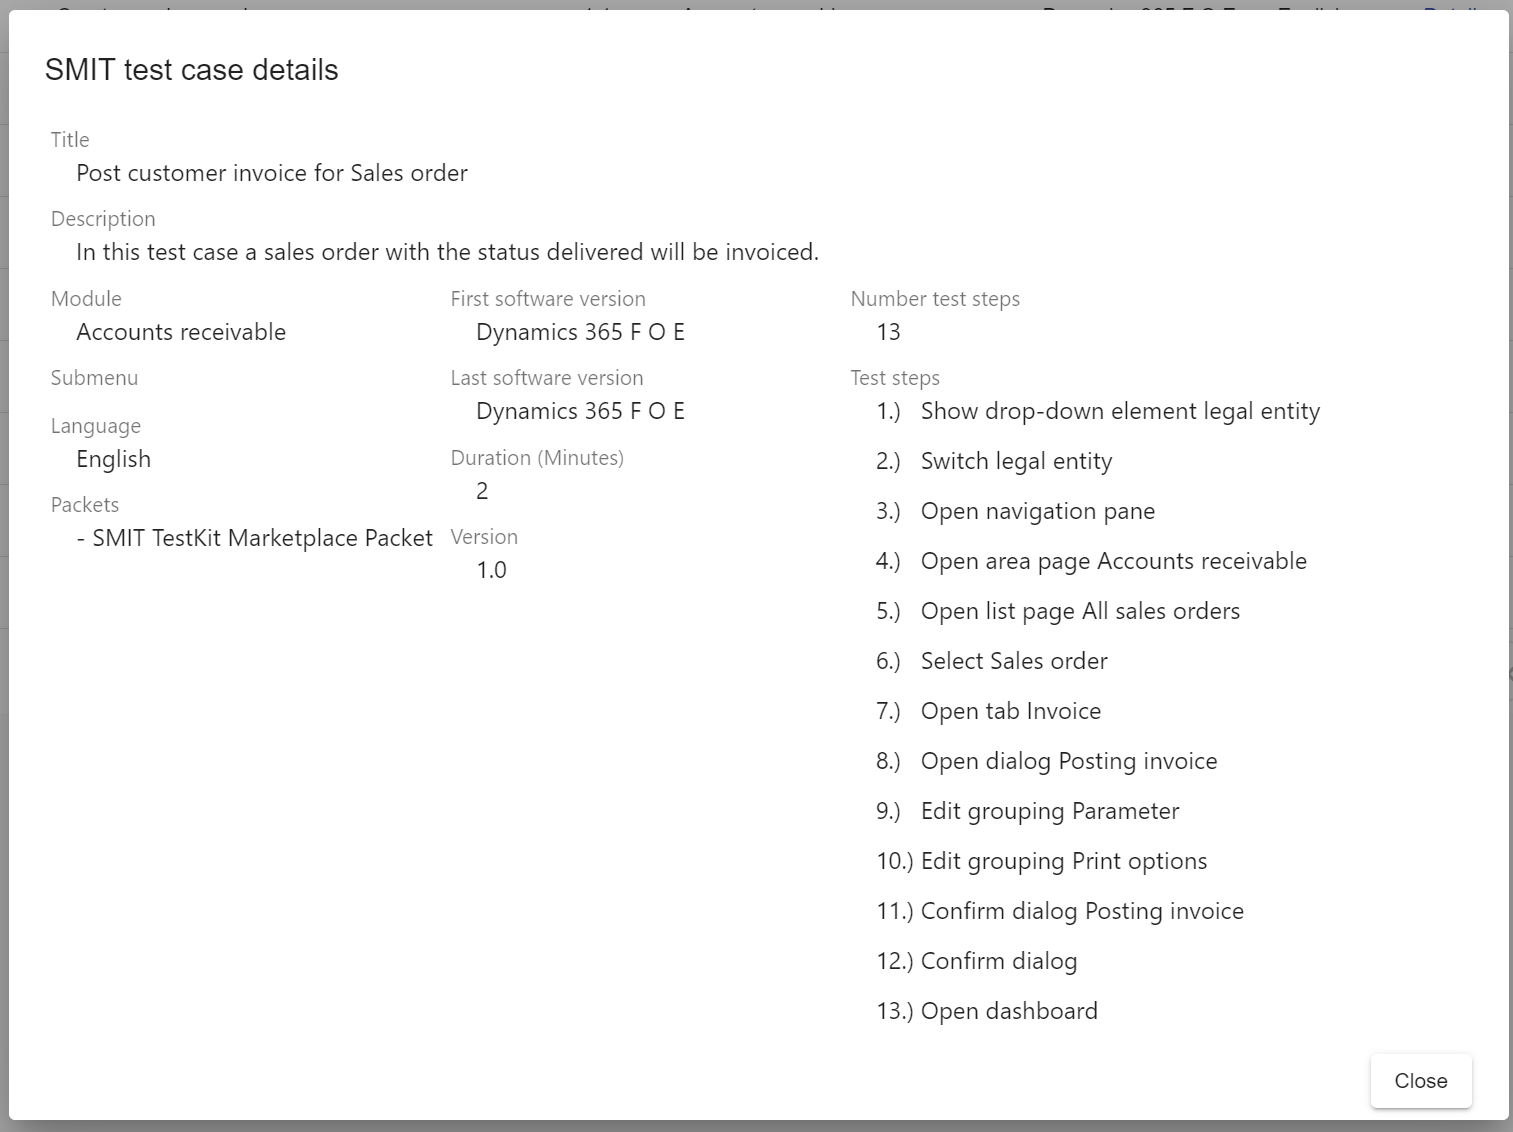
12.4 Import preview for TestKit Test Cases
In the SMIT Marketplace import page you can open a preview version of the test cases by clicking on the button 'Details' in the 'Actions' column.
The preview includes general information about the test case such as title, module and version as well as the number of test steps, the test step titles and the marketplace packets to which it belongs.
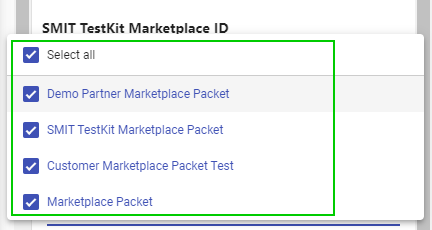
12.5 SMIT TestKit filter for Sub-Sets and Partner Packages
The user can now filter for different packages in the SMIT TestKit Marketplace. The packages in the drop down element are related to the test case packages. 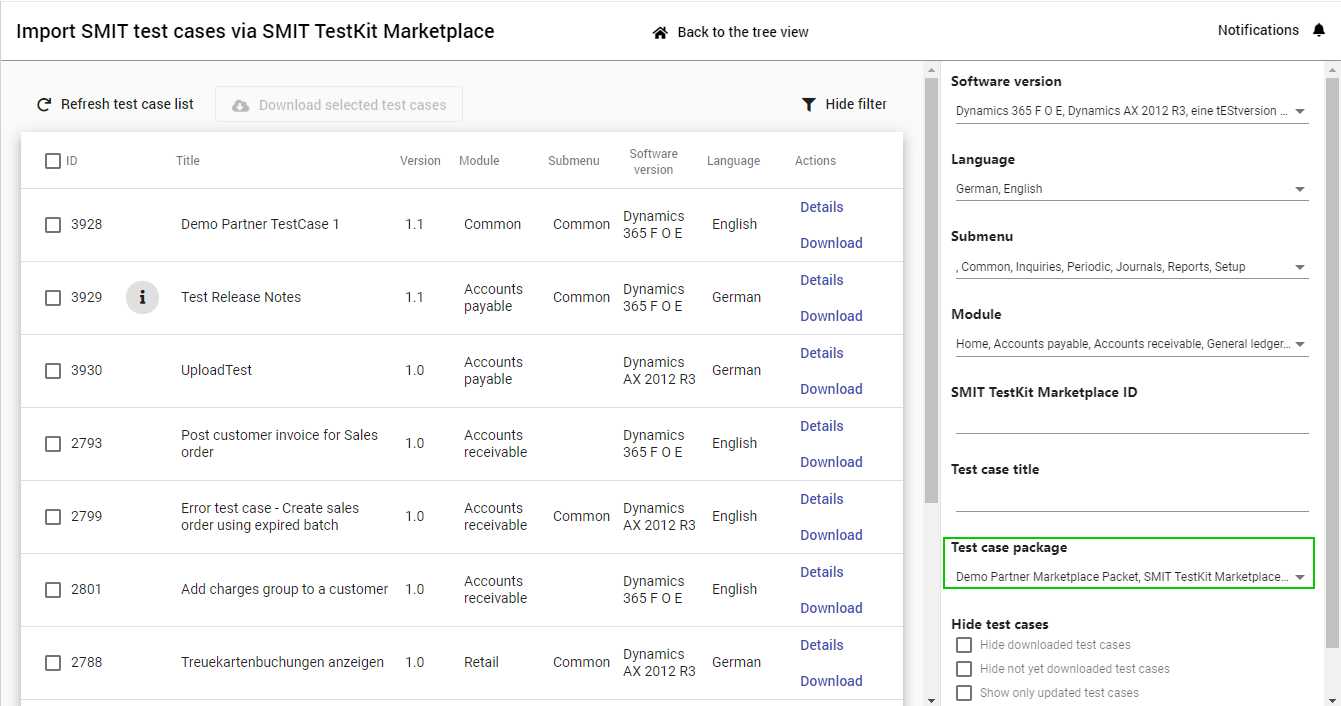
13 13 - Test case creation process
13 - Test case creation process
13.1 Board for SMIT Test Cases
The SMIT TestCaseHub extensions adds a new backlog level for SMIT Test Cases which is activated in the projects that use the SMIT TestCaseHub extension. This adds a new board to your Azure DevOps Boards area which can be used to visualize the status of your SMIT Test Cases.
An example quality management process including states was introduced to the SMIT TestCaseHub board.
14 14 - User settings
14 - User settings
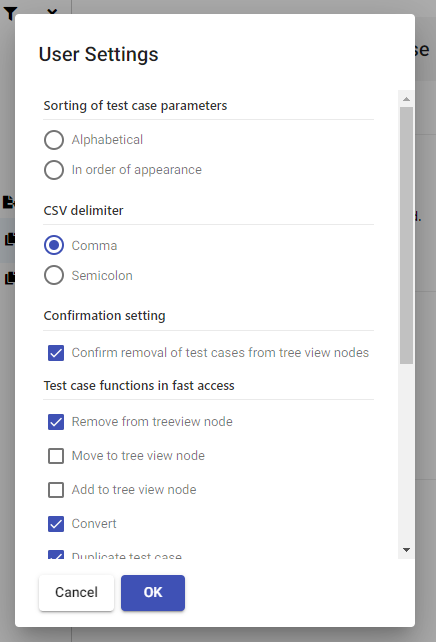
14.1 User settings page
The user can open a settings dialog using a button in the menu bar. Using this dialog the user can set user specific configurations for the SMIT TestCaseHub extension. The settings dialog includes the following options:
- Sorting of test case parameters (in the overview on the right side of the tree view)
- CSV delimiter (delimiter of parameter values in .csv files)
- Confirmation setting (show the confirmation dialog when removing (not deleting) test cases from a tree view node)
- Test case functions in fast access (buttons to display on test cases in the tree view directly or in the more menu of the test cases)
- Treeview node functions in fast access (buttons to display on tree view nodes directly or in the more menu of the nodes)
- Search setting (trigger the search in the search bar only when hitting the enter key)
15 15 - Installation instructions
15 - Installation instructions
15.1 How to handle problems with system process templates during installation
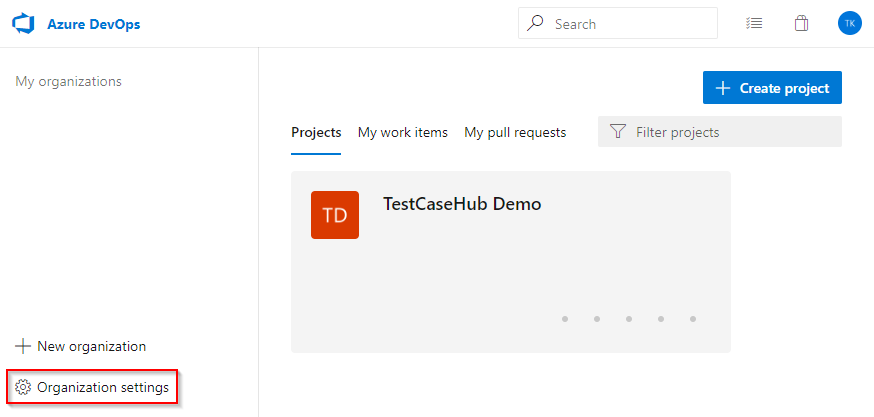
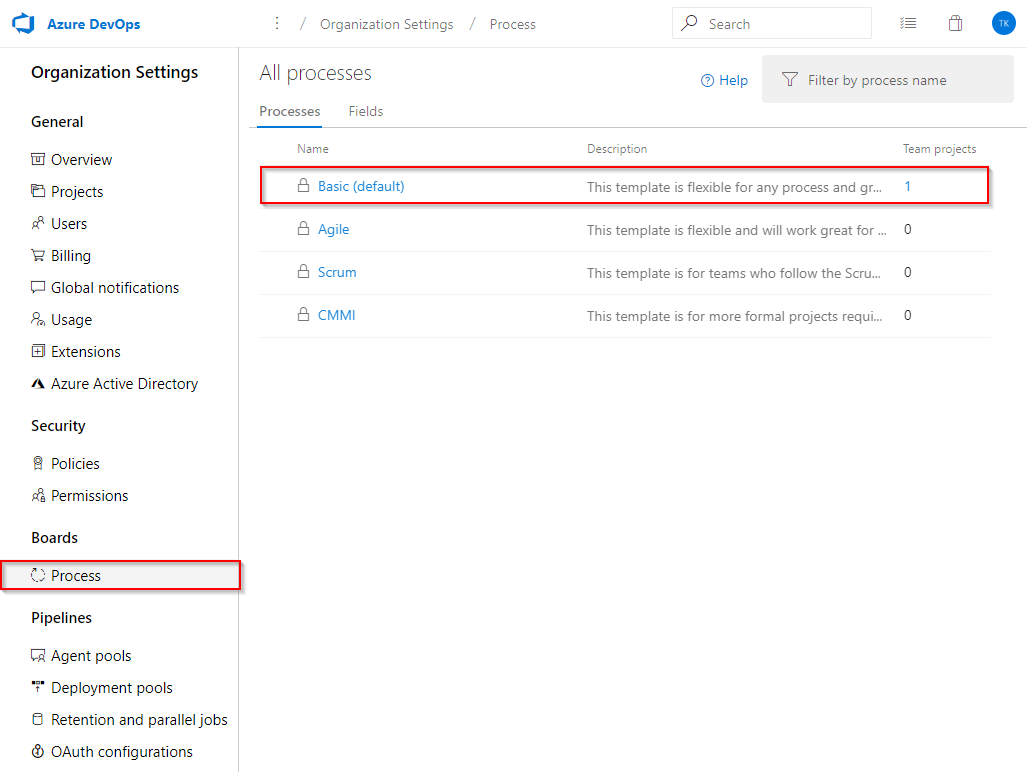
Open organization settings
Open the start page of your Azure DevOps system and click on "Organization settings".
Open processes page
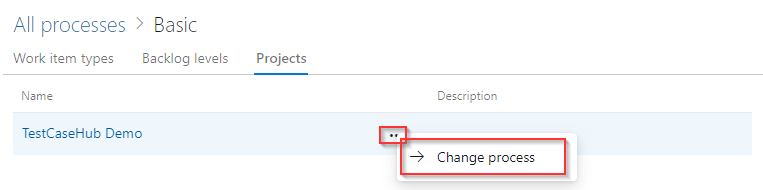
Under "Boards", click on "Process" to open the "All processes" page. Identify the process to which your project is currently assigned. The "Team projects" column shows the number of assigned projects. Clicking on the number opens a list with the project names. In this example, the project is assigned to the "Basic (default)" system process.
Open process settings
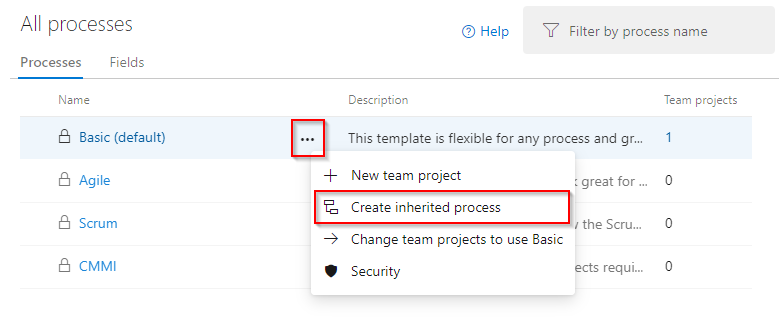
Open the process menu by clicking on the highlighted button and then click on "Create inherited process".
Create inherited process
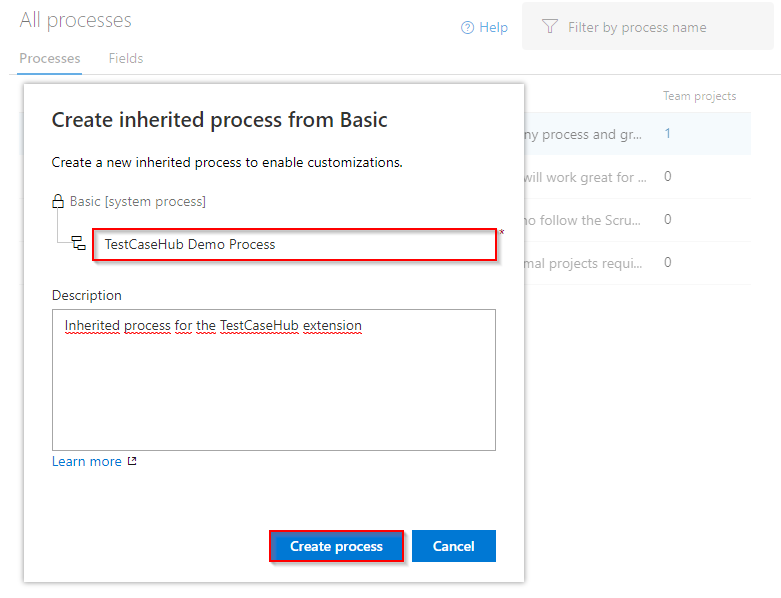
In the highlighted field, enter a name for the derived process. Then click on the "Create process" button.
Show project
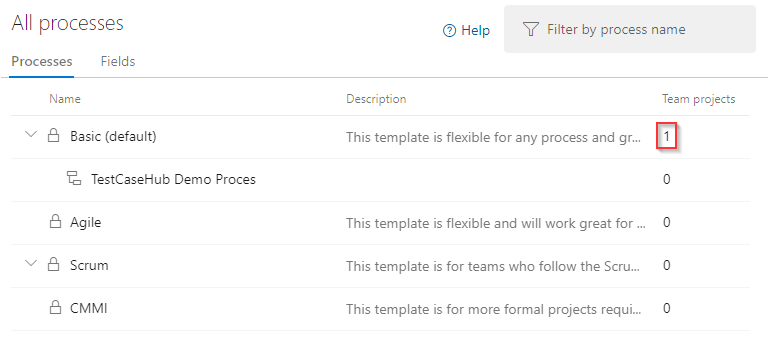
Click on the number in the column "Team projects" of the system process to which your project is associated.
Change process
Open the context menu for the project with the name @YourProjectName and then click on the button "Change process".
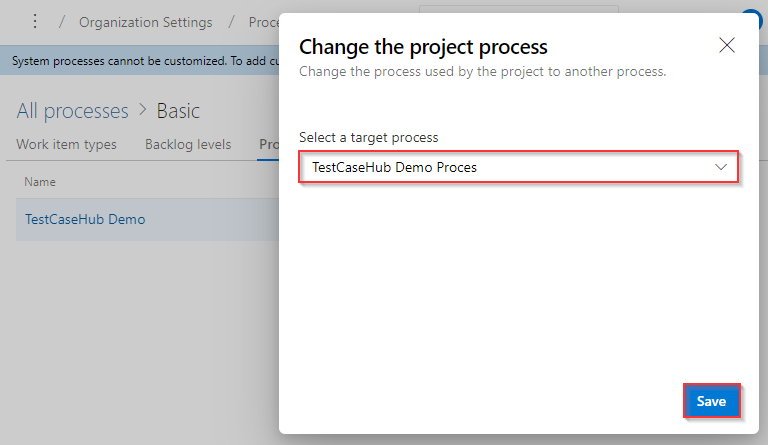
Select target process
In the "Select a target process" drop-down menu, select the target process that you created earlier and click on the button "Save".
Close dialog
Click on the button "Close".
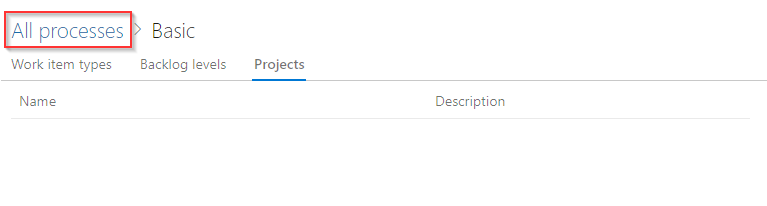
Switch back to the page "All processes"
Click on "All processes" to switch back to the page "All processes".
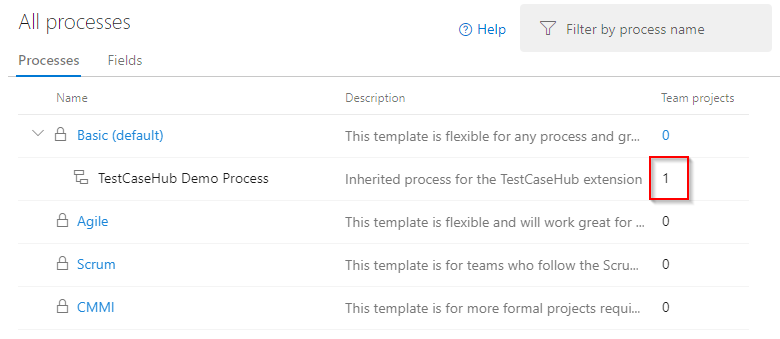
Verify the process change
The project should now be assigned to the new process. You can verify this by looking at the list of team projects in the new process and searching for your team project there. You can now go back to your team project and load the extension SMIT TestCaseHub.
16 16 - Subscription management
16 - Subscription management
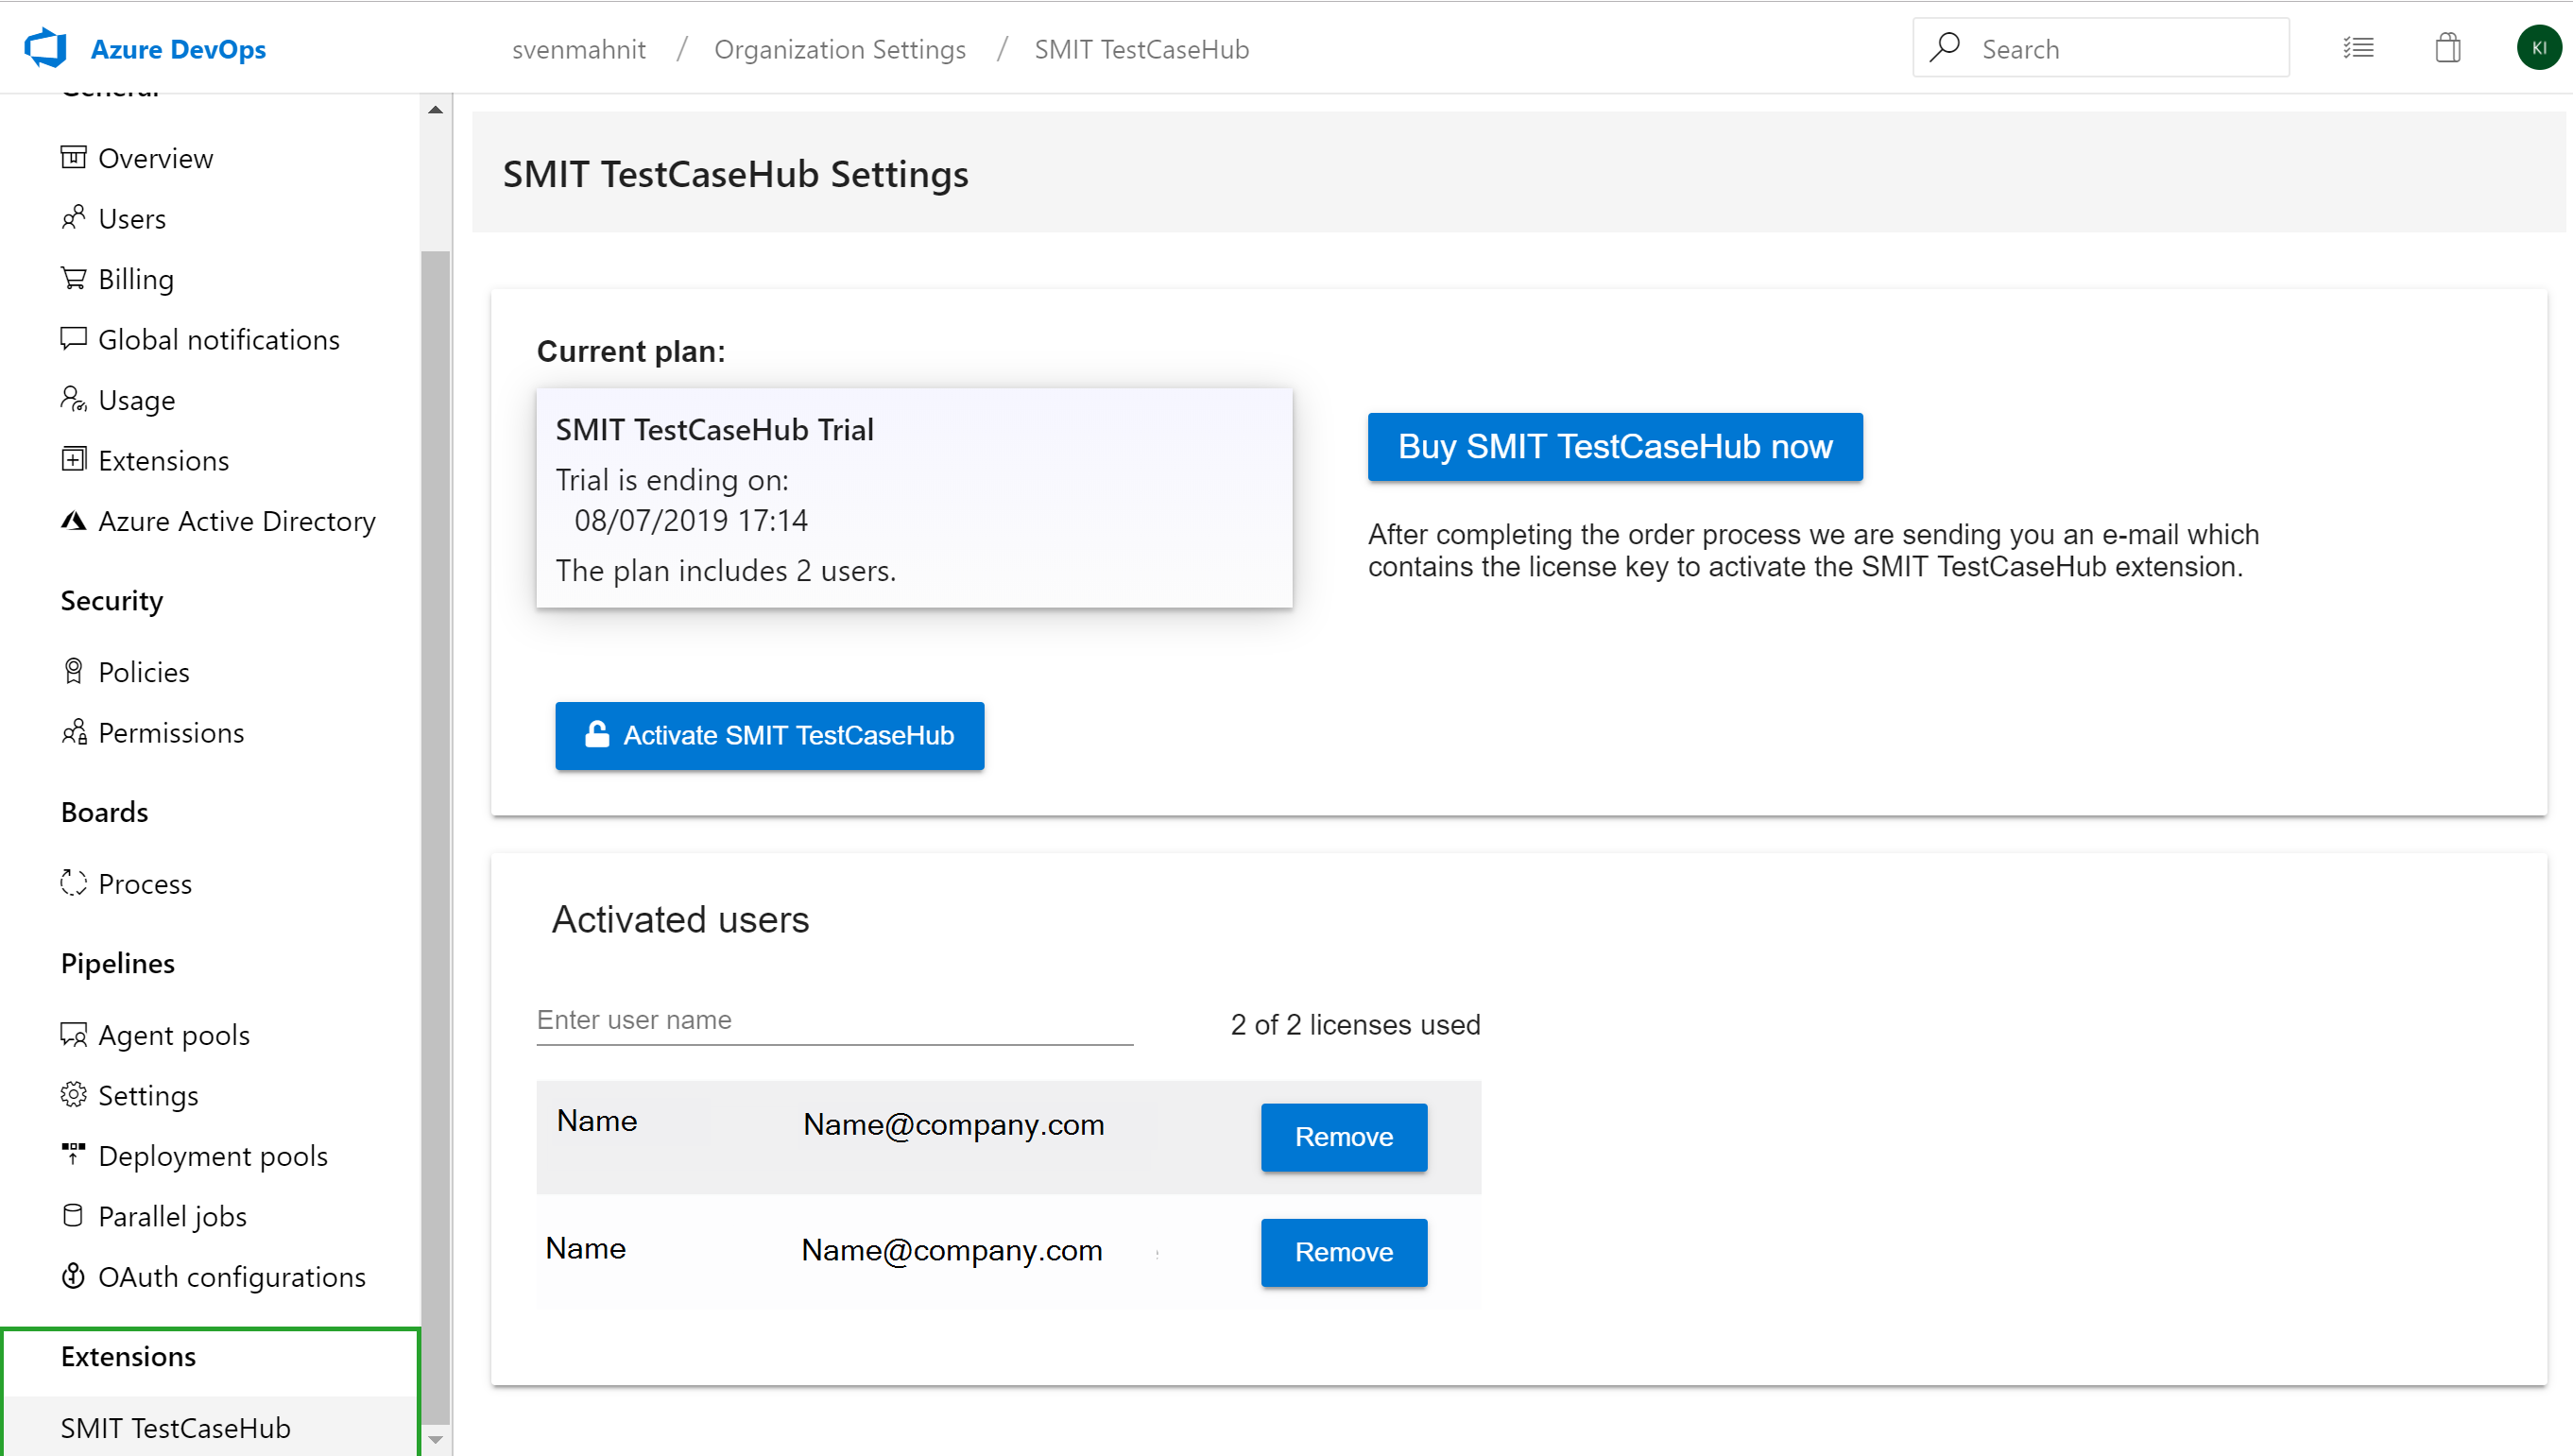
16.1 Subscription management – Overview and trial
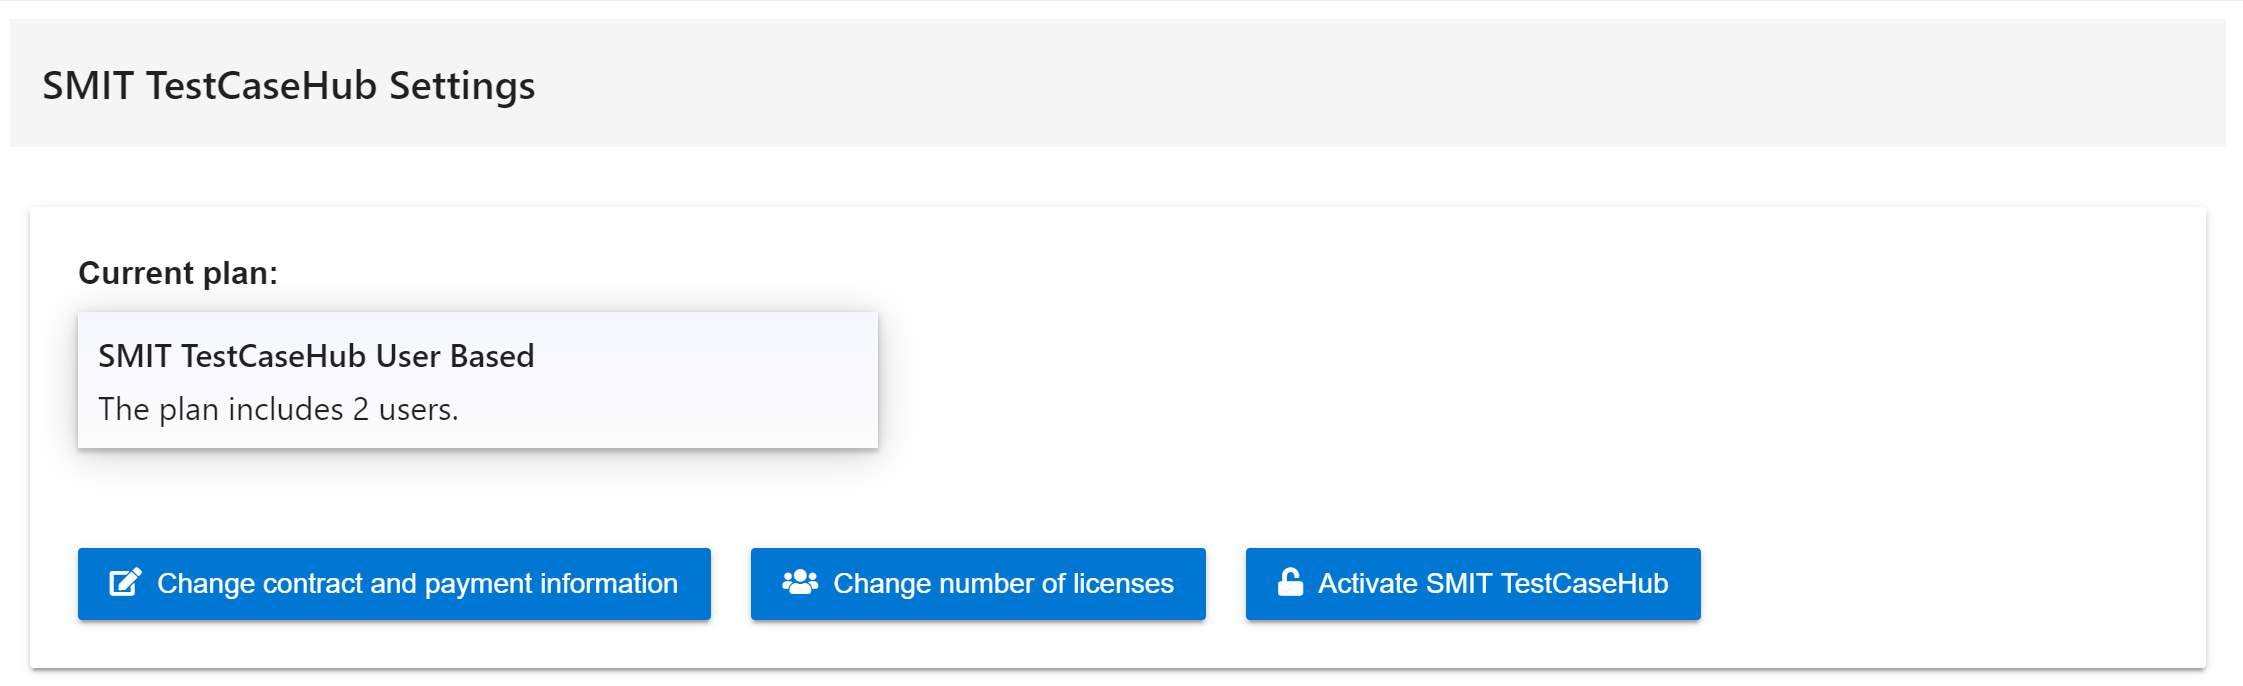
The license for the SMIT TestCaseHub extension is managed from within the extension. You can find a page to manage or buy SMIT TestCaseHub licenses in your organization settings page under the tab 'SMIT TestCaseHub' after installing the extension.
It is structured in multiple groups with the first one allowing to buy or activate a license, the second one to assign your organization users to the license and a third one to increase or decrease the number of user licenses, which is only visible in the licensed mode.
After opening the settings page a 30 day trial license will be activated automatically. In the first group the extension will show you the plan you are currently on with the end date (if applicable) and the number of included users. A trial license can be used by 2 users.
Next to the box which shows the current plan you can find the button 'Buy SMIT TestCaseHub now'. The button forwards you to the order portal for the SMIT TestCaseHub. You need to specify your personal and payment information there.
16.2 Subscription management – Ordering and license activation
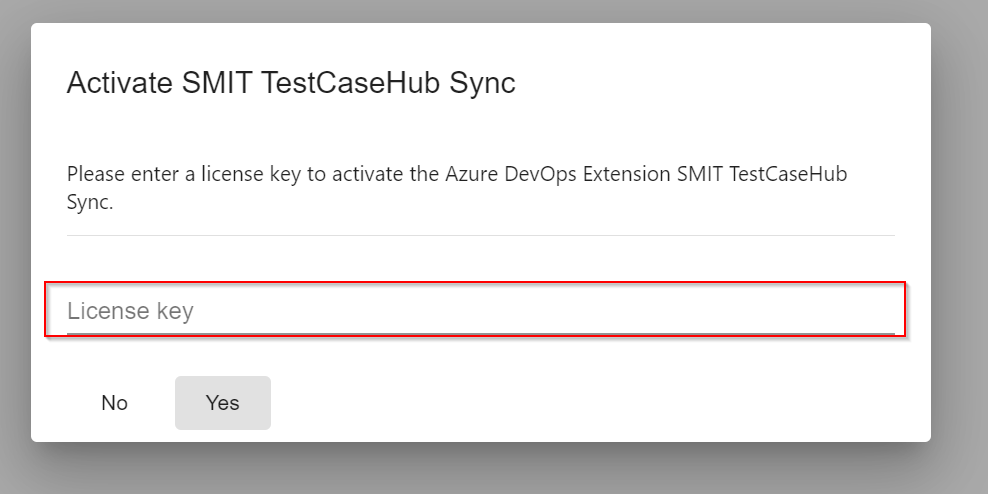
In the order portal you need to enter your payment data. Additionally, you select the number of user licenses (can be changed later) there. After signing up for a license you will receive an e-mail with a license key which can be used to activate the SMIT TestCaseHub extension in your Azure DevOps system. Therefore please provide a valid e-mail address in the order portal and check your spam folder if you don't receive an e-mail.
In the extension management, click on the button 'Activate SMIT TestCaseHub'. There you can enter the license key.
16.3 Subscription management – Change contract, number of licenses or cancel subscription
If you have a paid license activated you have two additional buttons.
Clicking 'Change contract and payment information' will open a page where you can change your personal and payment information.
The button 'Change number of licenses' opens a new (the second) group which can be used to change the number of user licenses for your current plan.
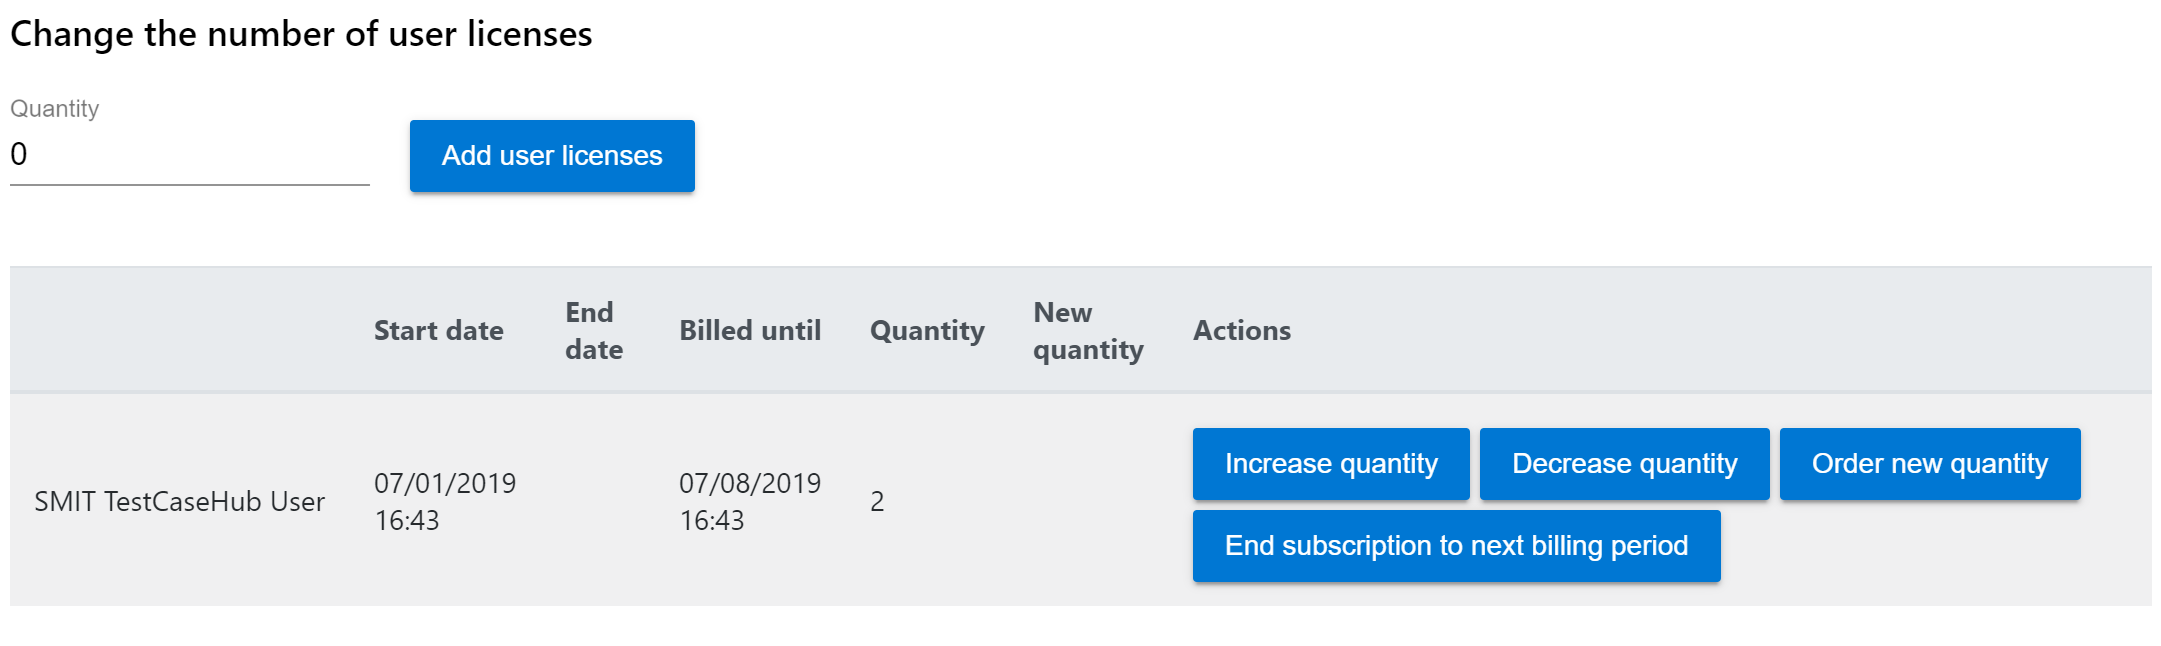
To increase the number of users you can specify a number in the field quantity and then click on the button 'Add user licenses'. A pop-up appears asking you to confirm the new quantity.
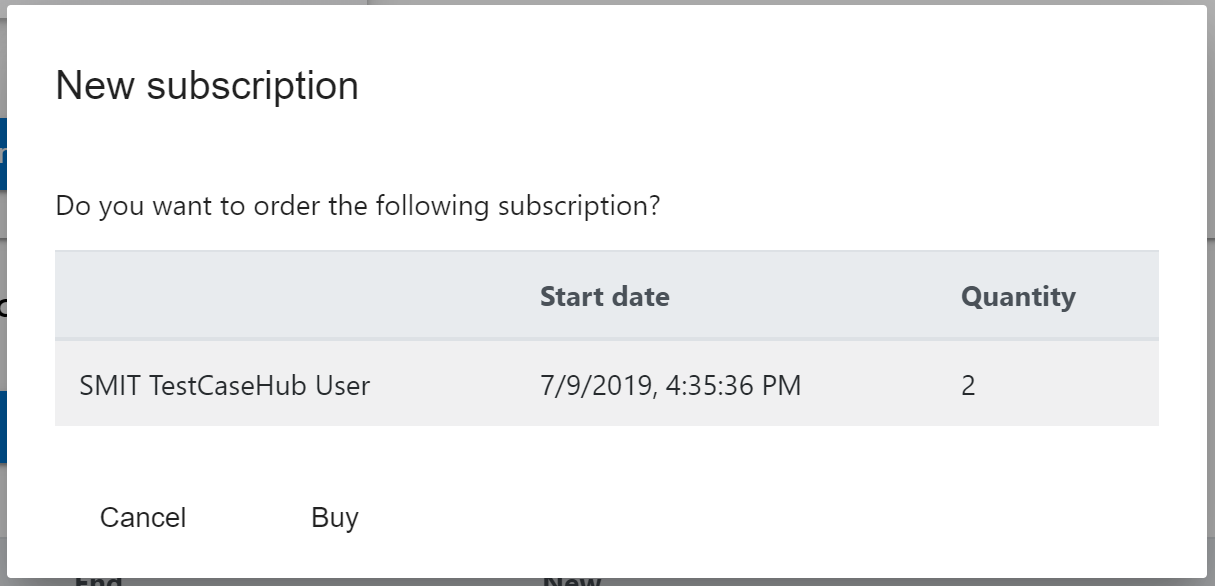
You can also click on 'Increase quantity' next to a current subscription. If the column 'New quantity' shows the correct number you can click on 'Order new quantity'. New user licenses start directly.
To decrease the number of users you can click on 'Decrease quantity' next to a current subscription and specify the number of new users for this subscription. If the column 'New quantity' shows the correct number you can click on 'Order new quantity'. This will end the subscription to the next billing period and starts a new subscription with the decreased quantity starting at the next billing period.
To end a subscription you can click on 'End subscription to next billing period'.
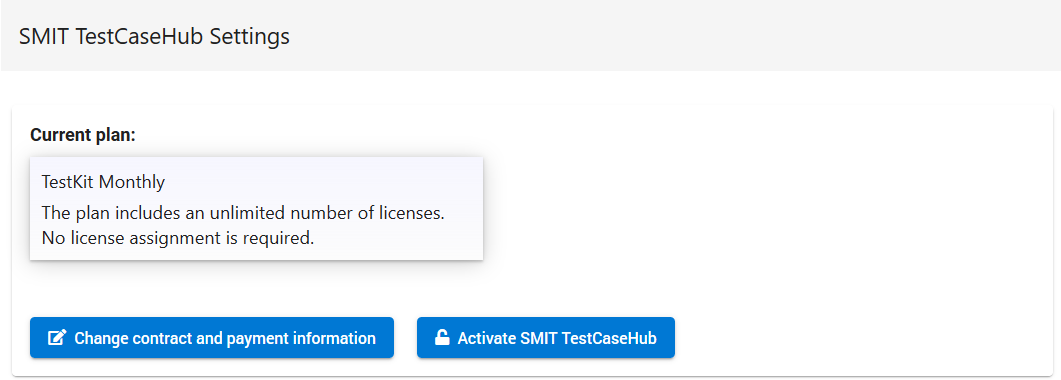
If you have a paid license which includes the unlimited users component you won't have the button to change the number of licenses. You will see that your current plan includes an unlimited number of licenses and therefore no license assignment is required for this plan.
16.4 Subscription management – Activated users

The group 'Activated users' manages the users which are associated to the current plan. Only users that are shown in the list can use the extension. Users can be added by clicking in the input field 'Enter user name' and then selecting one of the users from the proposed list. You can filter the list by entering a name in the 'Enter user name' field. To remove users you can click on the button 'Remove' for the corresponding user.
17 17 - User permissions for the SMIT TestCaseHub
17 - User permissions for the SMIT TestCaseHub
17.1 Required permissions
When the SMIT Test Case Hub extension is started the first time the required process setup steps for the extension are executed. To allow for the creation of the work item types upon installing the extension, you need the permission 'Edit Process' in the tab 'Permissions' on the 'Organization Settings' page for the respective user in Azure DevOps Services.
If all steps were finished successfully they are not run again. This reduces the loading time of the extension and the users do not need to have special rights (like editing organization wide process templates).
The SMIT TestCaseHub settings page in the organization settings provides the option to restart the process setup at any time. This starts the setup steps for a specified process template and project. Please note that this may delete own customizations that were made to the work item types 'SMIT Test Case' and 'SMIT Test Step'.
18 18 - Help area
18 - Help area
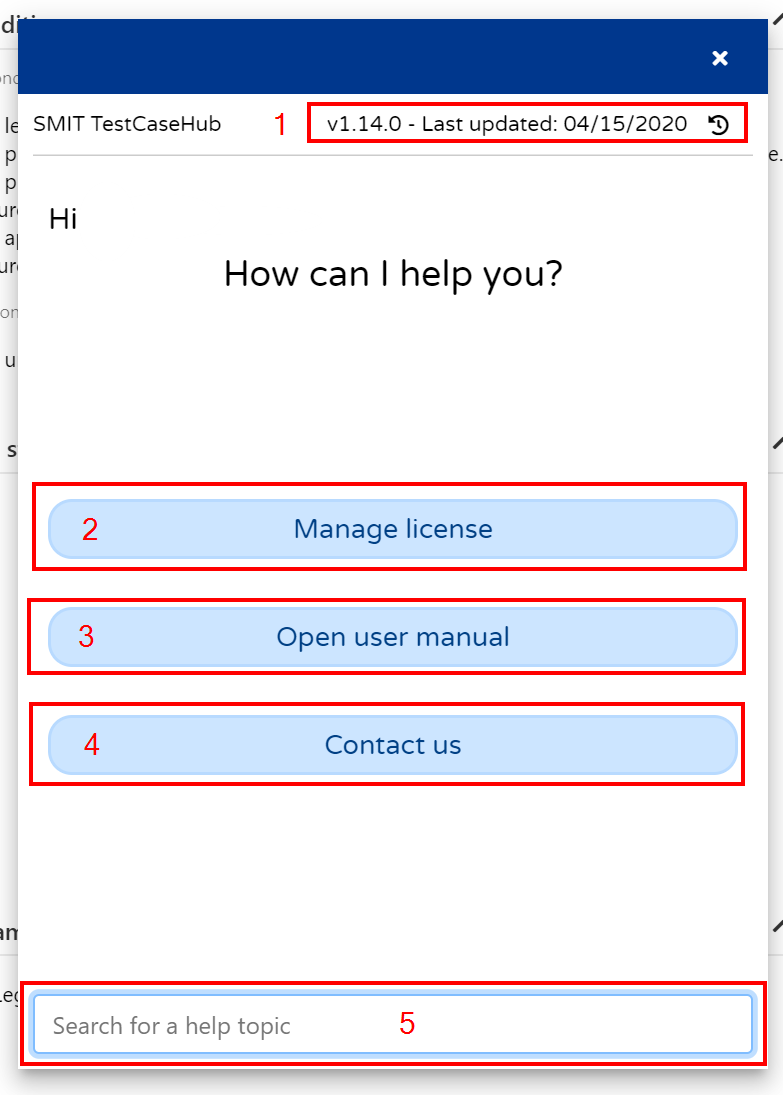
18.1 Chat-bot support
To help you with questions and problems that may arise during the use of the extension SMIT TestCaseHub a help area is included on the overview page.
You can open it by clicking on the help button in the bottom right corner.
The help area provides access to multiple links within the extension and to help topics regarding the use of the extension.
1: Show the release notes of the extension
2: Open the organization settings to manage your SMIT TestCaseHub license and users
3: Open the user manual
4: Contact us via e-mail
5: Search for a help topic
19 19 - Test case creation process
19 - Test case creation process
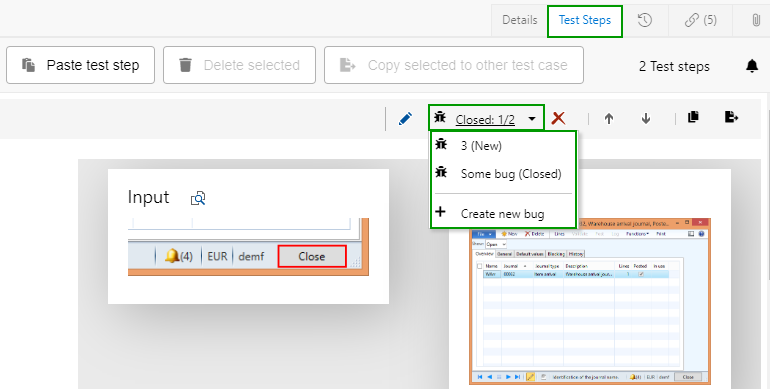
19.1 Add bugs to SMIT Test Steps
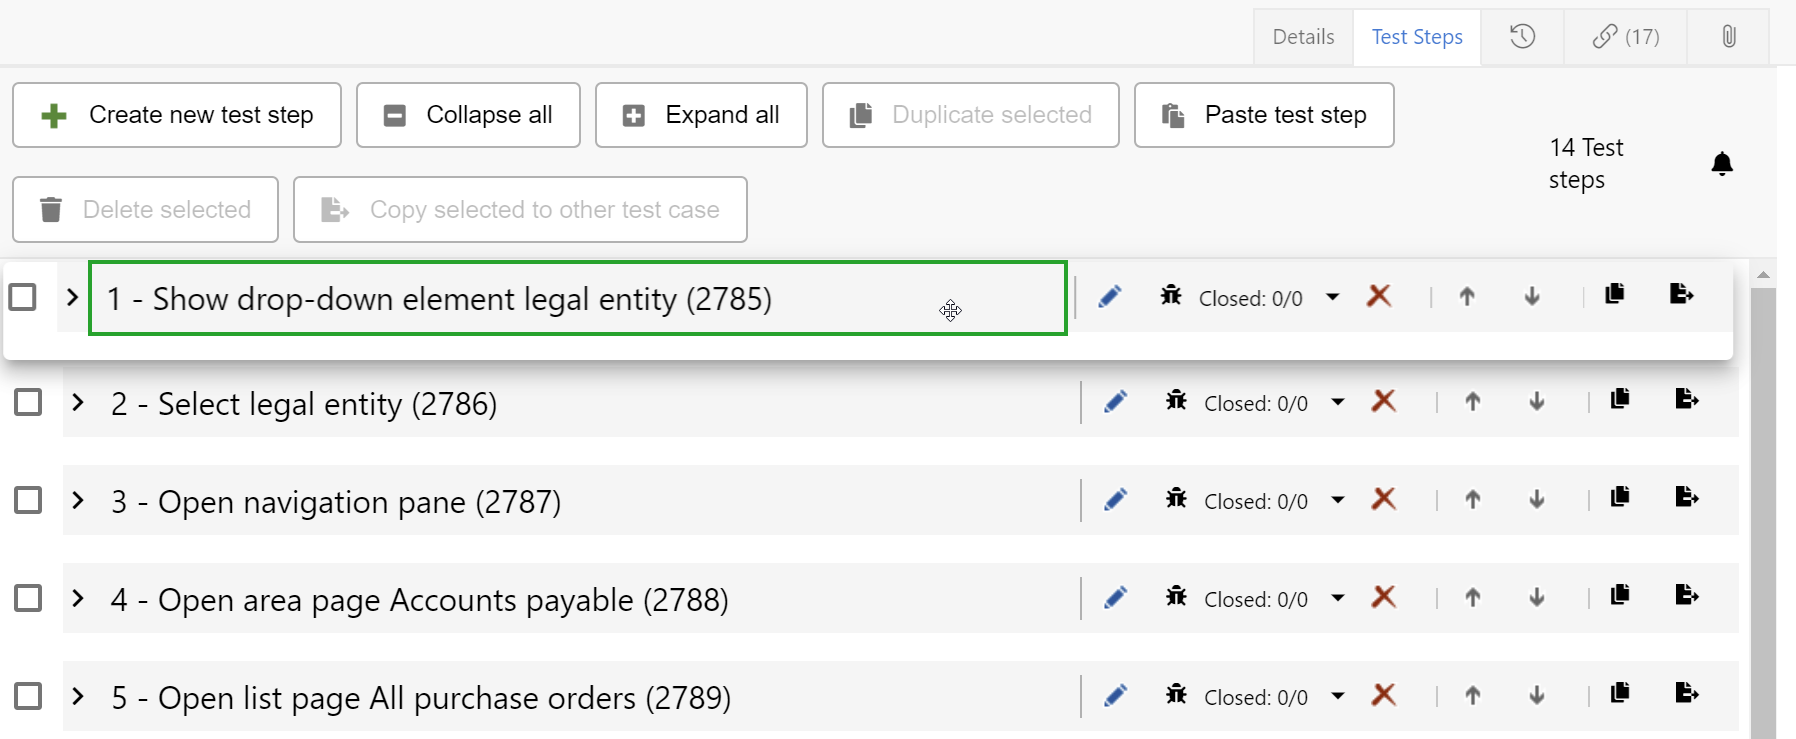
If you want to handle errors in SMIT Test Steps with bugs, you can activate the toggle button Organize SMIT-test-case-errors with bugs in the organization settings of the SMIT TestCaseHub.
When enabled, a new button is displayed for every SMIT Test Step in the tab Test Steps of SMIT Test Cases. you can easily create a new bug for an SMIT Test Step which will be linked to the SMIT Test Case and the SMIT Test Step. Existing bugs for the test step are displayed above with indications of their state.
20 20 - Notifications
20 - Notifications
20.1 Handling of information messages
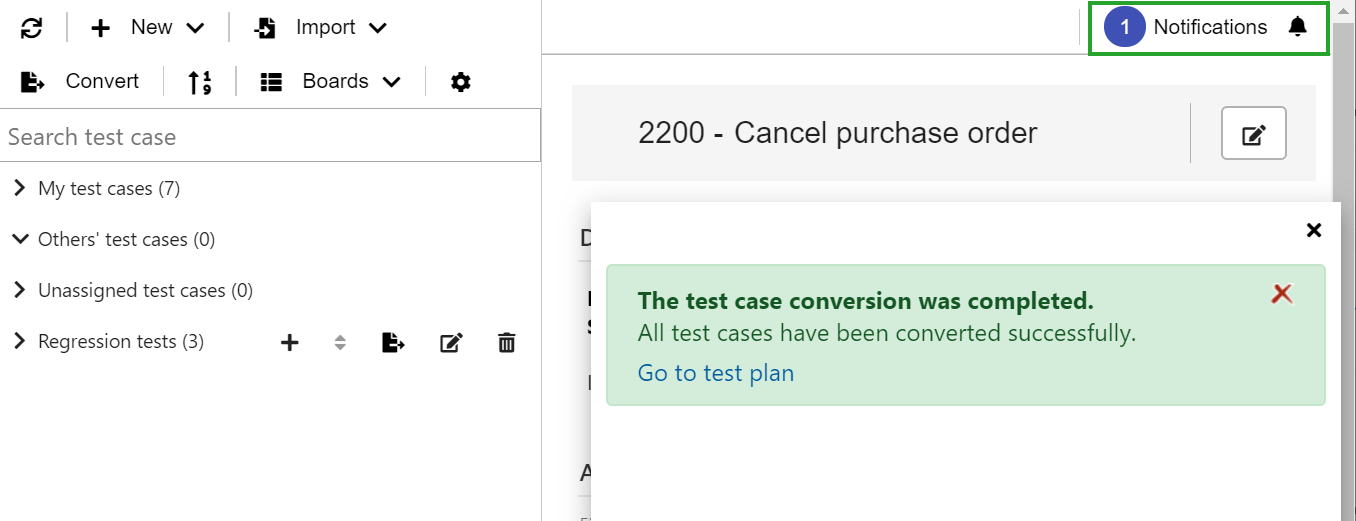
Using the button Notifications gives you access to a notification window which lists all notifications that were generated in the current session. Additionally the latest message is shown on the currently opened page. You can choose to delete notifications in the notification window.
Next to the Notifications button a number is displayed to give you a hint on the number of notifications that are available in the notification window.
21 21 - SMIT TestCaseHub Sync
21 - SMIT TestCaseHub Sync
21.1 SMIT TestKit Sub-set subscription
Test cases are mapped to a packet with a seperate api-request. When first uploading a new test case it is automatically mapped to a packet owned by the company of the uploading user.
21.2 TestCaseHub-Sync extension for Partners
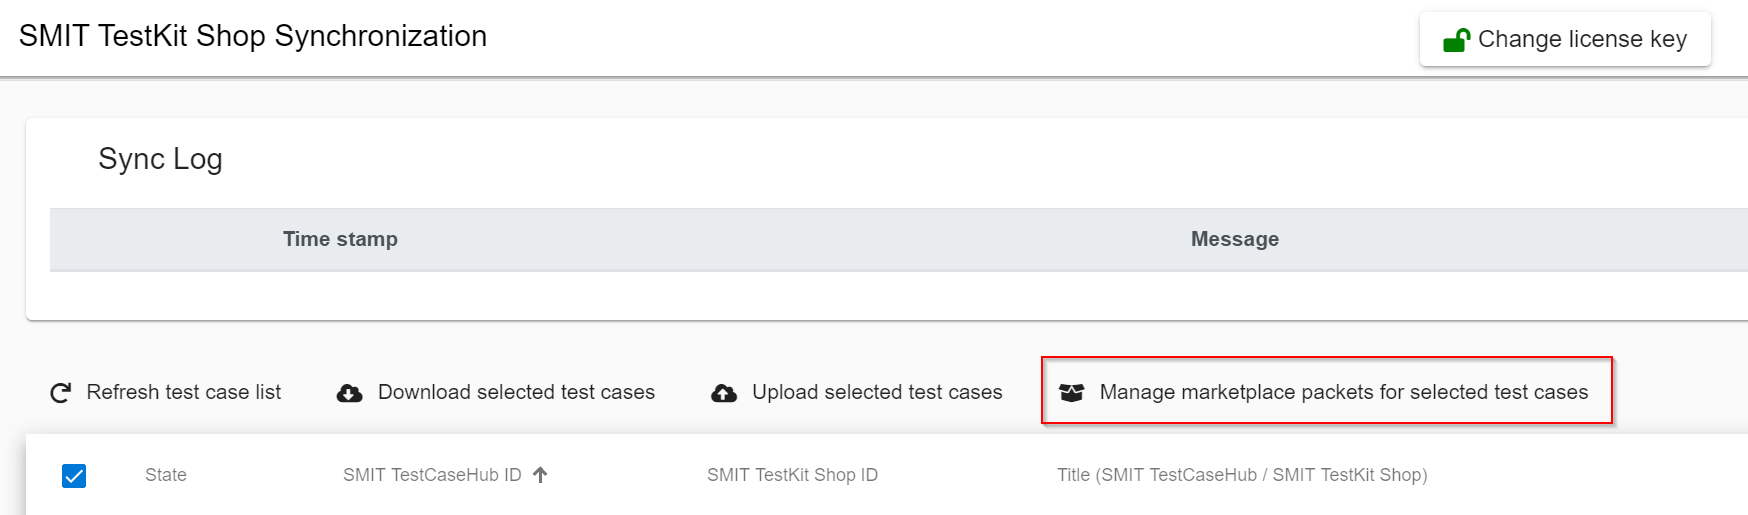
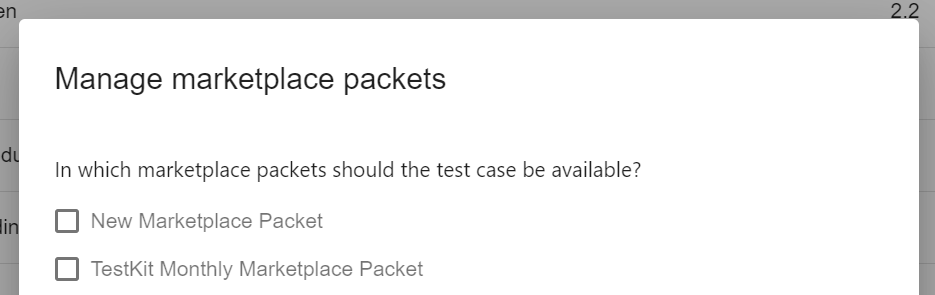
As a customer with a marketplace subscription and access to the SMIT TestCaseHub Sync extension you can log in to the marketplace by entering your license key. Afterwards the log in is handled automatically.
You can select test cases in the table and upload them to the marketplace or download them to you Azure DevOps organization. Using the Manage marketplace packets for selected test cases button or the options button in the actions column of the table you can set the marketplace packets in which certain test cases should be available.
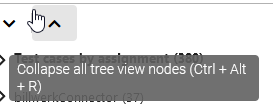
22 22 - Available shortcuts
22 - Available shortcuts
22.1 Available shortcuts